
As an astrophotographer, it is good to know the sky conditions overnight. We set up our telescopes in the early evening. The telescope and its mount automate the process of taking pictures. Many images are captured while we sleep. In the morning, we want to evaluate the images captured overnight, to assess their quality. It is helpful to know whether clouds or other phenomena interfered with our imaging session. Also, it is good to know the accuracy of weather forecasts for future reference. Many people also like to capture meteors (shooting stars), aurora or other sky phenomena overnight. Here are the requirements:
- 180 degree (all sky) coverage
- Weatherproof – it is very important to prevent water intrusion
- Heat tolerant (will be roof mounted)
- Capture still images for time-lapse video
- All images tagged with time, temperature and humidity (inside the enclosure)
- Connected to house network by ethernet
- The camera must be completely automated, producing a time-lapse video every 24 hours
Some of these requirements will be met by the hardware, others by software. Bash scripts and Python will be used for the software.
Here is a link to a video made using this camera.
Supplies
Here's what I used. The links are to the products and sources I purchased.
- All versions
- Raspberry Pi 4B
- Raspberry Pi HQ Camera
- Arducam 180 deg fisheye lens for HQ Camera
- clear plastic dome (4″ Trollyshop)
- cables for ethernet and power
- silicone calk for sealing
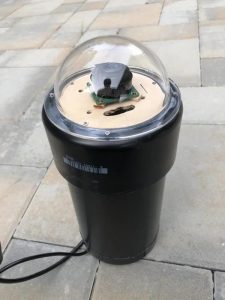
- Version 1 (ABS tube enclosure)
- 4″ ABS tube with end caps (hardware store)
- mounting plates for RPI and HQ camera (hand made from plywood)
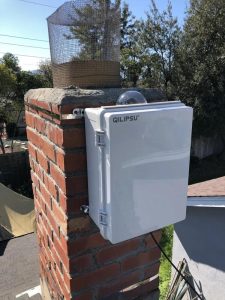
- Version 2 (enclosure with door)
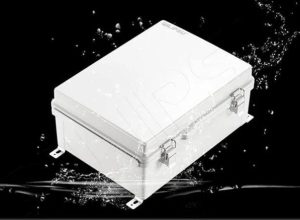
- Enclosure (QILIPSU Hinged Cover Project Box)
- Cable Gland (Tuparka 50 Pack Cable Gland)
- POE Ethernet Switch (TP-Link TL-SG1005P)
- POE Splitter (Uctronics PoE Splitter)
- Optional
- DHT11 Temperature and Humidity Sensor
Step 1: Sample Image
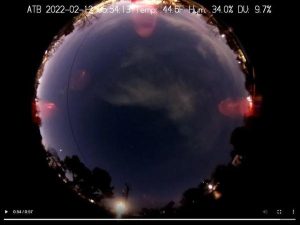
Here is a sample still image from the camera. The titles are mostly self-explanatory, except for “DU” which is disk usage on the RPI, so I know when the disk is getting full.
Step 2: Version 1
We are using a Raspberry Pi 4B with the HQ camera. Previous versions of the Raspberry Pi camera are not really capable of low-light photography unfortunately. I learned this the hard way.
Version 1 was housed inside a 4 inch black ABS tube with end caps. This works, but it has some drawbacks. It has to be glued or calked together to be weatherproof, and this makes it very difficult to take apart and service. It is mainly for this reason I decided version 2 would be inside a weatherproof enclosure with a door that is easy to open and close.
Step 3: Set Up Your Raspberry Pi
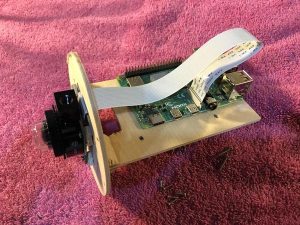
Nothing special to set up the Raspberry Pi, just install Raspbian and enable the camera. I made the wooden support structure for version 1 to hold the camera and RPI inside the ABS tube. The end plate (round plate) was fastened to the ABS tube end-cap using screws. The plastic dome was then fastened to the cap using silicone calk and screws. This version needed two cables, one power cable (USB-C) and one ethernet cable.
Step 4: Version 2
We decided to use an enclosure that is weatherproof, yet can be easily opened and closed. This makes it much easier to make changes and service the camera. I also wanted this version to use fewer cables.
Step 5: The Enclosure
Step 6: Fewer Cables

In this version, we are powering the Raspberry Pi using POE (power over ethernet). This allows there to be only one cable from the camera to the house network. You see the POE splitter at bottom. The PoE switch I chose provides more power (up to 60W) than I will need.
Step 7: Adding Sensors
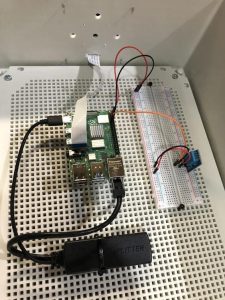
We are adding a temperature and humidity sensor, on the bread board to the right. This is the DHT11 sensor.
Once we finalize the sensor configuration, a permanent board will be made for them.
Step 8: Dome and Camera

I had to notch some of the enclosure to fit the dome flush with the edge. I drilled a few holes for cooling. Unfortunately these also allow some red light from the RPI LEDs into the dome, this is visible in the pictures. This can be eliminated by blocking the light from the LEDs.
Step 9: Environmental
There are two environmental problems with this type of camera.
- Dew/Fog and frost. This forms on the camera dome, obscuring the view of the sky. I have already seen frost.
- Overheating inside the enclosure
So far, I have only seen frost on a night where we had below freezing temperatures. This is somewhat rare for my area, so this problem is not urgent for me. YMMV (your mileage may vary) 🙂
I am definitely concerned about overheating inside the enclosure, especially during the summer months where we have been getting temps over 100F fairly often. From the reading I've done, the RPI is only good up to about 150F ambient. I figure that will easily be exceeded in the summer if I don't do anything to prevent it.
I am in the process of adding a cooling fan for the enclosure, more on that later.
Step 10: Software
The bash and python scripts I wrote to run the camera are in Github. The code isn't super clean, but it works. I use a cron job to run the bash script “allsky_new” once per minute. The crontab entry is just five stars followed by the full path to the script, for example:
* * * * * /home/pi/src/allsky_new
That script invokes the python script. The other script “daily” can be run either manually or via cron. I'm currently only running it manually since I don't need to generate the video every day. I'm running Apache on the RPI with a simple web page to display the current image and movie. That way you don't have to download the images from the RPI. There are of course even more sophisticated ways to do this.
Source: Raspberry Pi All Sky Camera