
1. INTRODUCTION
In order to understand the benefits that the Raspberry Pi platform provides it is important to understand the challenges that students and educators currently face. Parallel computation is increasingly becoming a topic that is taught as part of Computer Science education because of changes in advancing technology. With this rapid change in technology, a paradigm shift is occurring that students and educators must adapt to in order to stay current. Evidence of this parallel processing paradigm shift is already becoming extremely apparent. As of writing, a large portion of the consumer computer market consists of machines with multi core processor design, such as the Intel i series processors, or AMD Phenom II series processors. The use of these technologies has increased the need for software that takes advantage of these multi core designs.
We can reasonably expect that processor manufacturers are going to continue adding more cores in order to satisfy the
demand in computational power that modern software requires. A source of this increase in demand for processing
is due to big-data becoming an integral part of many ap plications. This paradigm shift used to pose challenges for
students or educators who wished to learn or teach about multi processor or large scale parallel computation, especially in the context of big-data. Traditionally, for a student to use a cluster computer, they would need to first have access to one which is not always possible depending on the institution they attend. Furthermore, the use of these systems are limited by time constraints due to the demand that these systems generate.
Ideally, a student should have easy access to these cluster computers, but their cost and limited availability poses a
challenge to those who wish to learn on these systems. Additionally, these systems are expensive and occupy a large
amount of space. Fortunately, there is now a way for students and educators to have access to cluster computers.
The advent of very small computer systems has provided the opportunity for cluster computers to become extremely
accessible. One such small scale computer system is the Raspberry Pi. The focus for this paper will be to examine the benefits of using the Raspberry Pi as a platform for building a small cluster computer as well as an overview of
the set-up and use of a Raspberry Pi cluster.
2. THE RASPBERRY PI PLATFORM
Originally conceived in 2006 by the Raspberry Pi Foundation, the idea behind the Raspberry Pi was to produce a
small affordable computer for kids.[9] After years of development the first first edition of the Raspberry Pi was released
in 2012.[1] Since its release, the Raspberry Pi has been used by many groups of people including students, teachers, and
makers.
B
2.1 Hardware
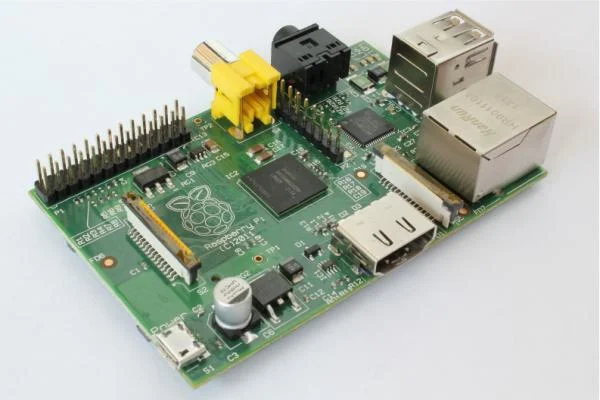
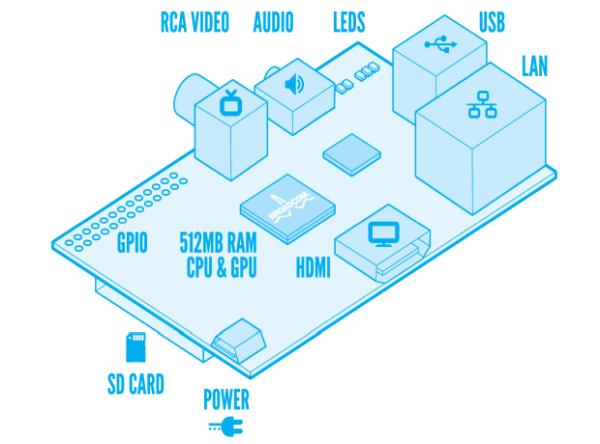
The Raspberry Pi is a small form-factor computer that is about the size of a credit card. [7] It is a fully functioning
all-in-one computer system that is capable of running Linux. Two models of the Raspberry Pi exist: Model A and Model
B. The model B Raspberry Pi has two USB ports, and ethernet connector, and 512 mb of memory. The model A, on the
other hand, has only one USB port, no ethernet connector and only 256 mb of memory. Other than these differences,
both versions of the Raspberry pi share the same hardware.
The processor that is used by the Raspberry Pi is a System on Chip (SOC) solution which contains an ARM1176JZFS
processor which runs at 700Mhz and a Videocore 4 GPU which is capable of BluRay quality video playback.[8]. Other
hardware features include audio out, composite video and HDMI out, as well as GPIO pins to allow interfacing with
other devices and sensors. The Raspberry Pi does not include a HDD; An SD card is used to store and run the operating system. Power to the Raspberry Pi is provided through a micro USB cable.
One point to note about the hardware is that thanks to the ARM processor, the Raspberry Pi is a low power device.
This is important to consider when thinking about using the platform for building a cluster computer.
2.2 Solution for students
The Raspberry pi is an ideal platform for building a cluster computer for a number of reasons. The first and foremost
reason is that the Raspberry Pi is cheap. The model A sells for around $25 while the Model B sells for around $35[7].
This means that the barrier to entry for owning a cluster computer is significantly reduced since the cost per addi tional node is only $35. For the price a standard desktop computer, it is possible to construct a cluster with many nodes in it. Additionally, the Raspberry Pi also solves the problem of space. Because it is such a small form-factor computer, it can be placed in space limited locations such as a classroom or even a dorm room.
Because of these two reasons, building a cluster computer becomes easy because of the inherent scalability of the platform. Another added benefit to using the Raspberry Pi is that it it has such a big community of people who use the device for many applications. Any issues with working on the platform are usually quickly resolved thanks to the support community. This added benefit means that obscure issues are usually not a problem for most users, especially when building a cluster computer.
3. BUILDING A RASPBERRY PI CLUSTER
Building a cluster computer using the Raspberry Pi platform is not as difficult as it may first seem. Because of the all-in-one nature of the Raspberry Pi, putting together the cluster mostly consists of plugging in a few wires, and networking the Pis through a switch. This makes the bill for materials small because all that is needed for constructing a cluster is at least two Raspberry Pi computers, SD cards for each Raspberry Pi, and an ethernet switch to network the Raspberry Pis together. Optionally, a method for housing the Raspberry Pis together can also be put together, though this is not essential for the functioning of the cluster.
This ease of construction leads to a trivial procedure for physically assembling the cluster. All that is needed to do is to connect the Raspberry Pis to the switch using ethernet cable. The Remaining portion of setting up the cluster involves configuring the software.
3.1 Setting Up Software
As mentioned previously, there is a large community of people who work with the Raspberry Pi building all kinds of
projects, including building clusters. This means that there is a lot of support available to those who wish to build their
own clusters. The University Of South Hampton is an example of a contributing member to this large community of people working with the Raspberry Pi.The computer science department of South Hampton put together a 64 node Raspberry Pi cluster partly as research into building cheap computer systems and partly as inspiration to people in the computer science field.[5] As well as building the cluster computer, the University put together a well documented guide for setting up the software when building your own cluster.[6]
3.1.1 Over View of Procedure
The first that needs to be done when setting up a Raspberry Pi cluster is to install the operating system that you
are going to be using. The one that is suggested in the guide by the South Hampton University is Raspbian, which is debian that has been optimized for the Raspberry Pi. This installation will serve as the master node in the cluster as all other nodes will be cloned from this image, or decedents of this image. After installation has completed, basic setup needs to be done, such as setting up the username and pass-word for the system. Once this step has been completed, configuration of the cluster environment can begin.

Hampton
The next step involved in the software setup is to assign a static IP address for the Raspberry Pi. This is done to allow easy networking between the Pis over the switch. An alternative is to use WIFI adapters for networking though working with a switch is much easier. One thing to remember when cloning the SD card images is to remember to change the IP addresses for each node that is added to the cluster.
After basic networking setup, the next step is to build the MPICH software natively on the Raspberry Pi. The reason
for this is because the binaries that are commonly available are for Intel machines and not for ARM processors. This
portion of the setup can take a long time since the source code for MPICH is complex and memory and computation
power is limited on the Raspberry Pi. Depending on the speed of class of SD card used, compilation time may vary
slightly as read and write speeds differ from different class SD cards.
Once the system builds, the next step is to test the installation to make sure that MPICH works. MPICH comes with
a utility for this purpose and this makes it easy to troubleshoot any issues with installation. The test runs only on the current Raspberry Pi, without any other nodes yet. If the test utility gives no errors, MPICH was built and installed successfully on the master node.
The next step in the setup is to clone the SD card containing the image of the Raspberry Pi that was just set up. This is another portion of the set up procedure that can take a long time, depending on the size of SD card used. It is also a good
idea to keep a backup of this image as it contains a clean installation of MPICH. In the event of SD card corruption,
which can occur with improper powering of the Raspberry Pi, this image serves as a fast way to restore the cluster back
to working condition.
At this point in the setup, the first child node can now be powered on with the cloned image of the parent node. At this point, the IP address of the child is still the same of the parent. Changing this is the next step in the procedure. Once this is done, setting up RSA keys between the nodes is done so that the master node can SSH between child nodes without needing a password. Finally, MPICH can be tested to ensure that it works with multiple nodes and that no network issues exist. If this test passes without any issues, adding new nodes is simply a matter of cloning the child SD card image to any additional nodes.
4. USING THE CLUSTER
At the heart of the cluster is MPICH which is a lightweight version of MPI or Message Passing Interface. MPICH is
what allows a program to send messages from one process to another in a clustered environment. In order to run a
program on the cluster, the source must include the MPICH library and must be compiled using the MPICH wrapper for
C or C++ programs. Once compiled, the output must be copied over to all of the child nodes in the cluster. Only after
this procedure will a program be able to run on multiple nodes.
Below is a hello word example taken from a tutorial website to demonstrate basic use of MPICH.[2]
#i n cl u d e ” s t d i o . h ”
#i n cl u d e <s t d l i b . h>
#i n cl u d e <mpi . h>
i n t main ( i n t argc , ch a r ∗ argv [ ] )
{
i n t ti d , n t h r e a d s ;
ch a r ∗cpu name ;
/∗ add i n MPI s t a r t u p r o u t i n e s ∗/
/∗ 1 s t : l aunch the MPI p r o c e s s e s
on each node ∗/
MP I Init (& argc ,& argv ) ;
/∗ 2nd : r e q u e s t a th re ad id , sometimes
c a l l e d a ”rank ” from the MPI master
p r o c e s s , which has rank o r t i d == 0
∗/
MPI Comm rank (MPI COMM WORLD, &t i d ) ;
/∗ 3 rd : t h i s i s o f t e n u s e f ul , g e t the
number o f t h r e a d s o r p r o c e s s e s l aunched
by MPI, t h i s sh ould be NCPUs−1
∗/
MPI Comm size (MPI COMM WORLD, &n t h r e a d s ) ;
/∗ on EVERY p r o c e s s , a l l o c a t e sp ace f o r
the machine name ∗/
cpu name = ( ch a r ∗) c a l l o c ( 8 0 ,
s i z e o f ( ch a r ) ) ;
/∗ g e t the machine name o f t h i s
p a r t i c u l a r h o s t . . . w ell
a t l e a s t the f i r s t 80 c h a r a c t e r s
o f i t . . . ∗/
gethostname ( cpu name , 8 0 ) ;
p r i n t f ( ” h e l l o MPI u s e r : from p r o c e s s
= %i on machine=%s , o f NCPU=%i
p r o c e s s e s \n ” , ti d , cpu name ,
n t h r e a d s ) ;
MP I Fin alize ( ) ;
r e t u r n ( 0 ) ;
}
This example program, when run on three nodes gives an
output:
mpirun −np 3 −h o s t f i l e h o s t f i l e . / h ell o −mpi
h e l l o MPI u s e r : from p r o c e s s = 0 on parent ,
o f NCPU=3 p r o c e s s e s
h e l l o MPI u s e r : from p r o c e s s = 1 on c hil d 1 ,
o f NCPU=3 p r o c e s s e s
h e l l o MPI u s e r : from p r o c e s s = 3 on c hil d 2 ,
o f NCPU=3 p r o c e s s e s
4.1 Example Program And Data
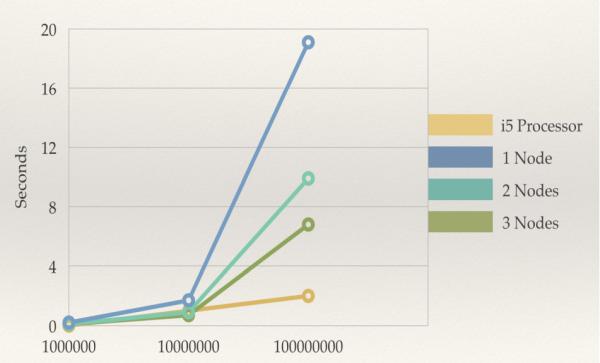
An example of the performance of a three-node cluster is examined using a computationally intensive program. For
this example, an algorithm for determining prime numbers was run on the cluster using one, two, and three nodes as
well as an Intel i5 processor. The algorithm used is an implementation of the Sieve of Eratosthenes, which is an ancient algorithm for determining all of the prime numbers in a given range. [3] The implementation provided had a serial version and a parallel version. The source code to this implementation was found on github. [4]
The results of running the tests can be seen in figure 4. The results clearly demonstrate how performance gains are achieved when adding more nodes to the execution of the algorithm. The computation time using two nodes shows a clear advantage over serial execution using one node.
An important point to note though is that even with three nodes, computation on the Raspberry Pi cluster is still slow
compared to a conventional processor found in every-day computers. The reason for this is due to the slow processing
power of the Raspberry Pi. Regardless of this performance constraint, the value that the cluster provides for students
and educators should still be apparent: It gives a hands-on approach to programming in a true cluster environment.
5. CONCLUSION
With parallel computing systems becoming more common every day, many students are beginning to learn about programming for parallel systems. Unfortunately, access to cluster environments for students is currently limited. Fortunately, small computers such as the Raspberry Pi have made it possible for students and educators to have access
to cluster computer environments. This lowered barrier to entry can now allow those that are interested to gain real
world experience building, programming, and maintaining a small cluster computer. The Raspberry Pi platform provides enough depth to allow students to get a feel for the challenges in cluster computing without having to spend lots of time or money. This makes the Raspberry Pi a very student friendly platform. Learning institutions can also benefit from the Raspberry Pi as a tool for teaching or researching cluster environments.