
In an attempt to get my Raspberry Pi talking to my Arduino I’m exploring various different options. The first was to just use the USB connection, but that was too simple. So, here is how to connect the two using the UART on the GPIO pins of the Raspberry Pi.
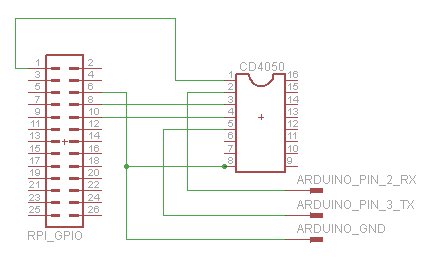
To make testing easier I wanted to keep the Arduino’s serial connected via USB to my PC so I can print messages there and read it with the Serial Monitor. This meant using the SoftSerial library to implement a second serial port to talk to the Raspberry Pi. To protect my Raspberry Pi and to convert the 5V of the Arduino to 3.3V the Raspberry Pi needs I used a CD4050.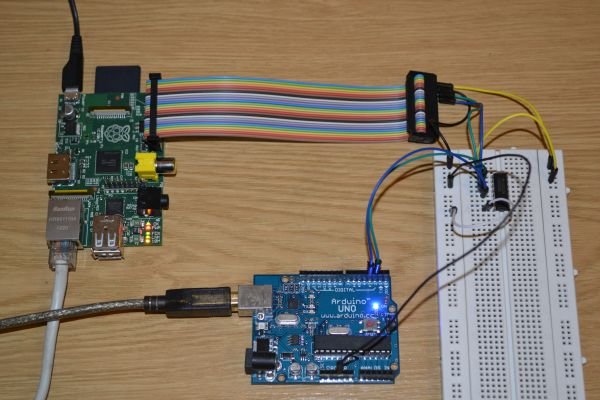
To show how this works the Arduino is running a small program that reads from the Raspberry Pi’s and copies this to my PC via USB.
By default the Raspberry Pi uses the UART in two ways:
- Console Messages (including bootup messages)
- A getty so you can login via serial
To use this serial port for your own uses you need to disable these two services. I decided to leave them enabled to test how well the serial connection works. However, the SoftSerial library on the Arduino doesn’t work so well at the default baudrate of 115200, so I changed this on the Raspberry Pi to 9600:
To change the console baudrate, edit /boot/cmdline.txt to look like this (this is all one line):
dwc_otg.lpm_enable=0 console=ttyAMA0,9600 kgdboc=ttyAMA0,9600 console=tty1 root=/dev/mmcblk0p2 rootfstype=ext4 rootwait
Also, edit /etc/inittab to change the baudrate of the getty (you should fine a line like this with the baudrate of 115200, change that number to 9600):
2:23:respawn:/sbin/getty -L ttyAMA0 9600 vt100
Ok, now upload the program to your Arduino:
/* Connects Arduino to Raspberry Pi Arduino: SoftSerial Raspberry Pi: GPIO UART This is just a simple passthrough, based on Arduino SoftSerial example */ #include <SoftwareSerial.h> SoftwareSerial mySerial(2, 3); // RX, TXvoid setup() { // Open serial communications to PC and wait for port to open: Serial.begin(57600); while (!Serial) { ; // wait for serial port to connect. Needed for Leonardo only } Serial.println("Connected to PC"); // set the data rate for the SoftwareSerial port to Raspberry Pi mySerial.begin(9600); } void loop() // run over and over { // If data is available on Raspberry Pi, print it to PC if (mySerial.available()) Serial.write(mySerial.read()); // If data is available on PC, print it to Raspberry Pi if (Serial.available()) mySerial.write(Serial.read()); }
 void setup()
{
// Open serial communications to PC and wait for port to open:
Serial.begin(57600);
while (!Serial) {
; // wait for serial port to connect. Needed for Leonardo only
}
Serial.println("Connected to PC");
// set the data rate for the SoftwareSerial port to Raspberry Pi
mySerial.begin(9600);
}
void loop() // run over and over
{
// If data is available on Raspberry Pi, print it to PC
if (mySerial.available())
Serial.write(mySerial.read());
// If data is available on PC, print it to Raspberry Pi
if (Serial.available())
mySerial.write(Serial.read());
}
void setup()
{
// Open serial communications to PC and wait for port to open:
Serial.begin(57600);
while (!Serial) {
; // wait for serial port to connect. Needed for Leonardo only
}
Serial.println("Connected to PC");
// set the data rate for the SoftwareSerial port to Raspberry Pi
mySerial.begin(9600);
}
void loop() // run over and over
{
// If data is available on Raspberry Pi, print it to PC
if (mySerial.available())
Serial.write(mySerial.read());
// If data is available on PC, print it to Raspberry Pi
if (Serial.available())
mySerial.write(Serial.read());
}Connect the Arduino to the Raspberry Pi:
For more detail: Raspberry Pi and Arduino via GPIO UART