
To this effect a LED, resistor 330 ohmnios, Wire, and protoboard, or tin and a soldering.
Also need our Raspberry tenga yes Raspbian preinstalled, if not your case, you can see how to do it in the following link directory.
Mounting the circuit
You can solder directly LED the wire and resistance as you will see in the following diagram, although it is much better to use a protoboard; is also very important to look good both on pins, and the “diagonal” inside diode LED where the two legs join the riding circuit, already if you assemble will not turn inside out.
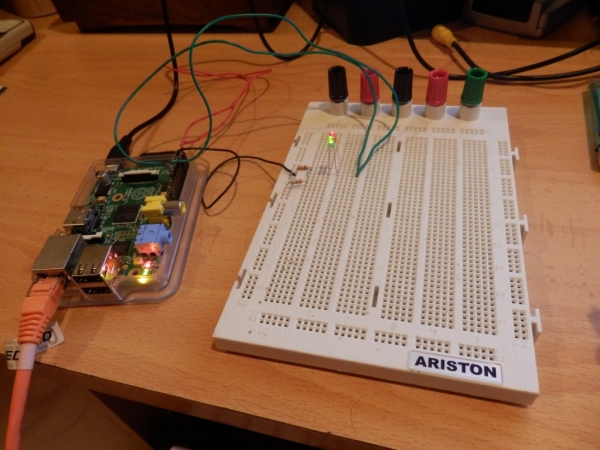 I'll use a protoboard, and I recommend that you use one, there are from about 4 € and allow us to reuse components and again without soldering, internal connections of protoboard usually the following.
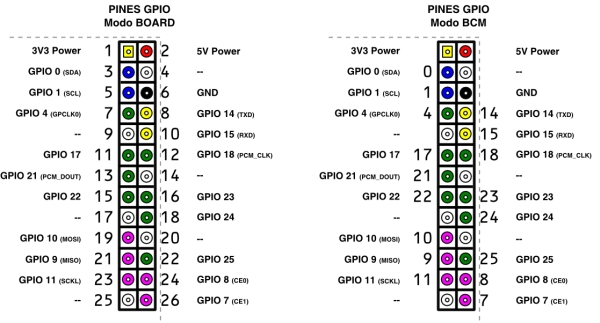
The connections between protoboard and Raspberry should be as in the following diagram, the GPIO You can reach issue 3,3In to assign a logic high.
Hello World del GPIO con Bash
Once assembled circuit, we do what I call a “Hello World GPIO” in Bash executing the following script.
#!/bin/bash
#Exportamos el puerto GPIO 17
echo 17 > /sys/class/gpio/export
#Lo configuramos como salida
echo out > /sys/class/gpio/gpio17/direction
#Encendemos el LED asignandole 1 como valor lógico
echo 1 > /sys/class/gpio/gpio17/value
To turn off the LED we can do the following script.
#!/bin/bash
#Apagamos el LED asignandole 0 como valor lógico
echo 0 > /sys/class/gpio/gpio17/value
#Eliminamos la entrada del puerto GPIO 17
echo 17 > /sys/class/gpio/unexport
Basically what we are doing with Bash is to create a directory hierarchy in /sys/class/gpio and add content to each file that will be sought after as a variable.
Introduction to Python
We have found that our circuit works correctly and LED has gone on to give a logic high value to the variable, Now let's see how we can do the same in python, which will allow us to schedule our web applications to control inputs and outputs GPIO from any device.
Before following, I recommend that you see Chapters 1 the 10 of this Python video tutorial channel Youtube of Facilitated Code, if like me do not have much idea of programming in Python, I may very well come to familiarize with the code you will see below and come to understand.
For more detail: Raspberry PI and GPIO pin: Controlling an LED with Bash and Python