
Turn your Raspberry Pi into a DMX light controller
This instructable shows you how to display a color wheel editor window on the screen of a Raspberry Pi computer, which you can manipulate with your mouse. As you change the color on the screen, the color on the DMX light fixture changes in realtime to match. This can serve as a starting point for a variety of simple lighting projects using the Raspberry Pi ( i.e. haunted houses, onscreen light control panel, TV backlights, living room DJ setup, etc. ).
Step 1: Nuts and bolts
A standard $35 Raspberry Pi computer runs a program that generates theonscreen interface, and sends commands via USB to a DMX controller continuously. The DMX controller then sends DMX commands to the light fixture to change the color. The hardware was chosen for cost and durability, and the software was developed on the platform and is available for free in source and binary format so you can begin hacking right away. Here is what you'll need ( as pictured ):
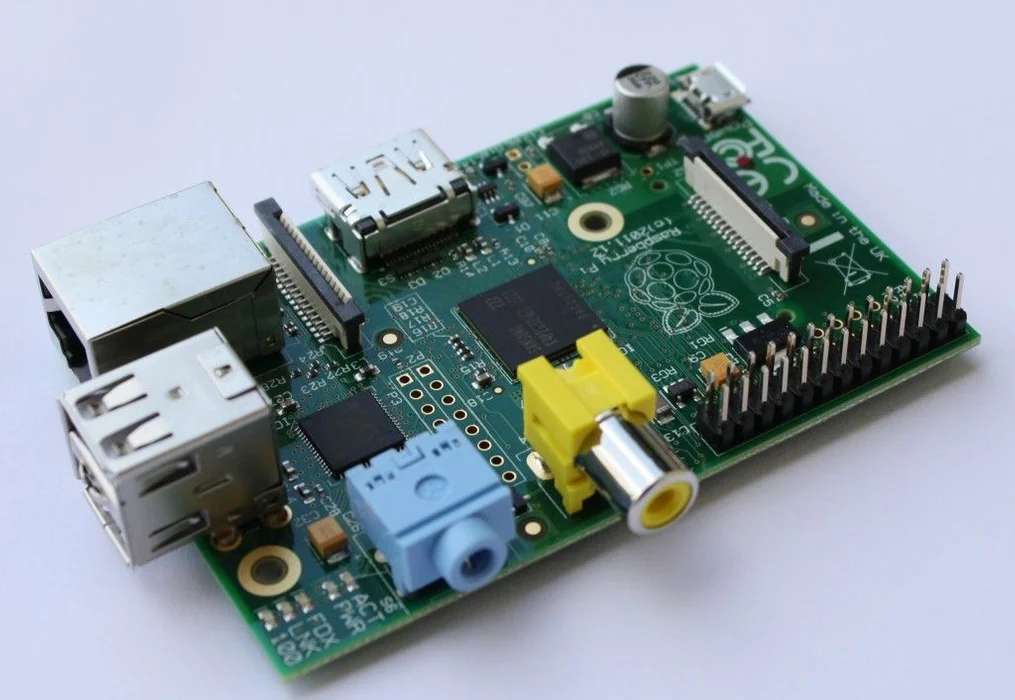
1. Raspberry Pi
2. USB | DMX Controller
3. DMX light fixture
4. HDMI ( or NTSC monitor )
Step 2: The raspi
1. raspi-tize yourself
The bulk of the work on this project is to get your raspi ready for business. You can purchase the raspi from several sources, but our preference is from the great folks at Adafruit industries – they have been and continue to be a strong supporter of makers everywhere. You can purchase a raspi from this link:http://www.adafruit.com/products/998
2. get jacked
The raspi by itself is just a card, so to make it into a fully functioning computer you'll need a few components that you most likely already have lying around. It is well worth the effort to build your raspi into a fully functioning computer because it really is great machine for building any “smart” project you have in mind down the road. The Raspberri Pi foundation website is a great resource for getting or raspi up and running. Please read this page for information on what you need to get your raspi computing:http://www.raspberrypi.org/quick-start-guide
3. get loaded
This project is using the stock Raspian “wheezy” operating system, which you can download for free from the Raspberry Pi Foundation website. This page has complete details on how to get the OS to your SD card – its very straightforward procedure, and in less than 20 minutes you should be able to plug the SD card into your raspi and have it booted and ready for business.http://www.raspberrypi.org/downloads
4. hello raspi!
http://www.raspberrypi-spy.co.uk/2012/06/auto-login-auto-load-lxde/
5. get wheelin'
The software that creates the color wheel interface and talks to the DMX converter can be downloaded for free in both binary and source format directly to your raspi. To get started, download the free DMXWheel application code from here, using the native web browser on the raspi ( Midori ):http://www.dmxwheel.com
Launch Midori ( from your desktop icon ), and enter the URL. Click on the “download software” link, and save the file to your desktop when prompted; this will create an icon labeled DMXWheel.tar.gz” on your desktop. Next, open up a terminal window to get a command line interface by selecting the icon on the lower left of the tool bar -> Accessories -> LXTerminal. In the terminal window, type these two commands:
cd Desktop

tar xvzf DMXWheel.tar.gz
6. get the extra bits
sudo apt-get install libusb-dev

sudo apt-get install gtk+3.0
7. raspi-ready
Step 3: The Dmx Controller
Now that your raspi is ready, the next step is to connect the lights to it. This is a simple procedure that basically involves connecting a USB cable from the raspi to the DMX interface, and a DMX cable from the interface to the light fixture you are using. First let's take a look at the DMX converter.
1. USB | DMX | FTW
To make things easier now (and down the road), we are using the VM116 USB Controlled DMX Interface by Velleman. This box performs the simple function of converting serial data send over USB to DMX signals sent to DMX units. This unit comes in two model numbers depending on whether you purchase it as a kit ( K8062 ) or assembled ( VM116 ). The kit is not particularly difficult to build, and the price difference is about $20:
http://www.amazon.com/Velleman-K8062-USB-Controlled-Interface/dp/B000TA79UK
http://www.amazon.com/Controlled-Interface-Factory-Assembled-Tested/dp/B001IRMFUW/ref=pd_cp_pc_0
As you can see from the picture, the unit requires a USB ( D ) input, which is the most common USB cable connection. Odds are that you already have one of the D to flat USB connectors lying around somewhere. The DMX out connector is a standard XLR connector commonly used for microphones and other balanced audio functions; these cables for fine so don't bother getting a DMX specific cable unless you feel the need to spend more money.
2. hub up? yeah, probably
One thing that you may have observed is that the raspi has two USB ports, both of which are currently in use by your keyboard and mouse. For this reason we recommend you look into a cheap powered USB hub; you may already have one sitting around somewhere, or might find a keyboard that has a mouse integrated into with (i.e. internal hub). We were able to get a powered hub for $10 at OfficeMax on clearance, so with a bit of shopping you'll find it will make life easier when working with the raspi. Another reason to get a powered hub is that it takes the power load off the USB connection on the raspi, thus reducing the power load on the supply on the raspi. You can, of course run this project without the hub ( by disconnecting the keyboard after launching the program ), but it can be cumbersome to develop the application in any significant way doing this.
3. puttin' it all together
To finish up with the raspi to light connection, connect the USB cable from the converter to the raspi, and from the convertor to your DMX light unit. At this point you should have cables that connect the mouse, keyboard, monitor, DMX converter, and light all together, and you're ready to fire up the program.
Step 4: The Software
The last thing to do in the project is to fire up the program and have some fun!

1. the secret sauce
The source code included in the DMXWheel distribution contains two programs that are needed to run the project. The way the code works is that there is one program that runs as a background process that reads a shared memory location that contains the states of the DMX channels. A second program runs directly in the foreground and brings up the color editor and changes the intensity values in the shared memory segment.
This division of labor allows the raspi to keep a constant line of communication open the the DMX controller and updates at a fixed interval, regardless of what application program manipulates the shared memory. The two programs communicate with each other using a C library that contains simple functions to set the DMX channel data so that the shared memory operation is transparent.
The programs are shipped in binary format and do not need to be recompiled, but you can do this if you want to make changes to the code or write your own program using the DMX controller. The software you downloaded has the following structure:
dmx/ DMX software library ( lib/ ) and the deamon program ( deamon/ )
DMXWheel/ contains the color wheel application ( src/, bin )
Makefie/ make file to build the source
README detailed information about the software and its operation
2. daemonic intervention
The first step in getting things going is to launch the DMX controller interface program that runs in the background. In Linux parlance this is called a daemon. This program needs only be started once each time you boot the system. To start this program, type:
<strong>cd ~/Desktop/DMXWheel/dmx/deamon</strong>
<strong>sudo ./dmxd.bin &</strong>
When this program starts, it prints out some basic status information about the USB connection, and then goes quiet while it transmits the DMX channel data to the DMX interface. Note that this program must be run as an administrator ( sudo ), and runs in the background ( & ).
3. present the colors
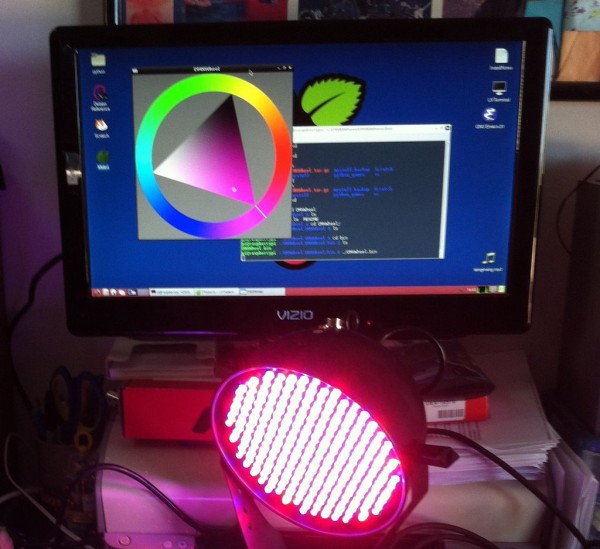
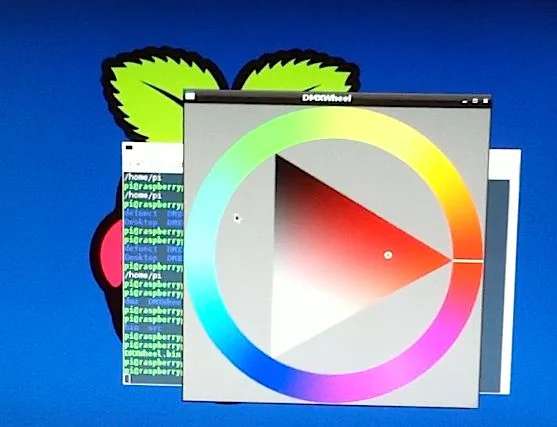
The second step in getting things going is to launch the DMXWheel program. This program is the one that creates a window that contains the familiar color wheel that you can edit with the mouse. As you can see in this shot, there is an outer ring with a grab line that you can drag around to change the hue, and a circle inside the center triangle that lets you adjust saturation and brightness. As you move this control about, the color on the light will change accordingly. You can launch the program using the following command ( and quit the program by closing the window ):
<strong>cd ~/Desktop/DMXWheel/DMXWheel/bin</strong>
<strong>./DMXWheel.bin</strong>
Step 5: What's Next
Congratulations on a job well done. After experimenting a bit with the color wheel, a wide variety of outrageous ideas will most likely pop into your head. With the hardware you have in your possession you have all the resources you need to use DMX compatible devices in your raspi applications. Its time to start making!

In developing your own applications, some things you might find useful:
1. check out DMXWheel.c This program is very simple but shows you two important things. First, it shows you how to use the DMX library function calls to set DMX channels. You can easily change the code to support different channels, additional channels, and so on. Second, it shows you how to open up a GTK window on the screen. With a bit of googling on GTK you'll find a whole library of functions to create your own on-screen interfaces without having to start from scratch.
2. check out dmxd.c This program is the other side of the shared memory coin and does the serial command communication for the DMX controller. This code describes the packet format for sending data and gives you the nuts and bolts on how the DMX controller interprets the data.
3. check out other DMX units There are a lot of cool DMX controlled devices – this simple application just writes three channels of the available 512 that represent red, green, and blue for a light unit, but you can also support motors, lasers, strobes, and all kinds of smart units with just a bit of code tweaking.
4. check out the raspi We touched a bit on this amazing device, but if you poke around you'll find this board can go some impressive real-time 3D graphics, stereo audio, general I/O and more. Its just been released, so keep following its progress and more features and
applications become available to make your projects come to life.