
This instructable describes how to extend your audio system with a Raspberry Pi micro-computer to play any local music or audio stream from the internet (including Spotify Premium etc.). The best thing is, that you don't need to have any keyboard, mouse, monitor or TV attached to this box: hide it somewhere behind your audio system and remotely control it with your mobile phone (Android, iOS or anything else!) or PC (via any web browser). Yes, there are out-of-the-box solutions available i.e. from Sonos and Bose, but they start at around US$200. This solution will do the same and even some more for around US$70. You only need very basic hardware skills and some basic software skills. Just follow these steps to get your next-level-audio-system.
Have you ever heard of Raspberry Pi? It's a low-cost micro-computer that is able to run Linux and has endless extension possibilities. This little micro-computer originally was developed to teach children at school, but it has now become very popular for all kind of DIY-projects. It costs only about US$35 and opens up endless possibilities of what you can build with it. The official website can be found at http://www.raspberrypi.org
Step 1: Hardware components
There is only a handful of hardware components you need to build this versatile amazing little audio box:
Raspberry Pi: To build this audio box, you can either use a Raspberry Pi B or the newer version Raspberry B+. This article will focus on using the new model B+. It comes with 700MHz Broadcom CPU, 512 MB Ram, 4 USB ports and a 100MBit ethernet port. You can order it from here. Cost: about US$40. (Readers from Germany see the notes at the end of the instructable).
Case for the Raspberry Pi: The Raspberry Pi computer comes pretty “naked”, so you want to give it a case to protect it and make it look good. Depending on where you will put your audio box later, you can use a cheap and ugly or a nice expensive case. Please remember that you don't need any visual contact to your audio box, everything is remotely controlled via your mobile phone or web browser. We prefer using the cheapest cases for about US$9 like this one.
MicroSD card: The Raspberry Pi needs an SD card to store the OS and data on it as it has no internal storage built in. The size of the SD card depends on if you want to store some music on the SD card as well to play local audio files from it or if you have stored all your music files somewhere on a network attached storage. If the audio box has access to your music files on a Windows shared folder, you can use a small SD card with with 2 or 4 GB. We currently prefer 8 GB class 10 cards, as these are pretty cheap right now. These currently cost around US$7. You can order them from here.
If you are using a Raspberry Pi model B+, be sure to order a microSD card as the B+ model only has a microSD card slot. If you are building this audio box with a model B, you can also use the bigger SD card.
Power supply: Be sure to use a power supply that gives enough power. When using a Raspberry B+, you should look out for a 2A power supply like this one. Cost: around US$9.
Wifi adapter: Depending on where you put your audio box later, there may be no ethernet cable there. But no problem: just plug in a wifi USB adapter and you should be fine. We made some very good experience with these edimax USB adapters that cost around US$9 and can be ordered from here.
That's it: for around US$70 to US$100 we have all the hardware we need.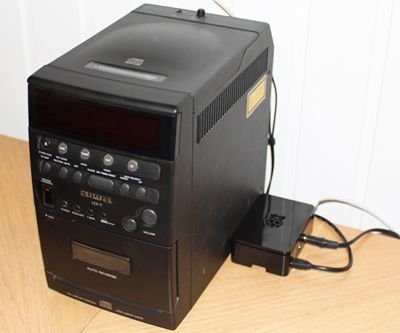
Step 2: Audio output
The Raspberry Pi never had a good reputation in audio output through the 3.5mm analog audio jack. But there are three things that you can easily do to improve this:
- use the new Pi model B+: it now has a dedicated low-noise power supply which results in a better audio quality than the previous versions of the Raspberry Pi
- use a USB sound card: to improve the audio output, you can just plug a USB sound card like this one to your Raspberry. This will result in a slightly better audio output, but don't expect any wonders from the cheap ones. Cost: about US$6.
- If you are an audiophile person and want excellent audio quality output, even in digital quality, use the third option: add a HifiBerry or Wolfson audio card: these are small add-on boards that have an excellent audio quality and just cost about US$40.
Step 3: Put the hardware together
When you have all the hardware components, start assembling the box. That only needs some basic hardware skills and should be done in a few minutes.
Step 4: Prepare the SD card
Now that we have all the hardware assembled, let's get the software part of this box installed.
Download Pi MusicBox
We recommend using Pi MusicBox. It's a great piece of free software developed by Wouter van Wijk. The current version is 0.5, which can be downloaded directly from here.
Connect SD card to your computer
To be able to write the necessary files to the SD card, you need to plug the SD card to your computer. You can do this by either using a microSD-to-SD card adapter (that usually comes with the microSD card) or by using a microSD-USB-adapter like this one. These cost only about US$6.
Write the SD card
After the download of Pi MusicBox has finished (be aware: it's pretty large… 230MB), unzip the included .img file. To write this disk image file to your SD card, you will need a software that is able to do this. When you're sitting in front of a Windows system, just download and install the free Win32 Disk Imager. After installation, run it and select the correct drive letter setting “Device” (REALLY check this to avoid erasing another drive by error!) and select the unzipped .img file. Click “Write” to write the image file to the SD card.
Mac OS: If you're sitting in front of a Mac, use these instructions to write the .img file to the SD card.
Linux: And if you're sitting in front of a Linux desktop machine, use these instructions to get the .img file onto the SD card.
Step 5: Connect to your network
If you have the chance that your new Pi MusicBox has direct LAN network connection, you're already set. Put the SD card into your Raspberry Pi now and plug the LAN cable. The Pi should have access to your network.
But when you're using Wifi network, you first need to enter your Wifi settings in the config file of Pi MusicBox:
- Open the file settings.ini from the “config” folder of the SD card in a text editor on your PC
- Enter your Wifi network name (SSID) and Wifi passwort in the settings.ini in the next to “wifi_network” and “wifi_password”. Don't forget to save the settings.ini file afterwards. Please be aware that Pi MusicBox only supports WPA Wifi, no WEP!
- Remove the SD card from your PC and plug it into your Pi.
We're now done with these setups steps and can now start to configure Pi MusicBox in the next step.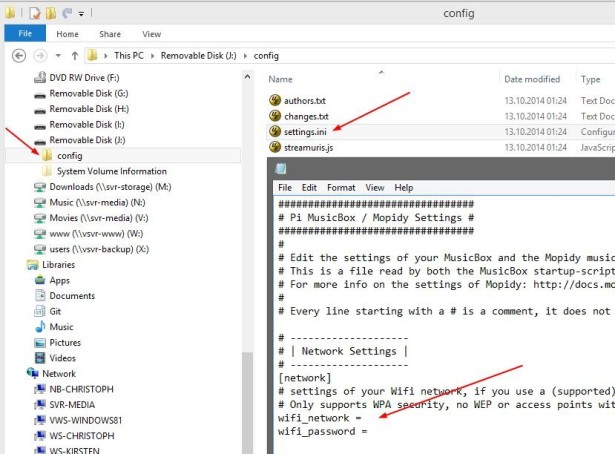
Step 6: Configure MusicBox
After you've plugged the power supply to the Pi, give it some time to boot up. Then open your webbrowser and open the url http://musicbox.local/. You should see the Pi MusicBox home screen.
Let's do some customization to the default settings of your Pi MusicBox. Click on “Settings” in the left menu or the home screen button. These are the settings explained:
Network
Wifi Network Name and Wifi Password: The SSID and password of your Wifi network (see explanation on how to connect your Pi to Wifi above in “Connect to your network”.
Workgroup: Enter your workgroup name of your Windows network. Enable SSH: If you want to directly connect to the Pi MusicBox via SSH, enable SSH access with this setting. This is only necessary for very advanced changes to the Pi system. Normally, you don't need SSH access in normal operation.
MusicBox
Device name: This is the name of Pi in your network. This will also set on how you will access the web control page of your Pi MusicBox. I.e. if you enter “livingroom” here, you need to access the Pi via http://livingroom.local/ then.
Autoplay Url: Enter any url that the Pi MusicBox will start to play after boot.
Wait time: Before playing the “Autoplay Url” after boot, it will wait for this amount of time in seconds.
Root password: By default, the root access to the underlying linux system is username “root” and password “musicbox”. But as that's not very secure, you should change the password to some very secure one here. Be sure to use numbers and special characters in the password to make it hard to guess.
AirPlay Streaming: Do you want to stream directly from your iOS device to the MusicBox? Just enable this setting and it should show up in your AirPlay devices list on your iPhone, iPad, etc. when these are in the same network as the MusicBox.
DLNA/uPnP/OpenHome Streaming: If you want to stream audio directly over these protocols, just enable this setting.
For more detail: Raspberry Pi as low-cost audio streaming box