
Moving on from “My first GPIO LED”, I decided to take a look at a different LED I had in my possession, an L-59BL/1.
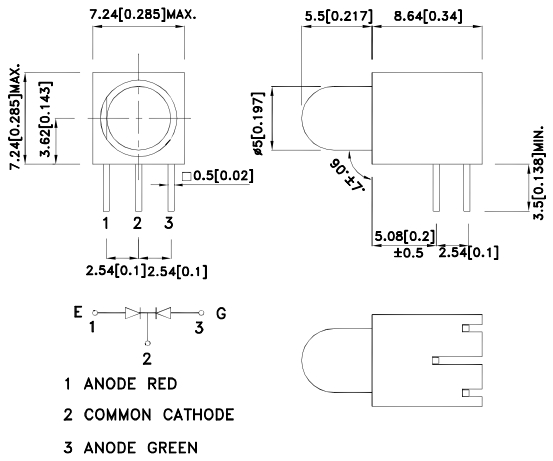
This LED has 3 pins and I had no idea what they were for, so I Googled it and found this parts list, and this data sheet.
So this LED has two anodes, one for Red and one for Green. This would let me try and use two GPIO Pins.
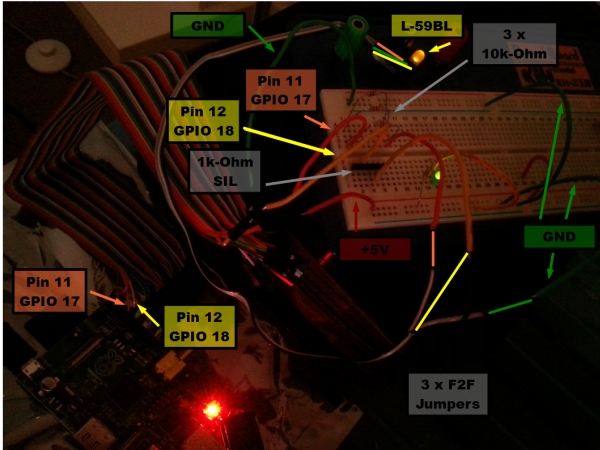
I decided to leave the +5V LED connected, and so used another Female-to-Female jumper to connect Pin-12 (GPIO-18). This would be in addition to the already connected Pin-11 (GPIO-17).
 Original image found here – http://www.raspberrypi-spy.co.uk/2012/06/simple-guide-to-the-rpi-gpio-header-and-pins/.
To connect one anode to the circuit, I decided to use the 3x10k-Ohm in parallel I already had to limit the current for Pin-11. But with the +5V LED taking up another resistor, that left me with no more resistors!
After some digging around, I found a 1k-Ohm SIL (similar to this) that I had removed from a previous PCB. I would use this for the second anode.
I stripped 3 Female-to-Female jumper wires off my ribbon cable to house the 3-Pin LED.
The finished circuit looks like this (the picture had to be taken in the dark as the LED was quite dim in my circuit).
To control GPIO-18, I had to follow the setup steps from my previous post.
|
1
2
|
root@raspberrypi:~# echo "18" > /sys/class/gpio/exportroot@raspberrypi:~# echo "out" > /sys/class/gpio/gpio18/direction |
Then I could control both lights.
|
1
2
3
4
5
6
7
8
9
|
root@raspberrypi:~# echo "1" > /sys/class/gpio/gpio17/valueroot@raspberrypi:~# echo "0" > /sys/class/gpio/gpio17/valueroot@raspberrypi:~# echo "1" > /sys/class/gpio/gpio18/valueroot@raspberrypi:~# echo "1" > /sys/class/gpio/gpio17/valueroot@raspberrypi:~# echo "0" > /sys/class/gpio/gpio17/valueroot@raspberrypi:~# echo "0" > /sys/class/gpio/gpio18/valueroot@raspberrypi:~# echo "1" > /sys/class/gpio/gpio17/valueroot@raspberrypi:~# echo "0" > /sys/class/gpio/gpio17/valueroot@raspberrypi:~# echo "1" > /sys/class/gpio/gpio18/value |
I didn't actually get any Red light at all! I think this is because the part I have is actually a Yellow/Green two-colour part.