Purpose: Learn how simple it is to use the Raspberry Pi CNC Hat from Protoneer by testing it out on a CDROM stepper motor.
Why: Many of us dream of making our own CNC router / engraver but get bogged down in the details and unknowns. This is a simple and inexpensive way to test the waters using components you may already have laying around.
Time: ~2 hours including flashing the SD card & soldering.
Difficulty Level: Beginner
Parts / Tool List:
- Raspberry Pi 2 Model B (other versions may work but I have not verified)
- CNC Hat V2.51 (sold by Protoneer Here for $30 + shipping)(wiki located here)
- A4988 StepStick stepper driver (I bought mine here for $6)
- CDROM Drive with mechanical door (salvaged mine from old computers being recycled at work)
- Power supply (24V gave me the best result)
- Solder gun
- Multi-meter (optional)
- Basic wiring tools (Strippers, cutters, small screw drivers, crimpers, etc.)
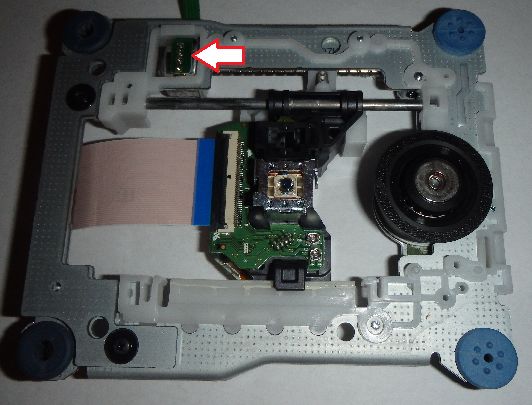
- Carefully take apart your CDROM drive and remove the inner tray leaving the stepper motor and laser assembly intact. Should only required a small phillips screw driver. (Hint: remove the front face first)
- Locate the four leads on the stepper motor, see red arrow in the above image. Don't try to remove the flexible wire circuit, this will pull out the four leads in the motor and make this much more difficult to complete.
For more detail: Raspberry Pi CNC Hat Controlled CDROM Stepper Motor


