
Raspberry Pi powered MAME machine in an IKEA coffee table.
I probably wouldn’t recommend trying to build this unless you have a bit of experience with electronics. This is only a basic run through of how I went about building my Raspberry Pi arcade and hopefully that is enough to give you the ideas and/or inspiration for you to make your own 🙂
NOTE: I found this works best with the older generation games like space invaders, pac-man and frogger ect.
More modern (if I can call the early 90’s modern) arcade games such as Mortal Kombat and NBA Jam seem a bit much for the pi to run in my experience, I’m not saying they won’t work, I’m just saying I wasn’t able to get them to work, but with newer versions of the Pi and emulators you may have more luck.
I have about 20 “classic generation” games loaded on mine all working great.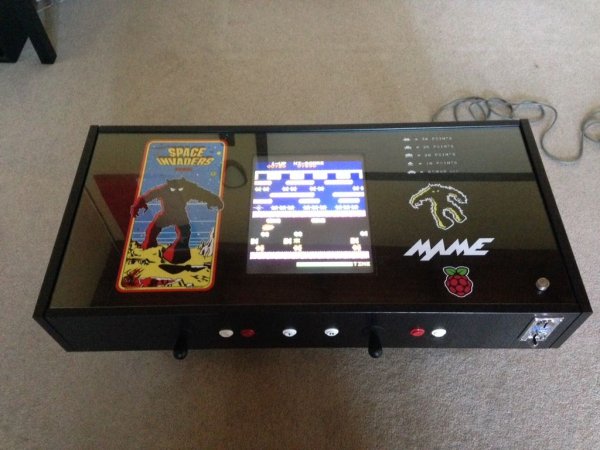
Step 1: Materials and Tools
*Materials*
Coffee table – One with a glass top looks best IMO
LCD monitor – The older squarer screens are better due to the aspect ratio. I picked up one second hand for $10. Also a HDMI or DVI port will make connecting to it a lot easier.
Raspberry Pi – I used a B+ but any model could work.
Micro USB Power Supply, SD Card, HDMI/DVI lead
A USB Keyboard – One you don’t mind destroying
Arcade Joysticks and Buttons – You can find them on online easily enough.
Computer Speakers
Coin Mechanism (optional)
Decal (optional)
*Tools*
Router
Jigsaw
18mm spade bit or hole saw
Soldering Iron
Step 2: Install PiPLAY Emulator
Set up your Pi with PiPLAY and get a few games working on it. PiPLAY is MAME (Multiple Arcade Machine Emulator) software made for the Raspberry Pi. It is easy to set up by downloading a ready made image file and even includes a FTP server for managing your ROMs. I’m not going to go through how to do the install, setup and run PiPLAY because all the information is readily available from PiPLAY. The link to their site is http://piplay.org/
Step 3: Start Building
Once you have your Pi set up with PiPLAY and have tried a few games. It’s time to start building.
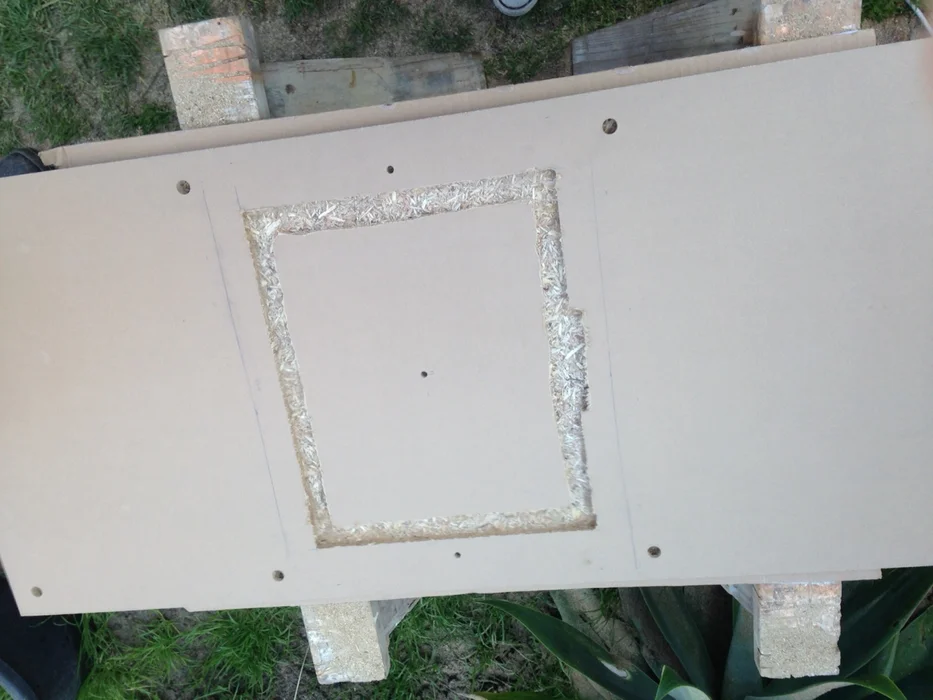
Use a router to carve out a nest for your monitor.
Add some metal strapping to hold it in place.
Use a spade bit or hole saw for the mounting holes for the arcade joysticks and buttons.
Use a jigsaw for cutting a mounting hole for the coin mechanism.
Step 4: Building Cont…
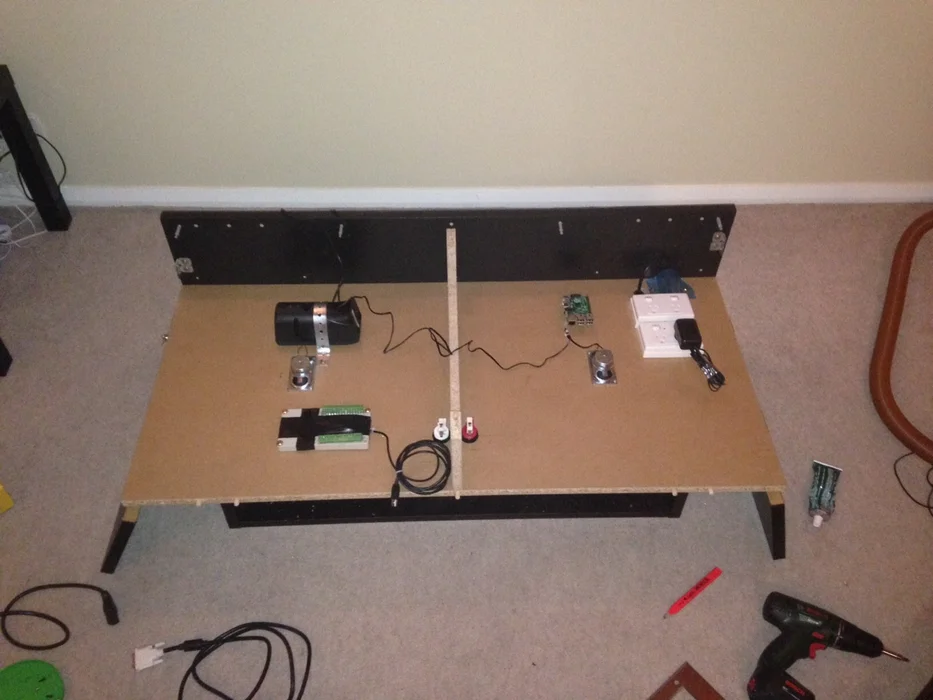
Mount some computer speakers plugged, the Raspberry Pi, power supplies and any other required hardware inside your table.
Step 5: Keyboard Decoder
Keyboard Decoder. This is probably the trickiest step.
You can buy off the shelf keyboard decoders for arcade machines, but it is possible to make your own (as I did) if you have an old/cheap USB keyboard. I’m sorry I don’t have any photos of this step (I made my KB decoder many years ago for another project and was able to reuse it in this project).
It really isn’t too difficult, although it is a little time consuming.
This video might help you understand the anatomy of a keyboard better and make my instruction a bit clearer. https://www.youtube.com/watch?v=chSzoovWtzU
Here’s how:
– First work out what keys are required for your machine (note: it is possible to reassign keys as desired in MAME).
– Pull apart your keyboard. You will notice that a keyboard is a two membrane matrix that feeds back into a small control board.
– You will need to trace out the tracks on each membrane for each of the keys you require to locate which two pins on the control board need to shorted to create that key stroke.
– Then you are able to remove the control board and wire your arcade joysticks and buttons straight to it (with some fiddley soldering).
You now have USB arcade controls 🙂
Step 6: Put It All Together
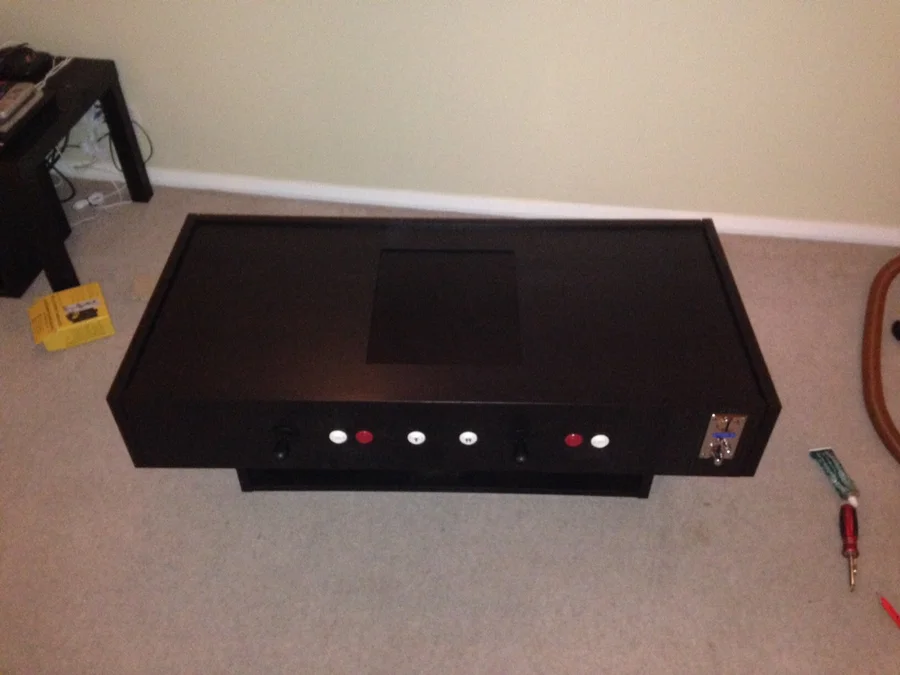
Once all your electronics is together and working finish building the table.
For a nice finish add a decal. For my decal I found images online and made a design using Microsoft paint. Then I found a photo printer online that did prints close to the same size as my table and got it printed up. It cost about $30. I just had to cut it to size, cut out a hole for the screen and place under to glass table top.
Source: Raspberry Pi Coffee Table Arcade