
I have always had a passion for photography, and so in this instructable, I will describe how I created my own Raspberry Pi Digital Camera.
I began creating this digital camera with 3 objectives:
- To have a small lightweight camera
- To make it unique
- To have full control over the camera settings, ISO, Shutter Speed, etc.
To fulfill my objectives, I first designed the camera case to be round, which reduces the size and weight of the camera, while also giving it a sleek, modern look. Using Python 3 and Tkinter, I also programmed an app to allow for full manual control over the camera settings and features.
In this instructable, I will outline the materials used, the design process, the steps to follow, as well as some improvements for the future.
Let's dive in!
Supplies
Tools:
- 3D Printer
- PETG Filament
- Screwdriver
- An extra computer to flash the sd card
Materials:
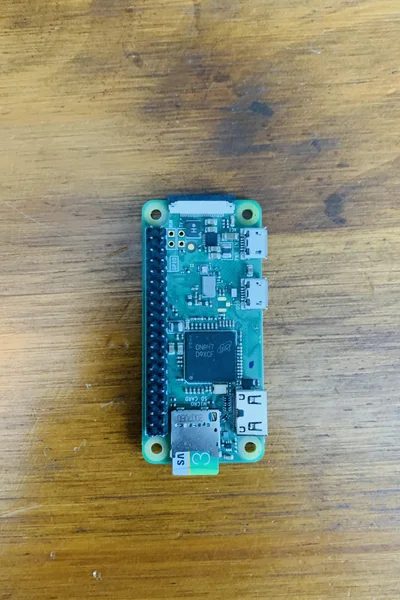
- Raspberry Pi Zero W or Zero 2 W
- CS-Mount Lens (I used an adjustable wide-angle lens from Pimoroni)
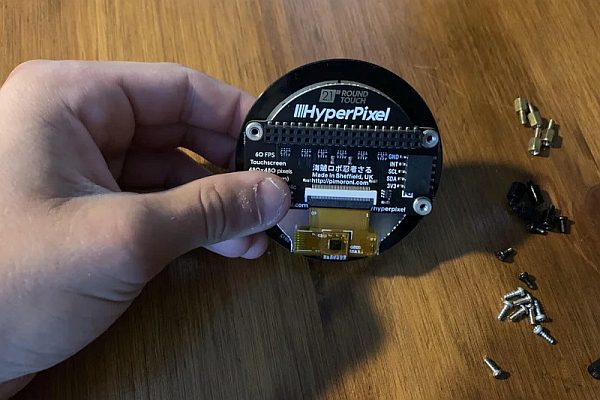
- Pimoroni Hyperpixel 2.1″ Round Touch Display
- Raspberry Pi HQ Camera
- 15cm Raspberry Pi Zero to Camera Ribbon Cable
- Short Pi Standoffs Kit (Available from Pimoroni)
- M3x6mm Screws x12
- M3 Female to Female Standoff 10mm x4
- M3 Female to Male Standoff 5mm x4
- Right Angle Micro USB Male to Female Cable
- Micro USB to USB Cable
- Portable Battey Pack
- (Optional) Tripod to Hold Camera
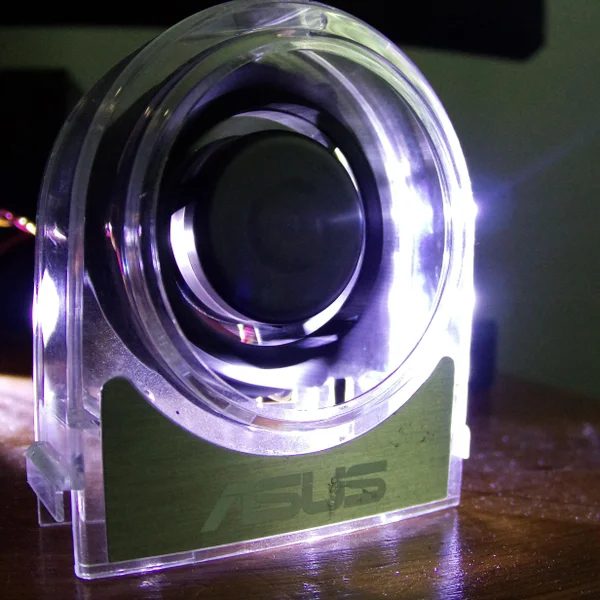
Step 1: Designing the Camera Case
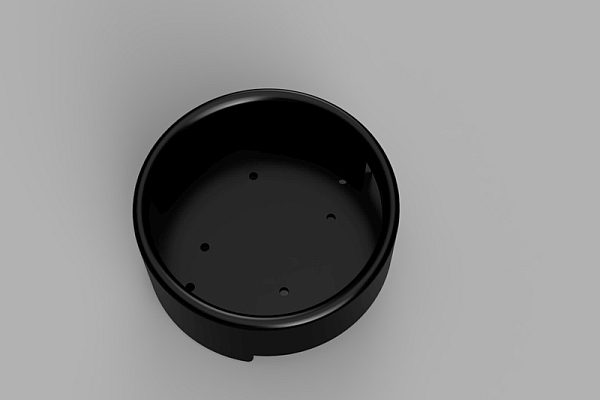
For the design process, I used Fusion 360 to sketch out a case for the Raspberry Pi and the camera to mount to. The purpose of the case is to provide protection for the touch screen and camera. I attached the design files down below.
Step 2: 3D Printing
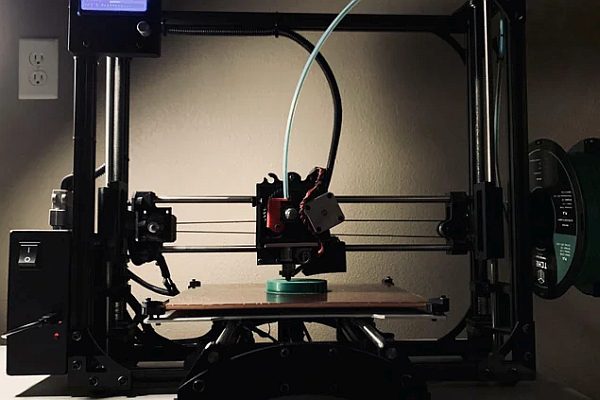
Here are the print settings used:
- Printer Model: Lulzbot Taz 5
- Filament: PLA
- Filament Brand: Hatchbox
- Supports: Yes
- Color: Green
- Infill: 20
- Printing Speed: 40
- Printer Extruder Temperature: 205 Celcius
- Printer Bed Temperature: 55 Celcius
Below is the Camera Case STL file.
Step 3: Setting Up the SD Card
Before we assemble the camera, let's set up the SD Card for the Raspberry Pi.
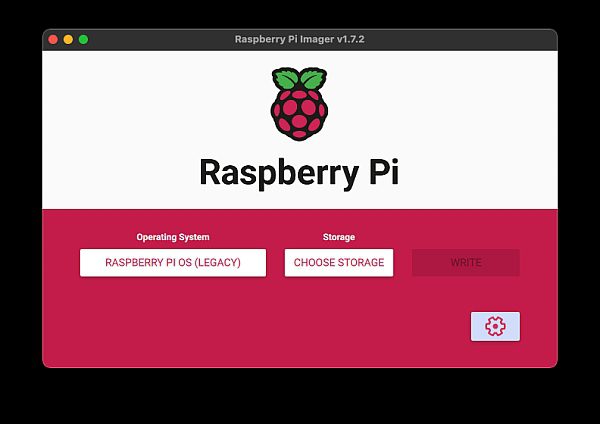
We first need to flash Rasbian Buster to an SD card. To do that you either need to download the image yourself, then use a program like Balena Etcher to flash the image, or let the Raspberry Pi Imager app do everything for you. For the purposes of this tutorial, we will be focusing on the Raspberry Pi Imager. Once you have the Raspberry Pi Imager installed and running, select Choose OS » Raspberry Pi OS (other) » Raspberry Pi OS (Legacy). Once you have selected the image to flash, select Choose Storage then select your SD card. Now you can access the advanced settings menu by clicking the gear icon. From there, configure SSH WIFI by selecting “Enable SSH”, and “Configure Wireless Lan”. Click Save, and It will save your settings to the image. Now, click write and wait for it to finish flashing the image to your SD card. Now you can safely remove the SD card from your computer, and insert it into the Raspberry Pi.
Step 4: Assembling the Camera
Now that we have all the parts and tools, it's time to assemble the camera. You can use the images above as guides.
- Using the four standoffs found in the Short Pi Standoff kit, screw each standoff into the back of the Hyperpixel display. (Refer to images 1-4)
- Once all four standoffs are screwed into the back of the display, gently push the Raspberry Pi headers onto the headers of the Hypepixel display, careful not to break the glass. (Refer to images 5-6)
- Then using the M3 Female to Male Standoff 5mm, screw the Raspberry Pi securely to the back. (Refer to images 7-9)
- Set the display aside to work on the camera module. Using four M3x6mm screws, screw the four M3 Female to Female Standoff 10mm onto the camera module. (Refer to images 9-15)
- Using four more M3x6mm screws, I screwed the M3 Female to Female Standoff onto the Camera Case. (Refer to images 16-20)
- Now that the camera module is connected, we will finish setting up the Raspberry Pi. Feed the small end of the 15cm Raspberry Pi Zero to Camera Ribbon Cable through the square hole on the base plate (Refer to image 20 for details,) then connect the ribbon cable to the Raspberry Pi's camera port. (Refer to Images 20-22)
- Before you screw the display into the case, feed the right angle micro USB male-to-female cable through the hole on the side of the case. Plug the right-angle male side of the cable into the Raspberry Pi's power connector. (Refer to Image 23)
- Now, gently slide the display into the case until the display sits flush with the edges of the side of the case. Using the screws found in the Short Pi Standoff kit, snugly screw the Raspberry Pi into the case. Last but not least, plug the other end of the camera ribbon cable into the camera's port (Refer to Images 24-30)
Step 5: Configuring the Software, Part 1
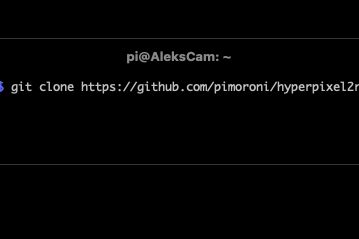
Before we can take pictures, we need to install the software for the HyperPixel Screen.
For full details visit: https://github.com/pimoroni/hyperpixel2r
When you first power on the Raspberry Pi, you may notice that the Hyperpixel display is blank. This is because the Hyperpixel's Driver is not installed, and so, to get it working you'll need to install the official driver provided by Pimoroni.
After you have SSH into the Raspberry Pi, enter the commands below to install the driver:
git clone https://github.com/pimoroni/hyperpixel2r
cd hyperpixel2r
sudo ./install.sh
After you have finished installing the library, reboot the Pi with:
sudo reboot
Once it has finished rebooting, you should see the screen display the Raspberry Pi's desktop.
Now that we've got the screen up and running, we will install the Hyperpixel's Python library.
Before installing the library, we need to edit the Raspberry Pi's config file, so that we can control the display with Python.
First, run:
sudo nano /boot/config.txt
Which will pull up the config file,
then add
:disable-touch
to
dtoverlay=hyperpixel2r
So it will look like this:
dtoverlay=hyperpixel2r:disable-touch
This disables the Linux touch driver so that we can communicate through Python to the touch IC.
Note: Adding “:disable-touch” to the config file disables touch input.
To install the Python Library, enter the following commands on the Raspberry Pi:
git clone https://github.com/pimoroni/hyperpixel2r-python
cd hyperpixel2r-python
sudo ./install.sh
Make sure to copy the examples from the library to ~/home/pi/hyperpixel2r-python/examples/
Once done installing, reboot again and now you should have a fully functional display.
Step 6: Configuring the Software, Part 2
Now it's time to install the Python application I created for taking photos!
Below is a list of all the modules that you will need to install:
- hyperpixel2r (Already installed)
- picamera (Install with PIP)
- tkinter * (Install with PIP)
- tkinter ttk (Already Installed with Tkinter)
- tkinter.font (Already Installed with Tkinter)
- subprocess (Install with PIP)
- datetime (Install with PIP)
- tkinter (Already Installed with Tkinter)
- fnmatch (Install with PIP)
- shutil (Install with PIP)
- time (Installed by default)
- glob (Install with PIP)
- sys (Installed by default)
- os (Installed by default)
Here is a link to my Github repository that contains all of the files you will need:
https://github.com/alekthegenius/Raspberry-Pi-Digital-Camera
First, download the file “gui.py” below, into a folder titled “App” in the documents folder of the Pi:
~/home/pi/Documents/App/
Once you have saved the python file to your Pi, add the file labeled “startCam.sh” below to the pi directory on the Raspberry Pi:
~/home/pi/
Lastly, add the “Cam.conf” file to the init directory located in etc:
~/etc/init/
Reboot your Pi, and you should now have a working camera!
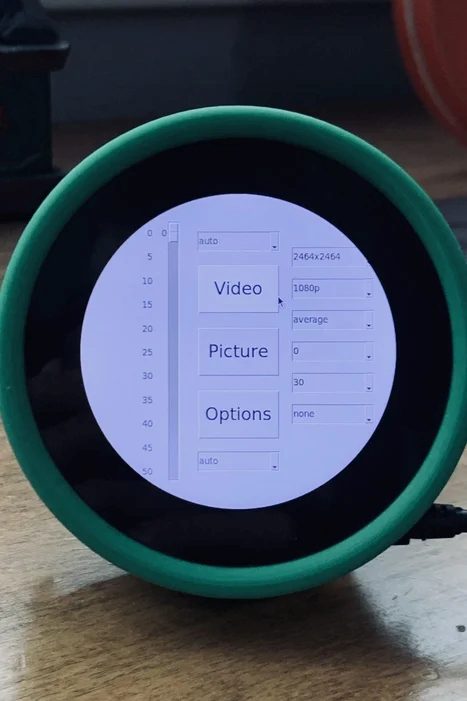
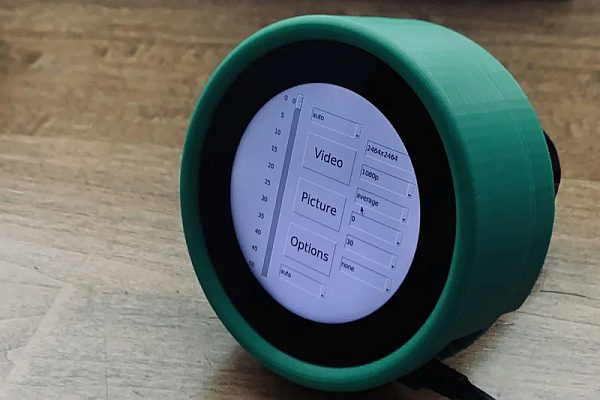
In this section, I will be describing how to navigate and operate the software I created.
Refer to the images above as guides.
Once you first boot up your Pi, you will be greeted by the main menu of my camera app. From there, you can enter video or photo mode or manually change the settings of your camera's resolution, exposure, shutter speed, etc.
You can also select the options menu, which allows you to format the Raspberry Pi's desktop, exit the camera app, and view information about your storage.
Now, let's talk about how to operate the different modes, photo, and video.
When you enter photo mode, an overlay of the camera will pop up in whatever resolution you selected. To take a photo, simply, click anywhere in the bottom half of the screen (the overlay will go away for a few milliseconds, once you take a photo). If you wish to return back to the main menu, tap the very top of the screen (that is where the button to return back to the main menu is located), and you will be exited from the photo mode. (Refer to images 3-4 for details.)
Taking videos is slightly different. When you enter video mode, you will once again see the camera's overlay on the screen, but this time, it's translucent. A translucent overlay means that a video is not currently recording, while a solid overlay means that a video is recording. To start recording, tap the bottom half of the display. To stop recording is the same process, just click the bottom half of the screen, and the overlay will become translucent again. (Important, do not exit video mode while recording!)
To manually change the camera's settings, simply tap on a combo box, and select the desired setting.
Step 8: BONUS: Create an Ad-Hoc Wifi Network
When using your camera, you might take it to places where wifi is not accessible. And so, while not mandatory, in this step, I will show you how to create an Ad-Hoc Network using this script: https://www.raspberryconnect.com/images/hsinstaller/Autohotspot-Setup.tar.xz
For full details visit: https://www.raspberryconnect.com/projects/65-raspberrypi-hotspot-accesspoints/183-raspberry-pi-automatic-hotspot-and-static-hotspot-installer
First, download the installer with this command:
curl "https://www.raspberryconnect.com/images/hsinstaller/Autohotspot-Setup.tar.xz" -o AutoHotspot-Setup.tar.xz
Next extract the contents of the file using this command:
tar -xvJf AutoHotspot-Setup.tar.xz
Now, go into the Autohotspot directory with the cd command:
cd Autohotspot
Lastly, run the Autohotspot script with this command:
sudo ./autohotspot-setup.sh
Now you will be presented with 8 menu options, select option 3, “Install a Permanent Access Point with eth0 access for connected devices”. Lastly, change the wifi name and password using option 7.
Once you are done with the wifi configuration, exit the script, then reboot the Pi to activate your Ad-Hoc network.
Step 9: Conclusion
After reading this Instructable, you should now hopefully be provided with enough knowledge to build your camera.
Because the Raspberry Pi Zero W default GPU memory is 128MB, I encountered memory allocation errors when trying to use the max resolution of the camera, 4056 x 3040 pixels—so using the command sudo raspi-config I set the GPU memory to 256MB under the Advanced Options, which fixed the problem. View this answer for details: https://raspberrypi.stackexchange.com/a/60389
I added some photos above that were taken by the camera.
For more info on the code, visit: https://alekthegenius.github.io/Raspberry-Pi-Digital-Camera/
Now, sit back, relax, and enjoy snapping photos with your DIY Digital Camera.
If you have any questions, feel free to comment below and I will try to answer.
Source: Raspberry Pi Digital Camera