
Overview
Face recognition is an exciting field of computer vision with many possible applications to hardware and devices. Using embedded platforms like the Raspberry Pi and open source computer vision libraries like OpenCV, you can now add face recognition to your own maker projects! In this project I'll show you how to build a treasure box which unlocks itself using face recognition running on a Raspberry Pi.
Before you get started with this project, it will help to familiarize yourself with a few things:
- If you haven't setup or used a Raspberry Pi, go through the tutorials on learning the Raspberry Pi like preparing an SD card, network setup, and using SSH before attempting this project. Also take a look at the lesson on using a servo for more background on how servos work.
- Skim the OpenCV tutorial on face recognition for an idea of how face recognition algorithms work. Don't worry, you don't need to fully understand the math or code to build and learn from this project.
Continue on to learn about the hardware needed to build this project.
Hardware
You will need the following parts for this project:
- Raspberry Pi, either model A or model B will work, running the Raspbian operating system.
- Your Pi will need access to the internet to setup the software, so make sure you have either a wired or wireless network connection setup with your Pi.
- Raspberry Pi camera.
- Small box that can fit the Raspberry Pi and locking mechanism inside. I found an inexpensive plain wooden box at a craft store, and finished it with wood stain and polyurethane.
- Look for a box that has hinges which are screwed in from the outside of the box. Although not terribly secure, it will allow you to disassemble and open the box in case the locking mechanism fails to open.
- Small servo or lock solenoid for the locking mechanism, depending on how your box can be latched shut.
- A servo that rotates a latch can work with most boxes that open from the top or side.
- A lock solenoid can work with boxes that have a door or drawer. See this locking drawer project for information on using a lock solenoid. Note: the software for this project is written to use a servo as the locking mechanism, so if you use a lock solenoid you will need to modify the software to actuate the lock with the solenoid instead of the servo.
- Momentary push button that can mount to the box. Depending on how thick your box is, you might need a smaller or larger push button.
- 10 kilo-ohm 1/4 watt resistor to use as a pull-up resistor with the push button.
- Power supply for the Raspberry Pi and servo or solenoid. For powering a micro servo, a 4x AA battery pack is a simple option.
- Wood, wood glue, and fasteners for building a latch mechanism and frame to support the Pi inside the box. The exact material will depend on your box, but you can see further below how I used 1/4″ dowel and thin bass wood to build the frame and latching mechanism for my box.
- Hookup wires to connect the switch, servo, and servo power supply. Female hookup wires work well for connecting directly to the Raspberry Pi GPIO pins, or you could use the Pi cobbler with a small breadboard.

Assembly
The box you use for your project will dictate exactly how the Raspberry Pi, servo, and latching mechanism need to be mounted. Read the notes below for tips on how to construct your hardware, based on how I built mine:
|
Use a box which can fit the Raspberry Pi, servo, and latching mechanism. Drill a hole in the top or side for the Raspberry Pi camera. I found a 7/16″ drill bit was enough for the camera to comfortably fit. Be careful when drilling large holes–work up from smaller bits so you don't crack the box. If you do damage the box, you can generally use wood filler to hide mistakes. If they aren't mounted there already, consider moving the hinges to be mounted from the outside of the box. This will allow you to disassemble the box in case the hardware fails in a locked position. Drill a hole in the box to mount the push button. You can see I mounted mine on the back of the box where it can be reached while a user looks into the camera on the top. Drill another hole to allow power cables to come into the box for both the Raspberry Pi and servo. I found a 1/2″ hole was enough to fit a micro USB cable through for powering the Pi. To the left, you can see the hole I drilled in my box next to the push button. |
|
|
For the latching mechanism, mount a small dowel perpendicular to the side of the box. Attach a right angle of wood to a servo horn so it can act as a latch that swings down to catch the dowel, locking the box. See the pictures to the left to see the latch mechanism and dowel I built in my box. If possible, mount the Raspberry Pi in the top of the box or near the hole for the camera. You can see how I mounted my Pi to a small board along with the locking servo, and then attached that board to dowels glued in to form a frame in the box top. A few screws and a smaller board can act as a clamp to hold the servo in place. |
Wiring
The electronics in this project are fairly simple and involve connecting a servo and push button to the Rasperry Pi. If you have never used these devices with a Raspberry Pi, read the following tutorials for a good overview of their usage:
- Raspberry Pi Lesson 4: GPIO Setup
- Raspberry Pi Lesson 8: Using a Servo Motor
- Bread Board Setup for Input Buttons
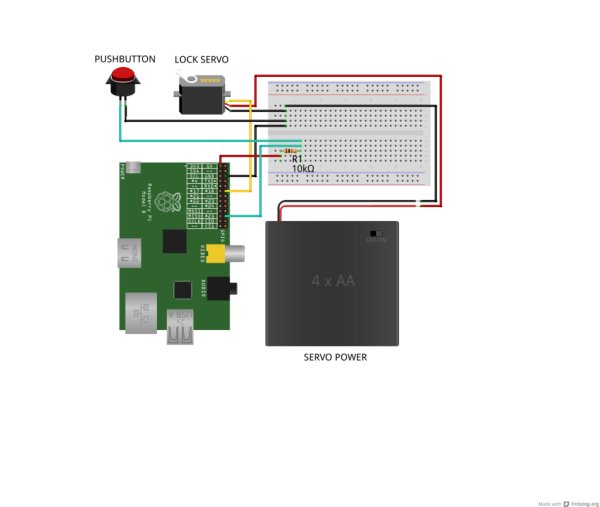
For the servo, connect the signal line to GPIO 18 of the Raspberry Pi. To power the servo I connected a 4x AA battery pack as a power source–connecting the servo to the Pi's 5 volt output could cause problems from noise or excessive current drawn by the servo.
The push button is attached to GPIO 25 of the Raspberry Pi, with a 10 kilo-ohm pull-up resistor to 3.3 volt power from the Pi.
See the diagram below for how to wire the push button and servo to the Raspberry Pi.
Software
OpenCV Installation
This project depends on the OpenCV computer vision library to perform the face detection and recognition. Unfortunately the current binary version of OpenCV available to install in the Raspbian operating system through apt-get (version 2.3.x) is too old to contain the face recognition algorithms used by this project. However you can download, compile, and install a later version of OpenCV to access the face recognition algorithms.
Note: Compiling OpenCV on the Raspberry Pi will take about 5 hours of mostly unattended time. Make sure you have some time to start the process before proceeding.
First you will need to install OpenCV dependencies before you can compile the code. Connect to your Raspberry Pi in a terminal session and execute the following command:
sudo apt-get update
sudo apt-get install build-essential cmake pkg-config python-dev libgtk2.0-dev libgtk2.0 zlib1g-dev libpng-dev libjpeg-dev libtiff-dev libjasper-dev libavcodec-dev swig unzip
Answer yes to any questions about proceeding and wait for the libraries and dependencies to be installed. You can ignore messages about packages which are already installed.
Next you should download and unpack the OpenCV source code by executing the following commands:
wget http://downloads.sourceforge.net/project/opencvlibrary/opencv-unix/2.4.9/opencv-2.4.9.zip
unzip opencv-2.4.9.zip
Note that this project was written using OpenCV 2.4.7, although any 2.4.x version of OpenCV should have the necessary face recognition algorithms.
Now change to the directory with the OpenCV source and execute the following cmake command to build the makefile for the project. Note that some of the parameters passed in to the cmake command will disable compiling performance tests and GPU accelerated algorithms in OpenCV. I found removing these from the OpenCV build was necessary to help reduce the compilation time, and successfully compile the project with the low memory available to the Raspberry Pi.
cd opencv-2.4.9
cmake -DCMAKE_BUILD_TYPE=RELEASE -DCMAKE_INSTALL_PREFIX=/usr/local -DBUILD_PERF_TESTS=OFF -DBUILD_opencv_gpu=OFF -DBUILD_opencv_ocl=OFF
After this command executes you should see details about the build environment and finally a ‘– Build files have been written to: …' message. You might see a warning that the source directory is the same as the binary directory–this warning can be ignored (most cmake projects build inside a subdirectory of the source, but for some reason I couldn't get this to work with OpenCV and built it inside the source directory instead). If you see any other error or warning, make sure the dependencies above were installed and try executing the cmake command again.
Next, compile the project by executing:
make This process will take a significant amount of time (about 5 hours), but you can leave it unattended as the code compiles.
Finally, once compilation is complete you can install the compiled OpenCV libraries by executing: sudo make install
After this step the latest version of OpenCV should be installed on your Raspberry Pi.
Python Dependencies
The code for this project is written in python and has a few dependencies that must be installed. Once connected to your Raspberry Pi in a terminal session, execute the following commands:
sudo apt-get install python-pip
sudo apt-get install python-dev
sudo pip install picamera
sudo pip install rpio
You can ignore any messages about packages which are already installed or up to date. These commands will install the picamera library for access to the Raspberry Pi camera, and the RPIO library for access to the Pi GPIO pins and PWM support (for better servo control with the Pi).
Software Install
After OpenCV and the python dependencies have been installed, download the software for this project from the link below:
Copy the archive to your Raspberry Pi and extract it to a folder.
Continue on to learn about training the face recognition algorithm to recognize your face.
 Training
This project uses the eigenfaces algorithm in OpenCV to perform face recognition. To use this algorithm you'll need to create a set of training data with pictures of faces that are and are not allowed to open the box.
Included in the project is a large set of face images that are tuned for training with the face recognition algorithm. This is the database of faces published by research AT&T Laboratories Cambridge in the mid 90's. These faces make up the set of negative images which represent faces that are not allowed to open the box. You can see these images in the training/negative subdirectory of the project.
To generate images of the person who will be allowed to open the box, or positive training images, you can use the included capture-positives.py script. This script will take pictures with the box hardware and write them to the training/positive sub-directory (which will be created by the script if it does not exist).
With the box hardware assembled and powered up (servo power is not necessary for this step), connect to the Raspberry Pi in a terminal session and navigate to the directory with the project software. Execute the following command to run the capture positive script:
sudo python capture-positives.py
After waiting a few moments for the script to load, you should see the following instructions:
Capturing positive training images.
Press button or type c (and press enter) to capture an image.
Press Ctrl-C to quit.
The script is now ready to capture images for training. If you see an error message, make sure OpenCV and the software dependencies from the previous step are installed and try again.
Point the box's camera at your face and press the button on the box (or send the letter ‘c' in the terminal session) to take a picture. If the script detects a single face, it will crop and save the image in the positive training images sub-directory. If the script can't detect a face or detects multiple faces, an error message will be displayed.
If see error messages about not detecting a single face, you can examine the full picture that was captured by the camera to understand if it's picking up your face (or if other faces might be in view–be careful, even photos or posters with faces behind you can be detected!). Open the file capture.pgm (located in the directory with the scripts) in an image editor to see the last image that was captured. It's easiest to use a tool like Cyberduck to view the files on your Raspberry Pi over SFTP (SSH file transfer protocol).
Using the capture-positives.py script, capture some pictures of the face that is allowed to open the box. Try to take pictures of the face with different expressions, under different lighting conditions, and at different angles.