
l built a DIY Google AI Assistant using a Raspberry Pi, USB Speaker and USB microphone.
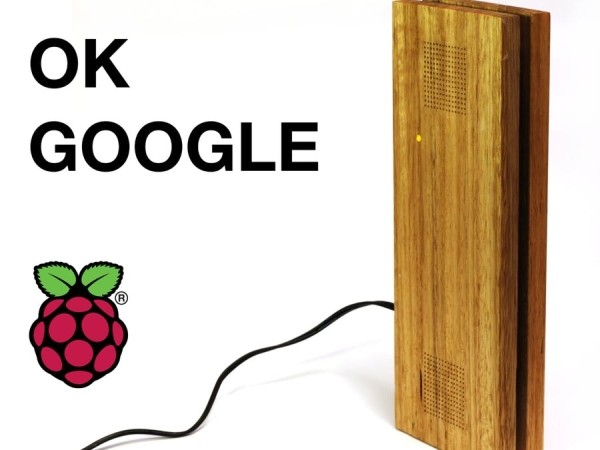
I’ll show how to build a DIY Google AI Assistant using a Raspberry Pi, USB Speaker and USB microphone. I’ll also show how to make the sleek hardwood box it’s housed in.
I’m assuming a basic knowledge of the linux operation system, raspberry pi and unix command line. If your new to raspberry pi there are plenty of good getting started tutorials here https://www.raspberrypi.org/help/
If your not interested in woodworking. You can easily substitute the wooden box for something simpler, like a cardboard box or a plastic project box.
Hardware used:
- Raspberry Pi 3 Model B: https://www.adafruit.com/product/3055
- Mini USB microphone: https://www.adafruit.com/product/3055
- Mini USB speaker: https://www.adafruit.com/product/3055
- Raspberry pi power adapter
- Raspberry pi micro SD card with Raspian OS installed
- 330ohm resistor
- 3mm warm white LED
- bread board prototyping wires
- electrical tape
Materials needed for the box:
- 10mm aluminum tube
- Tasmanian oak was used for the wood. Each board measured 24x9x1.2cm
- Wood finishing oil, I used Danish oil.
- 2mm wood screws
- 30mm wood screws
Tools used:
- soldering iron
- tenon saw
- hand router
- bench chisel and mallet
- sand paper
- drill press
- electronics perfboard was used as a template for the speaker holes
- hacksaw
- flat file
Step 1: Watch the Build Video
Watch this build video to get an idea on what is involved. If you like my video please, like it, leave a comment and subscribe to my channel (:
Step 2: Setup the Raspberry Pi
Connect the pi to a keyboard, monitor and mouse. Boot it up. Now configure network and ssh access. There is a good guide here: https://developers.google.com/assistant/sdk/develop/python/hardware/setup
Note Raspberry PI's do not have real time clocks so you will need to either setup NTP or manually set the time with the command:
$ date -s ‘2014-12-25 12:34:56'
not doing so can cause SSL errors later.
Once network is setup update you pi’s operating system by following this guide: https://www.raspberrypi.org/documentation/raspbian/updating.md
(Optional) Compile python3.6 on the raspberry pi
The default python3 install on the raspberry pi is python3.4, I wanted a more modern python, so I downloaded and compiled python3.6 from source http://bohdan-danishevsky.blogspot.com.au/2017/01/building-python-360-on-raspberry-pi-3.html
Step 3: Configure Google Cloud
The google assistant SDK needs to talk to it's API in google cloud. This process involves creating a google cloud project, enabling the assistant API, generating a client secret and downloading that secret json blob to the pi. There are detailed instructions here: https://developers.google.com/assistant/sdk/develop/python/config-dev-project-and-account
Step 4: Configuring the Assistant Python Software on the Pi.
If you just want a bear bones google assistant running on follow this guide: https://developers.google.com/assistant/sdk/develop/python/run-sample.
However if you want to add a LED or extend it in other ways git clone this library and follow the instructions to get it running:
$ git clone https://github.com/googlesamples/assistant-sdk-py… $ cp -r assistant-sdk-python/google-assistant-sdk/googlesamples/assistant/library new-project
You should now have a working Google assistant running on the Pi.
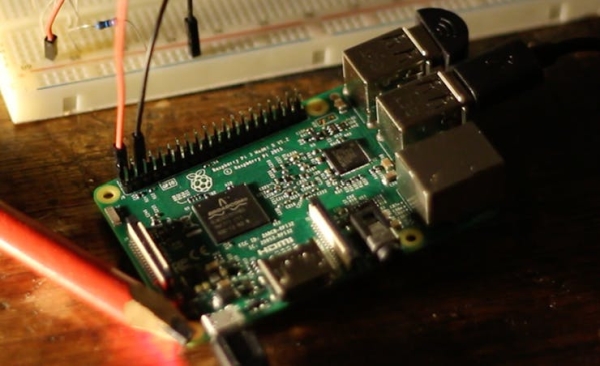
Step 5: Getting the Assistant to Turn on the LED
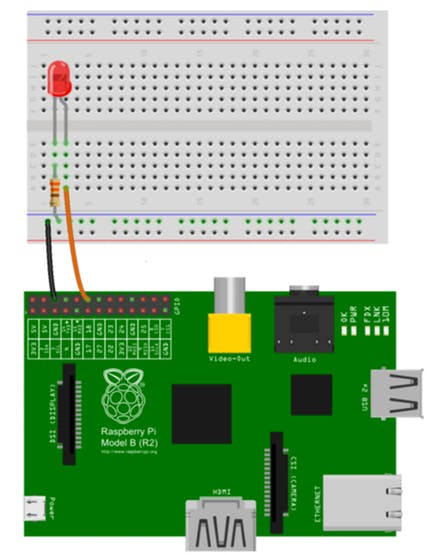
Solder the 330ohm resistor to the negative terminal of the LED and wire it up according to the above diagram. I used PIN3 for ground and PIN18 for positive.
Python has an excellent library for controlling GPIO pins called Rpi.GPIO. Install this library into your virtual env:
$ pip install RPi.GPIO
Before messing around with the assistant's code, I'd suggest following this guide to make sure the LED works first:
https://thepihut.com/blogs/raspberry-pi-tutorials/…
Adding GPIO code to the google assistant was quite straight forward. Download the attached patch and apply it with:
$ patch -p0 < hotword.py.patch
If the patch applied correctly the LED should turn on after “OK Google” and turn off after the assistant finishes.
Step 6: Building the Box

Now the google assistant and LED are working you can now make the box.
I sawed the timber to length 24cm and planed down the ends to match each other. Using a marking gauge I marked a rectangle on the inner face of each board that was 1/4” in from each side. I then chiseled and hand routed out this area to a depth of about 6mm. I place the pi between the boards regularly to check the gap distance. If you don't have a hand router, you could use an electric router or make a simple one.