
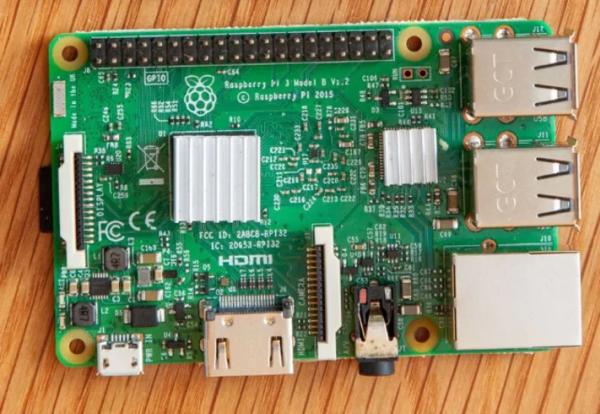
The best thing about the Raspberry Pi is that you can use it to build all kinds of awesome contraptions, from robots to retro gaming consoles and fart detectors. Most of the sensors, motors, lights and other peripherals that make these projects possible connect to the Pi's set of GPIO pins. Every Pi model since the Raspberry Pi B+ has had 40 GPIO pins, though on the Pi Zero and Zero W, you have 40 holes that you can solder pins or wires into.
No matter what you're building, you need to know the Raspberry Pi GPIO pinout, the map and explanation of what each pin can do. While some pins provide electricity, others are grounds and still others connect to different kinds of interfaces, all of which we explain below.
General Purpose Input Output (GPIO) Pins
The GPIO is the most basic, yet accessible aspect of the Raspberry Pi. GPIO pins are digital which means they can have two states, off or on. They can have a direction to receive or send current (input, output respectively) and we can control the state and direction of the pins using programming languages such as Python, JavaScript, node-RED etc.
The operating voltage of the GPIO pins is 3.3v with a maximum current draw of 16mA. This means that we can safely power one or two LEDs (Light Emitting Diodes) from a single GPIO pin, via a resistor. But for anything requiring more current, a DC motor for example, we will need to use external components to ensure that we do not damage the GPIO.
Controlling a GPIO pin with Python is accomplished by first importing a library of pre-written code. The most common library is RPi.GPIO (https://pypi.org/project/RPi.GPIO/) and it has been used to create thousands of projects since the early days of the Raspberry Pi. In more recent times a new library called GPIO Zero (https://pypi.org/project/gpiozero/)has been introduced, offering an easier entry for those new to Python and basic electronics. Both of these libraries come pre-installed with the Raspbian operating system.
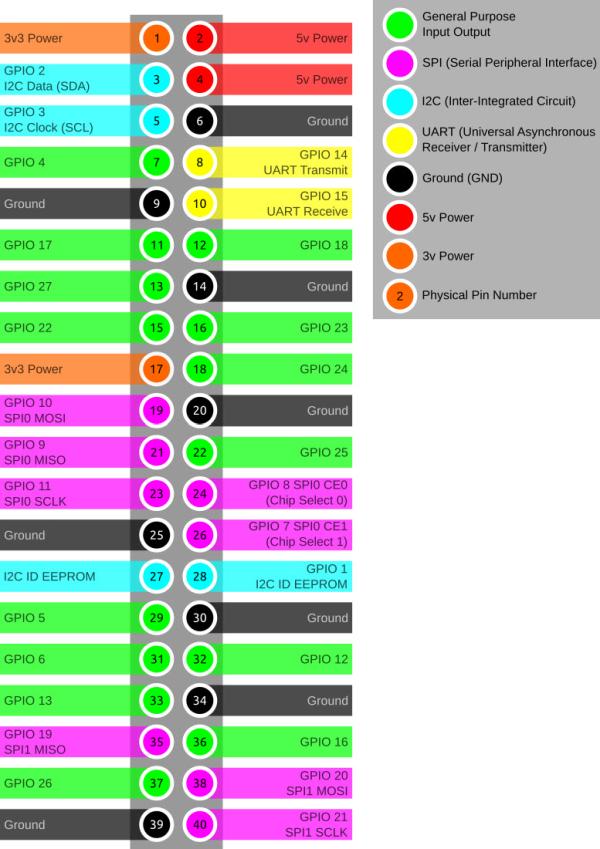
GPIO pins have multiple names; the first most obvious reference is their “physical” location on the GPIO. Starting at the top left of the GPIO, and by that we mean the pin nearest to where the micro SD card is inserted, we have physical pin 1 which provides 3v3 power. To the right of that pin is physical pin 2 which provides 5v power. The pin numbers then increase as we move down each column, with pin 1 going to pin 3, 5,7 etc until we reach pin 39. You will quickly see that each pin from 1 to 39 in this column follows an odd number sequence. And for the column starting with pin 2 it will go 4,6,8 etc until it reaches 40. Following an even number sequence. Physical pin numbering is the most basic way to locate a pin, but many of the tutorials written for the Raspberry Pi follow a different numbering sequence.
Broadcom (BCM) pin numbering (aka GPIO pin numbering) seems to be chaotic to the average user. With GPIO17, 22 and 27 following on from each other with little thought to logical numbering. The BCM pin mapping refers to the GPIO pins that have been directly connected to the System on a Chip (SoC) of the Raspberry Pi. In essence we have direct links to the brain of our Pi to connect sensors and components for use in our projects.
You will see the majority of Raspberry Pi tutorials using this reference and that is because it is the officially supported pin numbering scheme from the Raspberry Pi Foundation. So it is best practice to start using and learning the BCM pin numbering scheme as it will become second nature to you over time. Also note that BCM and GPIO pin numbering refer to the same scheme. So for example GPIO17 is the same as BCM17.
Certain GPIO pins also have alternate functions that allow them to interface with different kinds of devices that use the I2C, SPI or UART protocols. For example GPIO3 and GPIO 4 are also SDA and SCL I2C pins used to connect devices using the I2C protocol. To use these pins with these protocols we need to enable the interfaces using the Raspberry Pi Configuration application found in the Raspbian OS, Preferences menu.
I2C, SPI and UART: Which Do You Use?
We'll get into the specific differences between I2C, SPI and UART below, but if you're wondering which one you need to use to connect to given device, the short answer is to check the spec sheet. For example, one tiny LED screen might require SPI and another might use I2C (almost nothing uses UART). If you read the documentation that comes with a product (provided it has some), it will usually tell you which Pi pins to use.
I2C – Inter-Integrated Circuit
I2C is a low speed two wire serial protocol to connect devices using the I2C standard. Devices using the I2C standard have a master slave relationship. There can be more than one master, but each slave device requires a unique address, obtained by the manufacturer from NXP, formerly known as Philips Semiconductors. This means that we can talk to multiple devices on a single I2C connection as each device is unique and discoverable by the user and the computer using commands such as i2cdetect.
As mentioned earlier I2C has two connections: SDA and SCL. They work by sending data to and from the SDA connection, with the speed controlled via the SCL pin. I2C is a quick and easy way to add many different components, such as LCD / OLED screens, temperature sensors and analog to digital converters for use with photoresistors etc to you project. While proving to be a little more tricky to understand than standard GPIO pins, the knowledge gained from learning I2C will serve you well as you will understand how to connect higher precision sensors for use in the field.
The Raspberry Pi has two I2C connections at GPIO 2 and 3 (SDA and SCL) are for I2C0 (master) and physical pins 27 and 28 are I2C pins that enable the Pi to talk to compatible HAT (Hardware Attached on Top) add on boards.
SPI – Serial Peripheral Interface
SPI is another protocol for connecting compatible devices to your Raspberry Pi. It is similar to I2C in that there is a master slave relationship between the Raspberry Pi and the devices connected to it.
Typically SPI is used to send data over short distances between microcontrollers and components such as shift registers, sensors and even an SD card. Data is synchronised using a clock (SCLK at GPIO11) from the master (our Pi) and the data is sent from the Pi to our SPI component using the MOSI (GPIO GPIO10) pin. MOSI stands for Master Out Slave In. If the component needs to reply to our Pi, then it will send data back using the MISO pin (GPIO9) which stands for Master In Slave Out.
UART – Universal Asynchronous Receiver / Transmitter
Commonly known as “Serial,” the UART pins (Transmit GPIO14, Receive GPIO15) provide a console / terminal login for headless setup, which means connecting to the Pi without a keyboard or pointing device. Normally, the easiest way to do a headless Raspberry Pi setup is simply to control the Pi over a network or direct USB connection (in the case of Pi Zero).
But, if there's no network connection, you can also control a headless Pi using a serial cable or USB to serial board from a computer running a terminal console. UART is exceptionally reliable and provides access to a Pi without the need for extra equipment. Just remember to enable the Serial Console in the Raspberry Pi Configuration application. Chances are that you won't want to do this, but the UART support is there if you need it.
Ground (gnd)
Ground is commonly referred to as GND, gnd or – but they all mean the same thing. GND is where all voltages can be measured from and it also completes an electrical circuit. It is our zero point and by connecting a component, such as an LED to a power source and ground the component becomes part of the circuit and current will flow through the LED and produce light.
When building circuits it is always wise to make your ground connections first before applying any power as it will prevent any issues with sensitive components. The Raspberry Pi has eight ground connections along the GPIO and each of these ground pins connects to one single ground connection. So the choice of which ground pin to use is determined by personal preference, or convenience when connecting components.
5v
The 5v pins give direct access to the 5v supply coming from your mains adaptor, less power than used by the Raspberry Pi itself. A Pi can be powered directly from these pins, and it can also power other 5v devices. When using these pins directly, be careful and check your voltages before making a connection because they bypass any safety features, such as the voltage regulator and fuse which are there to protect your Pi. Bypass these with a higher voltage and you could render your Pi inoperable.
3v3
The 3v pin is there to offer a stable 3.3v supply to power components and to test LEDs. In reality, it will be rare that you factor this pin into a build, but it does have a special use. When connecting an LED to the GPIO, we first need to make sure that the LED is wired up correctly and that it lights up. By connecting the long leg of the LED, the anode to the 3.3v pin via a resistor, and the shorter leg, the cathode to any of the Ground (gnd) pins we can check that our LED lights up and is working. This eliminates a hardware fault from the project and enables us to start building our project with confidence.