
The other day I finally received my Raspberry Pi Model B in the mail!!! It only took 6 months…. but at least it arrived.
Regardless, I now have it in hand an am happily projecting away. Of course I could spend 30-50$ odd dollars online and buy a snazzy clear case or I could put on my MacGyver hat (better known as the I'm a broke student hat') and pull out my trusty Swiss army Knife and build this case!
Tools:
1 – Swiss army knife or equivalent
1 – Small Phillips screwdriver (possibly found on the Swiss army Knife or equivalent)
1 – Heavy duty rubber band (possibly holding the Swiss army knife or equivalent together…)
1 – Tube of super MacGywer glue.
1 – White marker / pencil crayon / marking tool
1 – Standard 7 function casing for a cheap volt meter (http://www.harborfreight.com/7-function-multimeter-98025.html) These are a dime a dozen!
Lets Begin!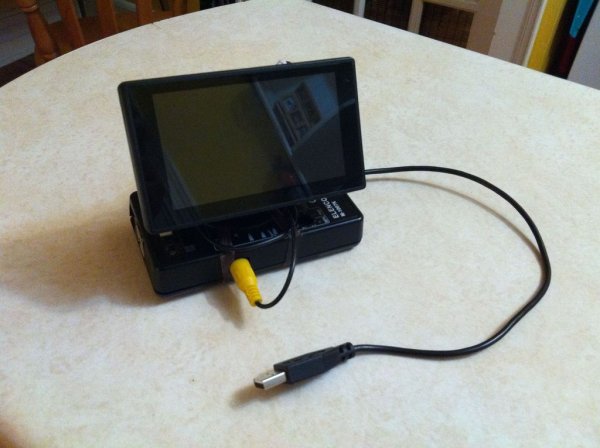
Step 1: Taking apart the 7 function Multi-meter and preping for the PI
1) Open your 7 function Multi-meter with the Phillips screw driver. There should be 4 screws on the back side.
2) Once open, remove the inner circuitry from the case. This will consist of the main processing board, the LCD display, possibly a back light, the dial on the front with the two ball bearings, battery ect.
3) Now, pull out your Raspberry PI, plug in the SD card, and gently line up the PI the casing. Now each case while identical on the outside, my have great variances within. With this being said, the only consistency between the multi-meters is the fact that the outside lenght, width and depth dimensions are the same.
This is fine for us, it just may entail a little more Swiss army knifing on the inside!
Step 2: Gutting the inside
Once you have the innards removed, its time to prep the case for the PI. I mounted mine on the bottom facing up so that through the hole where the Multi-meter dial once was, you can now have a visual of the PI and of the Status LEDs.
1) Pull out your knife and shave off all the screw mounts, battery casing, and knobs and ridges from within the BOTTOM portion of the casing.
REMEMBER: Dry fit your PI in the Casing as not all knobs will have to be removed, in fact, you may find there are some that will fit perfectly and will help to hold your PI in place!
2) Once your PI fits reasonably snug in the bottom portion, dry fit the top Portion of the casing to see what needs shaving down. On mine, the top casing had some knobs that needed removing but I've seen other casings that required nothing on the top to be removed.
As you can see in the attached picture, the two holes in the TOP of the casing were the original screw mounts, disregard the cut outs on the side of the casing.
Safety Note: Your working with your extremely sharp Swiss Army knife so work fast and take lots of chances, you're not Colombo, you're MacGywer and don't you forget it!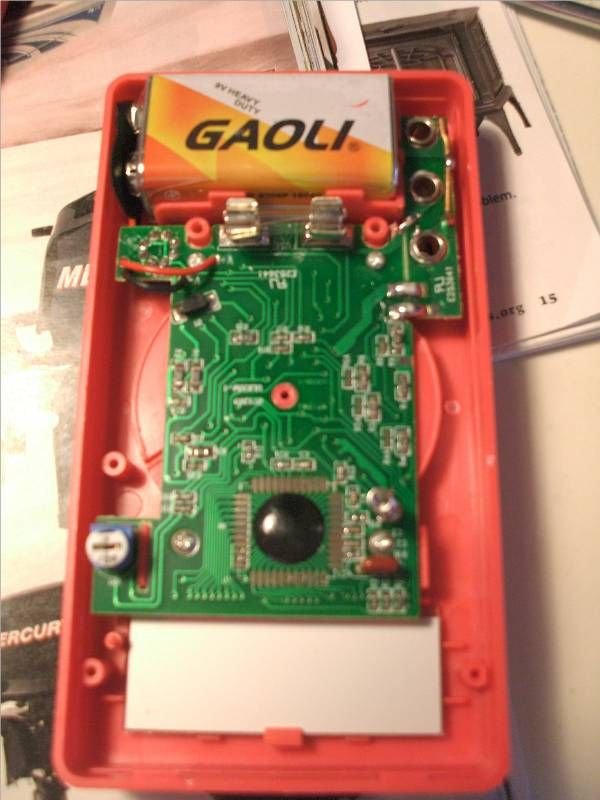
Step 3: Fitting the PI and etching out the access ports
Once you have the PI fitting snuggly in the case, its time to make access ports for the USB port, the S-Video Port, the Power input, The HDMI Ports, the Ethernet port, and finally the headphone jack.
1) Take your marking pen and lightly mark the USB Port on the bottom end of the casing. Cut this and then proceed to cut out the top portion. The better the USB port fits into the casing, the better your PI will hold and will line up with all the other parts so take case in cutting this one out.
NOTE: I found the easiest method to cutting out the USB Port was to make two small vertical cuts in the plastic to the desired depth, then gently work the plastic tab back and forth and it should sheer off nicely.
2) Once the USB port is cut out and fitting nicely with the PI, repeat the above process and cut out the HDMI, the Ethernet, the S-video, power outlet, and the headphone jack. Keep in mind the sizing of the cables for each when cutting these pieces out. Not everyone has the same power chord ect.
3) Now when I cut out the casing knobs and ridges just right, I found my PI fit so snuggly that I didn't need to secure it to the casing. If this is not the case with yours, a small screw in the mounting hole and through to the plastic should hold that PI in there nicely. Alternatively if you don't have a mounting hole, a square piece of Velcro on the bottom of the PI and bottom casing is a less permanent fix!
Step 4: Assembly
Finally, I slapped a big rubber band on her and attached a small 4.3″ LCD screen for effect! I tried a few other mounting techniques but I found that the simplest solution was the least permanent and worked the best!
Source: Raspberry Pi Hard Case