
Head mounted displays are definitely the latest fad that’s going around town now. You might have seen several wearable displays such as the google glass, and many others including virtual reality systems like the oculus rift. Head mounted displays are primarily used for video sharing, navigation, checking notifications, etc. However, several pioneers argue that the quintessential use for it have not yet been identified. But, if you ever wanted to build one for yourself from scratch, and are not willing to pay 1500$ just to experience its functionalities, then this DIY Head Mounted Display project is for you.
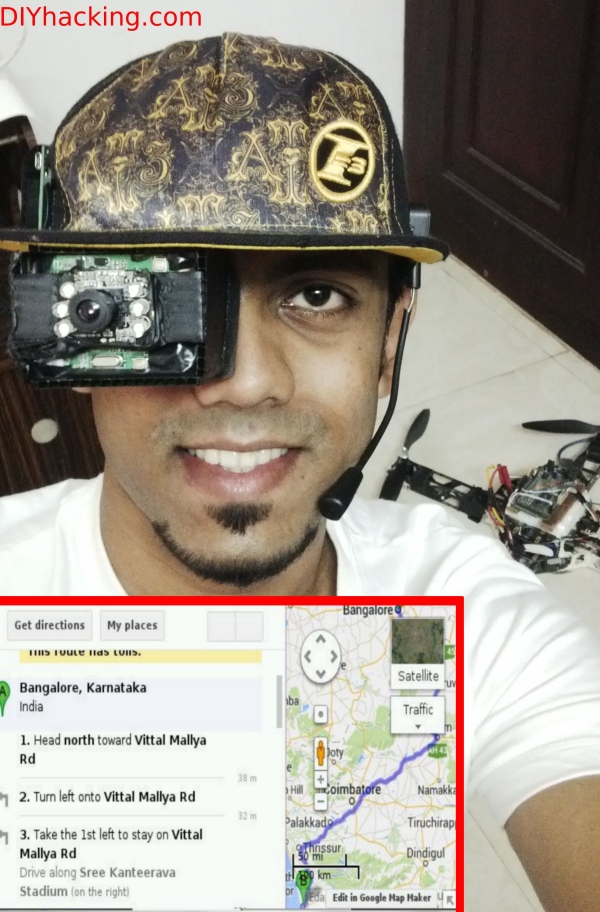
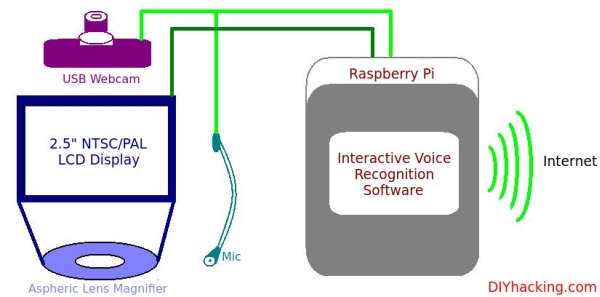
This DIY hacking tutorial will show you how you can make your own head mounted , virtual reality or augmented reality displays. I have built a “Smart Cap” , first of its kind , having a head mounted display on it. Here, I will instruct on how to build a monocular wearable display that runs on the raspberry pi as seen in the picture above. The system includes a webcam for video sharing and recording and also incorporates voice recognition for a hands free experience. Thus, you will be able to build an interactive voice recognition based wearable display at the end of this tutorial.
What are the stuff required to do this project?
Hardware:
- Raspberry Pi model B.
- A USB webcam with an inbuilt mic, I am using one from Iball.
- A 2.5″ NTSC/PAL LCD display (Since this display is not available in India, you can check this alternative: Raspi LCD)
- A headphone with mic.
- A loupe magnifier with aspheric lens.
- Sun board sheets or cardboard sheets.
- Fevicol SR glue or equivalent.
Software:
- Rasbi OS image with Voice Recognition Software.
How does it work?
Head mounted displays usually consists of a high resolution LCD or any other display screen within about 5-10 cm in front of your eyes. For virtual reality systems, usually one split display or two identical displays are used for each of your eyes for the stereoscopic effect. Here, I am only using one miniature LCD display in front of an eye , hence called a monocular head mounted display.
In this system , in order to cope with the “Least distance of distinct vision” , which is about 15-25 cm , I have used an aspheric loupe magnifier lens having 5X magnification. This makes it possible for me to see the screen impeccably at about 5-6 cm from my eye. The display is also completely enclosed and insulated from outside light. The next part of the system is a normal USB webcam which was cannibalized to take only the camera and the microphone. All the plastic enclosures of it was removed, and the wires were re soldered to get a niche position for the camera and microphone on the cap. Furthermore, I used a raspberry pi running a voice recognition software I engineered , to ensure hands free operation.
Here, the LCD display acts like any other PC display. However, when certain voice commands are executed in tandem with the system, appropriate results or data is displayed in front of your eye. A few of those examples are : email , maps for navigation, Google search, YouTube, webcam recording and first person viewing of other cameras, etc. The raspberry pi integrated with this head mounted display thus has to be connected to the internet for performing these functions.
Step 1: Preparing the head mounted display enclosure
It is necessary that the display needs to be cut off from all external light sources to ensure a sublime viewing experience. Here, I have used plastic sun board sheets, the kind of sheets normally used for vinyl advertising, for making the enclosure. Cut out a piece of the sheet of length 21 cm and width 6 cm. Mark cross sections vertically at 6 cm , 10.5 cm , 17 cm and 21 cm as shown. Next, take a cutting knife with the length of the blade adjusted to be just 3 mm. On the lines earlier marked, cut through half way of the board. This will ensure, that the board bends properly to form a rectangular enclosure for the display.
Now, hot glue the circuit board attached to the display to its back. This will make it a rigid one piece display as shown. Next, apply fevicol SR glue or any other synthetic rubber based adhesive to the edges of the display and stick it to the sun board sheet as shown. Bend and stick all the edges of the display and finally seal it, to make the enclosure.
Step 2: Attaching the lens for the head mounted display
The enclosure prepared , now has to be cut off in such a way that it fits snug with the contours of your face. Make outlines of your nose, your right eyebrow, etc using excess sun board sheets. Mark the outline obtained for the contours of your right eye on the prepared enclosure. Cut out all excess material on the four sides based on the outline. The ultimate aim being that the enclosure fits snug on your face.
Furthermore, take the aspheric lens and place it in front of the newly modified enclosure. View the display through the lens and wrap it using black insulation tape, such that only the LCD display could be viewed through it. The enclosure and the surroundings of the display shouldn’t be seen while viewed through the lens. This ensures a better visual experience for the head mounted display.
Stick the lens to the enclosure using the rubber adhesive as shown. Here, I have also spray painted the enclosure black, to prevent outside light from getting in.
Next, use some sponge or soft foam like material to stick on the front crevices of the plastic enclosure. This will make the head mounted display more comfortable while wearing it. Cut out the foam sections in the same shape as the four contours of the enclosure .Stick it to the edges using the rubber adhesive.
For more detail: Raspberry Pi – Head Mounted Display Tutorial