
There are not any examples that I could find that properly show how to get a simple DC motor working with RaspberryPI.
This is a simple tutorial for “How to make a motor turn.” Robots, wheels, conveyors, and all sorts of stuff can be made to move using simple Raspberry Code and really inexpensive RC-racer like motors. The parts for this can be purchased on eBay for about $10 (certainly under $20). This project assumes you have access to wires, old power supplies (scavenged from old electronic devices), and misc other items.
I would think this to be a fundamental must have in the journals of how-tos. After figuring it out from a confluence of different sources and some hacking. We have for you the simple steps for getting a standard DC motor to turn with a python code snippet on a raspberry pi.
Here's a youtube using an Arduino, not quite the same thing:
What is an “H-Bridge” and how does a DC motor change direction?
When you hook a dc motor up to {+} wire on one lead and {-} wire on the other lead, the motor turns a certain direction. When you switch the wires to other leads, the motor turns the other direction. But how do we “electronically” switch the electric polarity using circuits. ANSWER: H-Bridge.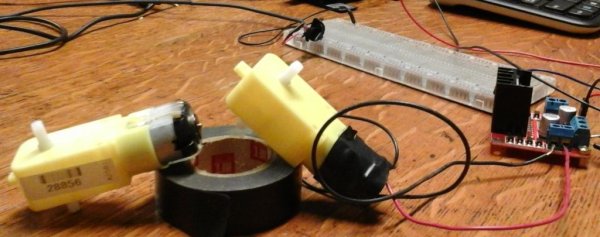
The circuits for H-Bridges are non-trivial for the beginner. The L298N module is a simple ready to rock and roll “dual” H-bridge circuit board. That means you have the ability to control TWO motors in either direction.
You need to get the module board for this.
Parts:
CONTROLLER:
5 PCS Dual H Bridge DC Stepper Motor Drive Controller Board Module Arduino L298N http://www.ebay.com/itm/231454411738
Double H bridge drive Chip: L298N Logical voltage: 5V Drive voltage: 5V-35V Logical current: 0mA-36mA Drive current: 2A(MAX single bridge) Storage temperature: -20 to +135 Max power: 25W
CHEAP DC MOTOR w/ GEAR BOX Car Gear Motor TT Motor Robot
http://www.ebay.com/itm/2pcs-Intelligent-Car-Gear…
100% brand new and high quality Operating voltage: 3V~12VDC (recommended operating voltage of about 6 to 8V) Maximum torque: 800gf cm min (3V) No-load speed: 1:48 (3V time) The load current: 70mA (250mA MAX) (3V) This motor with EMC, anti-interference ability. The microcontroller without interference. Size: 7×2.2×1.8cm(approx)
REFERENCE:
Another instruction on doing pretty much same thing!
Step 1: Extra DC power supply dedicated for motor
Note the sample image has two power supplies, one for the Raspberry PI (see elsewhere for details.)
The motor needs a DC power supply in the Voltage range of the motor. I used a left over 5V old power supply. Make sure the power supply has enough amperage or power to make the motor turn what ever you're looking to drive.
OLD POWER SUPPLIES (power chargers)
Do you have an old toy, used electronics, broken something around the house that isn't used anymore. These old chargers and DC power plugs are awesome, cause they are old or connector is ruined or damaged, you can still use them for hacking and building stuff. Learn to read about DC power, (See the picture of the old cell phone charger these are mostly 5V, as this one is and current drive is pretty low like only 400mA).
http://www.groovypost.com/howto/choose-right-power…
The sizing of the power supply is outside of this scope. In my case, we are just getting the motor to turn one direction or the other.
BATTERY PACK:
You can use the power from batteries to run your motors too. Purchase 6V DC batteries, (NOTE: batteries are already DC power) to drive your motors. (see picture sample above).
NEVER USE RASPBERRY PI built in power to DRIVE motors.
DC MOTOR SIZING:
The power to your motor needs to match. The motors we have are 6V DC hobby motors. If you're building something for real rather than just a quick learning tutorial like this one. Make sure you match you power drive to the motor requirements. Every motor needs different drive voltages. If you have less voltage than the motor needs then the motor will be under powered and may not turn what you want or might burn your power supply out, or worst start melting stuff. If your power supply is too high like for example you put 9 or 12 volts into a 6 volt motor, then the motor will turn really fast and hard. You see people hack their kids toy race cars with bigger batteries, the cars go fast and have a ton more power than the default design. These tricks always come at a costs for safety, reliability, and component breaking (melting, fires etc).
In our simple getting a motor to turn tutorial, a 5vDC old phone charger will suffice to drive a 6v motor, it's not optimum but it will work for a free spinning motor.
If the motor has torque or load in excessive the electrical power capabilities of the power supply the motor will likely stall. Go read about motor sizing, stalling, and hacking motors as your next learning adventure after this basic introduction.
Sample how to using chip instead of the controller:
Alternative reference how-to using the CHIPs on bread board instead of controller board.
Step 2: Connector wires for driving the direction on the motor.
The “GPIO” pins on the Raspberry PI will be used to “trigger” the l298n direction.
There are TWO pins per motor. One pin drives the power, {+} to one lead when the pin is activated.
If you have a PI2 or the newer B+ then there is a different pin layout for that. I did this one with the older base model B.
I like the pin outs that show the actual unit so you can rotate it to match the one on your desk next to your machine and get the correct pins. I'm always spatially screwing up, so I'll end up hooking up the wrong pins and on the raspberry pi, the two wrong pins together could cause the poor thing to burn out or atleast only crash and reboot (this has happened to me many times, so far lucky not the burn the PI up yet).
I'll talk more about the GPIO numbers versus the physical pin numbering nomenclature when we get to the code review. Suffice to say, if your code is not controlling the motors on/off directions, then likely you have the physical wires connected to the wrong pins or your code is referencing GPIO vs physical pin or visa-versa.
http://www.raspberrypi-spy.co.uk/2012/06/simple-guide-to-the-rpi-gpio-header-and-pins/
TROUBLESHOOTING TRICK
Check your physical pins with a volt meter or LED glow to make sure they are putting output when your code indicates the pin should be “HIGH” or energized.
Step 3: BREAD BOARD for simplifying wire connections.
I used a bread board to make the wire connections easier.
Trust me on this for your first time, get yourself a cheap bread board or just buy or find a friend with a full Maker Kit.
Even a cheap prototyping green or brown board are good for hacking wires together. Plus they boards hold them in place from moving around and possibly shorting out.
1> hook your Raspberry USB micro charger up to your standard PI input.
2> hook your 2nd power supply for your DC motor up to the + – on the bread board.
There's a few WHY and HOW to use electronic bread boards here on Instructables.
http://www.instructables.com/id/How-to-use-a-bread…
Link to instructable “breadboard” how -to use.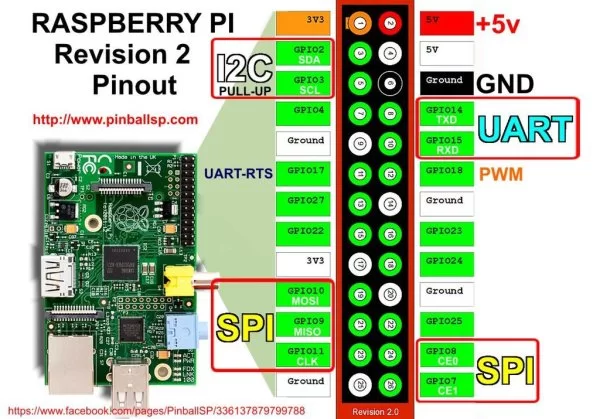
Step 4: Code Snippet Python sample make motor turn one way then other
Code snippets for python.
This page assume you have enough knowledge of python to know it's a programming language that's human readable and typed into a text file. Some experience with copy and paste will be required. Read the error messages and happy hacking your python motor codes.
GPIO vs Physical Pin Nomenclature:
There are virtual “GPIO” names for certain pins that are digital output pins, these overlay on top of or in lieu of the actual PIN numbering from the board layout. When writing your code you'll need to indicate which one of the pin numbering systems that you're using. The board pin number or the GPIO.
<p>GPIO.setmode(GPIO.BOARD)</p>
For more detail: Raspberry PI L298N Dual H Bridge DC Motor