
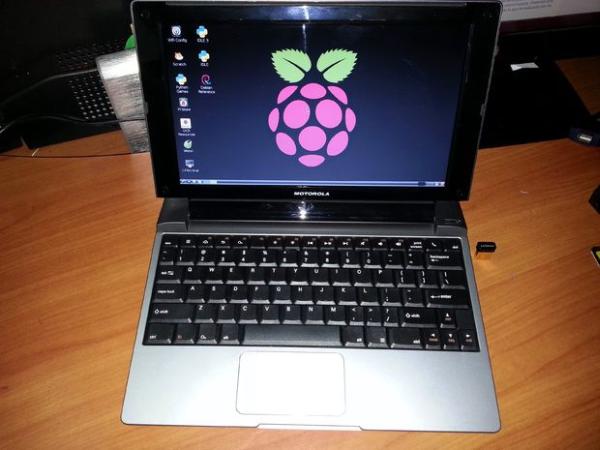
Step 1: Buying MOTOROLA DROID RAZR Lapdock 100
Some years ago I saw this gadget which I found very interesting although a bit extravagant. It is a device that was developed by Motorola, in order to “convert” a cell (specifically the Motorola Droid Razr) in a laptop. This device called Lapdock, is no more than a 10 “display with keyboard, battery and two USB ports. From backside lapdock there is a cable that terminates in a micro USB port and a micro hdmi, intended to connect the cell to the lapdock. Initially Motorola was selling roughly about $ 500.00 (not counting the cost of the phone) but it was not very well and ended up selling it much cheaper. Currently is available in Amazon about $ 110.00 in NEW condition. I bought one used at Amazon in “LIKE NEW” condition at US$ 45.00 plus shipping.
With state LIKE NEW from Amazon, the lapdock, came with his box in excellent condition with charger and user manual. The lapdock even had his M Sticker on the Motorola Lapdock.
Step 2: Buy cables to connect to RBPI Lapdock
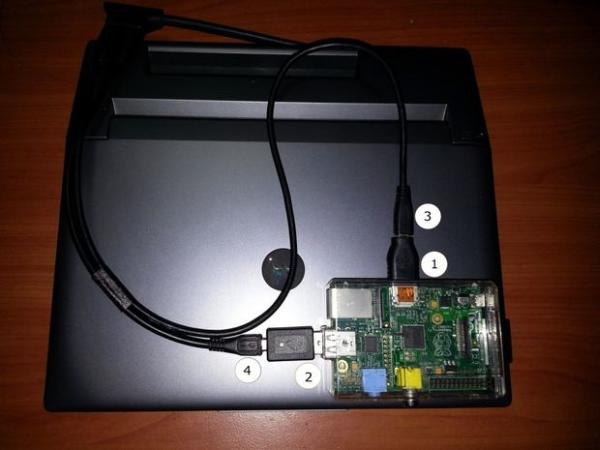
This was what gave me more headaches. The blog in which I based to make the connection suggested some cables for which Amazon had no stock. Ok I did my own analysis on how to connect everything to plug perfectly. I made a diagram to better understand the connection. I placed the order for the lapdock + cables + connectors, and after a month I received everything but my calculation failed. I did not take into consideration how close was the hdmi and USB connectors of the lapdock. If connecting one of the two, the other could not be connected. I left the idea of the lapdock for a month … Then resume the idea but this time with other cables, and finally with a configuration that did work for me. The cables and connectors configuration is:
 Connectors: Bought (both) on amazon for an amount of U.S. $ 11.90:
1) Micro HDMI Female to HDMI Male Converter Adapter
2) USB A Male to Micro USB Female Adapter (Black)
Cables: Bought in dx.com amounting to U.S. $ 9.70 (These were purchased from a Chinese shop, so shipping was a little slow):
3) Male D Type Micro HDMI to Female Micro HDMI Cable for Motorola Cell Phones
4) Micro USB Male to Female Extension Data Cable – Black