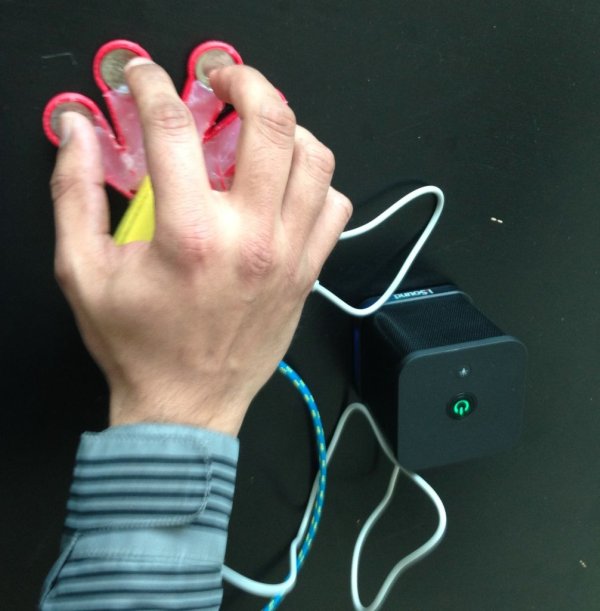
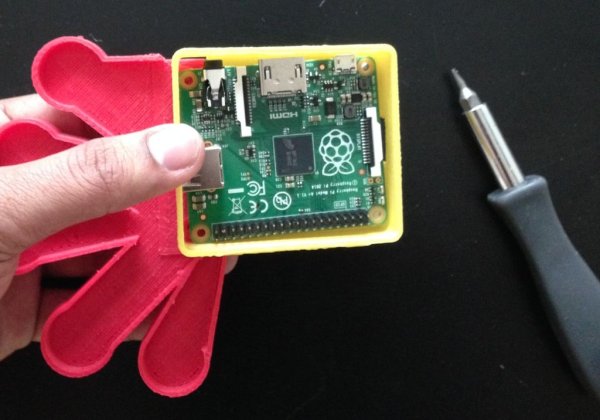
Creating music is always fun, but making it with your own DIY musical instrument is much better !!
Whether you are a professional musician looking for that next new instrument to try or an amateur enthusiast who has basic knowledge of electronics, use the Raspberry Pi to create your own DIY Music fingers.
So now set aside about half a day to complete the build of the new instrument shown in the pictures above.Start by 3D printing the STL files attached in steps 2 and 3.
And use hot glue to secure the wires and coins to the Adafruit Capacitive Touch HAT for Raspberry Pi.The Capacitive Touch HAT senses when your finger touches the coin which in this case are dimes, which then sends a signal to the Raspberry Pi python program, that trigger a wave file via the Portable speakers.
Step 1: Things you'll need
Gather all the Components you'll need
Adafruit Capacitive Touch HAT for Raspberry Pi – Mini Kit – MPR121
SD card
Portable Speaker or you can use you any speaker with an Audio Jack at home.
Screws
3D printing Filament
Hot glue sticks
5 Coins – dime's are an ideal size
Bread boarding
Tools you'll need
3D printer
Hot glue gun
Soldering Iron
Screw driver
USB stick
Wi-Fi dongle
Monitor+HDMI cable and wireless keyboard if you are not running Pi headless.
Step 2: 3D print the hand
Download the 3D printing software that your printer supports, in my case I am using the Printrbot Simple Metal which use Repetier-Host as a software to
- Slice the STL files attached,which basically means cutting the part into various layers
- And send commands to the 3D printer while printing
In my case I am using the Makerbot True Red PLA.
Download the STL files attached for the PiHand_v2.stl
- slicing should take about a 45-50 seconds
- and printing should take about 35- 40 mins base on your printer settings.
Step 3: 3D print the Raspberry Pi A+ case and Lid
Download the STL files attached
For the PiBasev2.stl
- slicing should take about 5-7 mins
- and printing should take about 1Hour 5mins to 1Hour 10 mins base on your printer settings
And for PiLid_CapTouchHatV2.stl
- slicing should take about a 4-5 mins
- and printing should take about 30- 35 mins.
Step 4: Preapre SD card for the Raspberry Pi
If you have just bought a Raspberry Pi, download Raspbian which is operating system for the Raspberry Pi from the link
https://www.raspberrypi.org/downloads/
Follow the installation link to prepare your SD card from the img you just downloaded https://www.raspberrypi.org/documentation/install…
Insert the SD card in the slot of the Pi and boot the Pi up, follow a couple of tutorial to get familiar with the Pi, follow the links below
https://www.raspberrypi.org/resources/learn/
Step 5: Enableing I2C on the PI
Now for the Adafruit Capacitive Touch HAT to talk to the Raspberry Pi , you will have to enable I2C on your Raspberry PI.
In you Terminal window on the Pi type in the following command
pi@raspberrypi ~ $ sudo raspi-config
Then follow the prompts as shown in the screen shot above
Once done Reboot Pi for the changes to take effect.
pi@raspberrypi ~ $sudo reboot
Now to install python-smbus and to run the commands below you will have have the Pi connected to the Internet , basically run the Pi headless using a Wi-Fi dongle.
Or if you have another Raspberry Pi B,B+or 2 that is already connected to the Modem/router via a LAN cable, pop the SD card and run the commands below.
pi@raspberrypi ~ $sudo apt-get install python-smbus
type Y to accept the changes
pi@raspberrypi ~ $sudo apt-get install i2c-tools
For more details, refer to the following link
Step 6: Download the code attached
Now to get the Zip file attached on to the Pi.Download the Zip file if you are running your Pi headless , or if you have got another Pi,you can take a short cut by using an USB drive to download it from your Laptop to the USB.
Connect the USB drive to the Raspberry Pi as shown in the picture above and copy the folder into the folder from /media/USB DISK to /home/pi/
Note: If you are running you Pi headless you can use a tool like FileZilla or WinSCP to upload the folder to the Raspberry Pi using the SFTP protocol
The code is based on the famous beetbox project..
Step 7: Setting up the Pi to output via the Audio Jack
By default the Pi output audio via the HDMI cable, to change it to output sound via the Audio jack run the following commands
pi@raspberrypi ~ $amixer -c 0 cset numid=3 1
In addition, run the command shown in the picture above to test to see if you are able to hear the sound via the speaker.
Step 8: Adding the Pi hat and running a quick test
Connect the Pi onto the GPIO header of the Raspberry Pi as shown in the picture above.
Connect the Pi to Monitor,Portable speakers and using a wireless keyboard , type in the following command and test the Capacitive touch Pi Hat as shown in the Video above
pi@raspberrypi ~$cd PiHand
pi@raspberrypi ~/PiHand $sudo python PiHandDrums.py
For more detail: Raspberry Pi Music Fingers


