
Refrigeration and air conditioning devices consume ~25% of all electricity generated on our planet! From small business owners to franchised restaurant chains to medical facilities the initial, operating, and maintenance costs of refrigeration and air conditioning units can be quite staggering.
The biggest factors contributing to power consumption are:
- Temperature difference between ambient and cooled area (the case).
- Machine “health” of refrigeration system.
- Door activity.
- Easy access to and visualization of data by different stakeholders (if you can’t see it, it’s not a problem).
To learn more about how these variables impact power consumption, Zymbit's Evan Fairchild set about building a low cost device for monitoring temperatures and door activity, computing the health of the refrigeration system, and presenting the data in an easy to understand format that could be quickly analyzed and shared with others.
Step 1: Major components
(Note: This is NOT the complete BOM.)
- 1x Raspberry Pi B+ (A, A+ also work)
- 1x Custom circuit board
- 2x LED 8×8 matrix display (Adafruit)
- 1x HT16K33 breakout board (Adafruit)
- 3x OLED 64×48 breakout micro displays (SparkFun)
- 1x CAP188 Capacitive Touch Driver (Adafruit)
- 6x NeoPixel breakout boards (Adafruit)
- 4x DS18B20 temperature probes (Adafruit)
Step 2: Prototype hardware
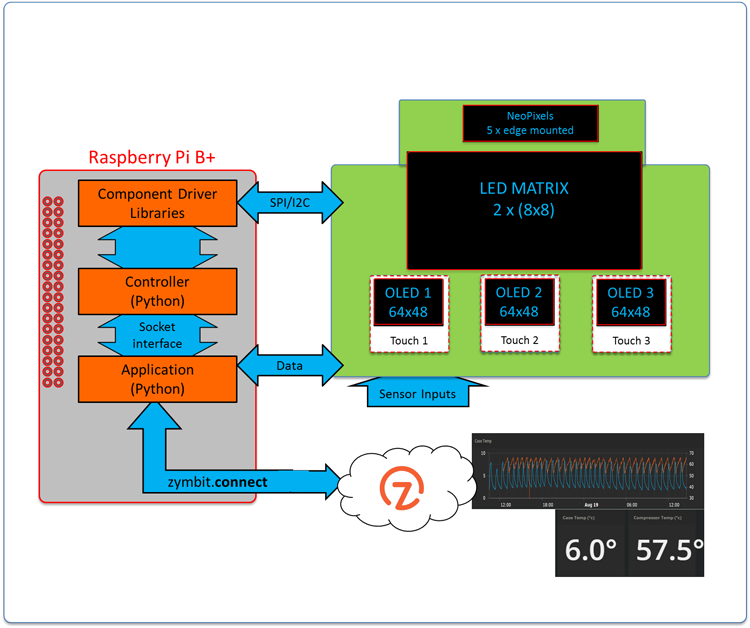
Evan designed a simple two layer “motherboard” to integrate all the sensor inputs, three different display types and a basic capacitive touch engine to make “interactive” OLED displays. With the addition of an RPi compatible header the whole assembly snapped onto a Raspberry Pi, no wires required. (So basically, he built a large “Pi plate” of sorts). The processing and communication horsepower is delivered using a Raspberry Pi B running the Raspbian operating system. Evan chose the Raspberry Pi (RPi) because it’s a powerful and affordable quad core computer with huge community support.
All display components are easily programmed with custom Adafruit and Zymbit python libraries.
For temperature, Evan used the readily available DS18B20 temperature probes which were connected to a oneWire (digital) bus routed to the screw terminal at the bottom left of the PCB. Simply screw in as many temperature-probes you like and that is it! There are also pinouts for the I2C bus and SPi bus with up to 5 additional slave lines routed to the left side of the PCB. These leave the board open to virtually any additional sensors.
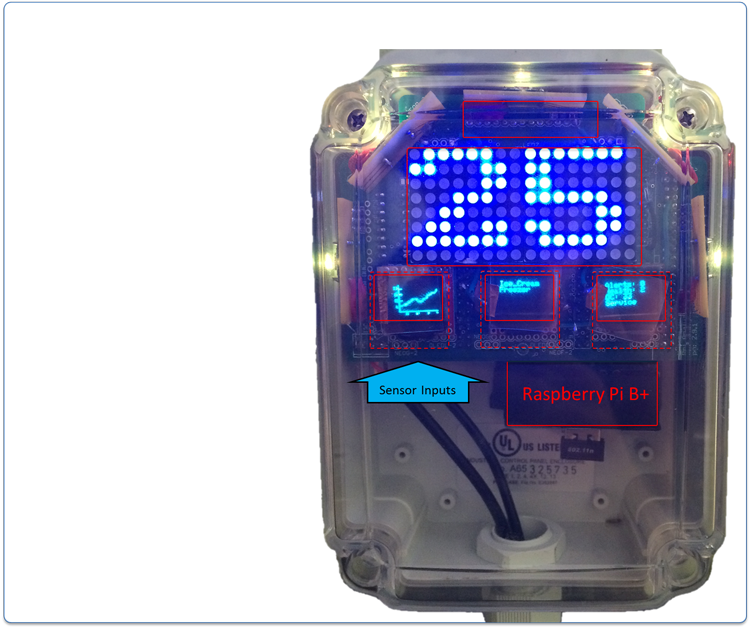
Step 3: Proof of concept — Built for convenience, not elegance

When building the motherboard, Evan needed it to be a quick process so he used standard ‘maker’ parts available from Adafruit and Sparkfun. Several of these came on mini PCBs of their own, making hand assembly and customization easy. Welcome to DIY IoT!
For a more finished product, which is cost optimized, the obvious next step would be to re-design the PCB to accept all chips directly and then machine assemble. But this is a proof of concept, and maker parts work great.
Step 4: Sensors and physical world stuff

The refrigeration thermodynamic process is remarkably quite simple with only three primary components of interest for monitoring: compressor, condenser and evaporator. The figure below shows the refrigeration thermodynamic cycle and vapor dome, temperature-entropy relationship.
For the above process to work efficiently, there must be proper airflow for energy to exit the system through the condenser. Dirty or clogged condensers are a common problem and service matter for refrigeration and freezer units. Monitoring temperature here will help maintain thermal efficiency. This is best accomplished by placing DS18B20 temperature probes before and after the condenser. One placed at the compressor-out stage and the other at the evaporator-in/expansion valve-in stage. If you are building this yourself take time to understand where components on your refrigerator or freezer are located. Evaporators usually run vertically along the back of the case. Condensers can run parallel to the evaporator (that’s how mine is built) on the outside of the case or along the underside of the unit.
Temperature data is collected from four locations:
- Tcase – temperature “case” (space being cooled).
- Tamb – temperature of ambient air.
- Tcin – temperature of condenser input.
- Tcout – temperature of condenser output.
Each data channel is immediately reduced to event-specific publishing constraints. For this prototype, Evan generated and event for a change of 1° in temperature, within any sensor.
Step 5: Software Basics and Setup
All code and detailed instructions can be found in the Zymbit community RPi Refrigeration Analyzer. Here, he summarize the basic steps needed to deliver a continuous stream of data via JSON, and some automatically created dashboards. Check out these links below to code and instructions.
Step 6: Visualizing Real-time Data With Dashboards
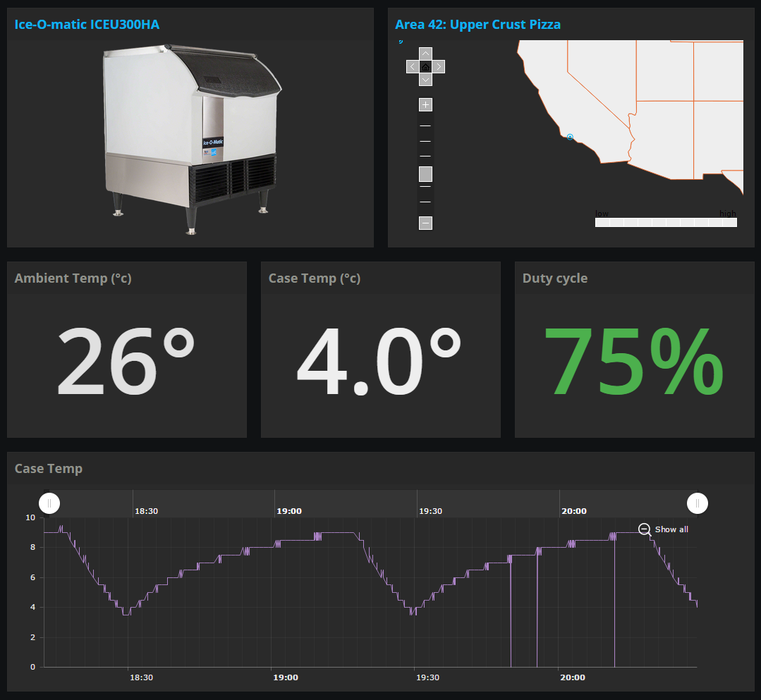
To make things really simple, the Zymbit console displays the real-time data with chart or dial widgets which can viewed on your profile’s dashboard and/or embedded elsewhere. The Zymbit dashboard is very easy to customize and it generates an iframe for embedding into HTML pages.
Calculating a “machine health indicator”
A first-order “machine health indicator” for the entire refrigeration system can be derived from the compressor duty cycle. First an initial ‘baseline’ is set, with known conditions of ambient temperate and case set point temperature. A simple model built in Python predicts what the optimal duty cycle should be based upon current ambient and case temperatures. If there is a pre-defined deviation between predicted and actual, then alerts can be triggered and servicing scheduled.
Behold! Preventative maintenance in its simplest form! Less failed units, less money spent, more energy saved.
Utilizing real-time data analysis like this means that servicing can be streamlined and scheduled when the refrigeration system calls for it. Also, making the real-time refrigeration data accessible and easy to understand expedites the service and repair process.
Taking the model further
This is only a first-order model that communicates the overall health of refrigeration system – essentially a symptomatic indicator of machine health. With additional sensors, such as pressure and electrical current, and more sophisticated software modeling, it should be possible to diagnose the likely root cause of the displayed symptoms: compressor failing, low refrigerant levels, or simply the air filters need cleaning. That’s a future project for someone.
Step 7: Designing a User Interface

The basic goal of the user interface was to make data easily understandable by different stakeholders. Evan also wanted to use components that were readily available for makers and easily programmed with pre-existing code libraries. Here’s what he came up with!
- Large matrix display, indicating temperature, visible from a distance.
- Peripheral display, indicating overall health, visible from a distance.
- Detailed OLED displays that show context specific data.
- Basic touch integrated with OLED displays.
Evan used the Zymbit messenger service to control the three different displays locally.