Introduction
Hello everyone, and welcome to this tutorial on how to create your own retro-gaming machine using Raspberry pi. This tutorial will teach you how to install RetroPie on a Raspberry Pi. I want to state I will focus on the Raspberry Pi 3 Model B. Before we get started, I want to first provide definitions for a few technical terms you will see throughout the Instructable.
Raspberry Pi : is a credit card-sized, ARM-based, single-board nano computer designed by professors in the Department of Computer Science
RetroPie: Software that builds upon various projects to enable you to play your favorite arcade, home-console, and classic PC games with very little set-up.
Emulator: Software that enables a computer system to behave like another. In our case, enabling a Raspberry Pi to behave like several different video game consoles.
ROMs: Digital versions of game cartridges.
After reading over and understanding these terms, let's get started by learning what materials you will need to begin building your retro-gaming machine.
Supplies
Material Needed
Main HardwareTo begin building our retro-gaming machine, we must first purchase some hardware
You will need:
· Raspberry Pi 3 Model B+
· Raspberry Pi Case²
· HDMI Cable
· Charger C type
· 16GB SD Card (*)
· Screen
· Mouse
· Keyboard
· BreadBoard
· Buttons (10)
· Jumper wires
Main Software
To begin building our retro-gaming machine, we must first purchase some hardware
You will need:
· Download the latest version of RetroPie from here: https://retropie.org.uk/download/
· You will need the balenaEtcher to burn the image file to your micro-SD card. Link to download: https://www.balena.io/etcher/
· If you don't know how to do it, follow the steps at “Write the OS image on SD card”: https://www.youtube.com/watch?v=2QcC2GmV9Ew
· You will also need some games roms – RetroPie doesn't include any of them – so just search your game titles in Google.
Step 1: ABOUT RETROPIE

What is RetroPie?
RetroPie allows you to turn your Raspberry Pi or PC into a retro-gaming machine. It builds upon Raspbian, EmulationStation, RetroArch and many other projects to enable you to play your favorite Arcade, home-console, and classic PC games with the minimum set-up. For power users it also provides a large variety of configuration tools to customize the system as you want. RetroPie sits on top of a full OS, you can install it on an existing Raspbian, or start with the RetroPie SD image and add additional software later. It's up to you.
What is an Emulator?
An emulator is software that makes a computer behave like another computer, or in the case of RetroPie a computer that behaves like a video game console such as the Super Nintendo. The RetroPie SD image comes pre-installed with many different emulators. Additional emulators may be installed from within RetroPie.
What are ROMS?
ROMs are digital versions of game cartridges. Loading up a ROM in an emulator is the equivalent of putting a cartridge in a game console. ROMs are copyrighted content and as such are not included with RetroPie.
Some Useful Links
Official Website: https://retropie.org.uk/
Documentation: https://retropie.org.uk/docs/
Forum: https://retropie.org.uk/forum/
Donate: https://retropie.org.uk/donate/
Step 2: Download the RetroPie SD Image
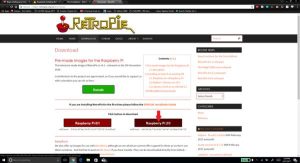
The next step in the project involves downloading the RetroPie SD image. To do this, follow these steps:
Go to https://retropie.org.uk/download/
If you look at the picture I have provided, you can see a red arrow pointing to a box with the text “Raspberry Pi 2/3.” Click the box to begin downloading the SD image.
Once the SD image has finished downloading, you may proceed to the next step.
Step 3: Put RetroPie SD Image in the SD Card
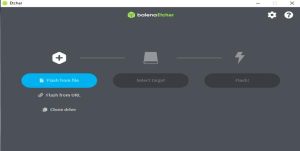
Flash the File into the SD Card
Extract the downloaded file, put it into the balanceEtcher choose Your SD Card and click flash.
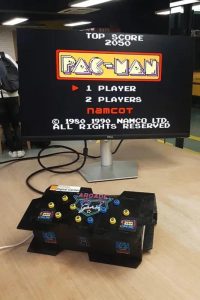
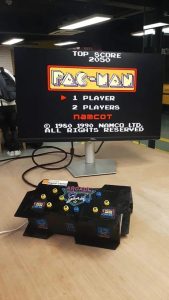
Step 4: Install Games Into ROMS
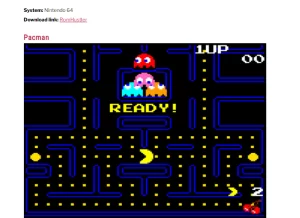
Install games into ROMS
Download the games linked below:
https://raspberrytips.com/best-retropie-games/
Put the installed games into ROMS in your RetroPie Setup
In the example above I chooses to download the Pacman Game
Step 5: WIRING
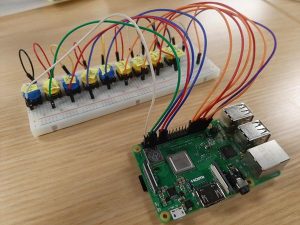
First, we need to work out is how to connect the buttons to the Raspberry Pi.
You only need to connect one of the button’s pins to the Raspberry Pi (GPIO PIN) and the other to 0V (Ground PIN)
Mapping The Buttons
Now that we know how to connect the buttons, we need to work on connecting each button to the right GPIO pins.
The full set of buttons we need is:
up, down, left, right, A, B, X, Y, Start, Select.
This gives us a total of 10 buttons inputs to connect to our GPIO header.
I’ll be wiring up my controller as shown above.
For testing purposes, I made the connections on a breadboard.
Step 6: BUTTONS CONFIGURATION
Configure Buttons
Into the RetroPie Setup: Fn + F4
Into the command Terminal: to activate GPIOS
· cd ~
· git clone http://github.com/mholgatem/GPIOnext.git
· ls
· bash GPIOnext/install.sh
Into the command Terminal: to configure GPIOS
· GPIOnext config
After choosing the buttons we’ll go right in to test’em.Into the command Terminal:
· GPIOnext start
· sudo reboot now
And we’re Done
Step 7: Modelisation
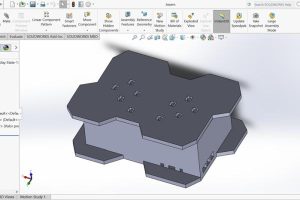
3D Design for 3D Printing
Software is important. Your choice of software affects your design process. For this article, I'll use SolidWorks.
SolidWorks is very powerful CAD software with many tools for 3D modeling, simulation, assembly, and manufacturing solutions.
2D Design for 2D Printing
I designed several iterations of the joypad using SketchUp, a free and easy-to-learn tool for 2D, 3D modelling. I already had a basic shape and style in my head, but the modelling process helped me figure out the angles and dimensions that worked best aesthetically.
Prepare files for the Laser Cutting Machine
Before sending the File Box in to the Laser Cutter, we need to Export at first the SketchUp drawing to a DXF File.
I’ll use RDWorksV8 Software to send Files to the Laser Cutting Machine