
Step 1: Name change to protect the innocent.
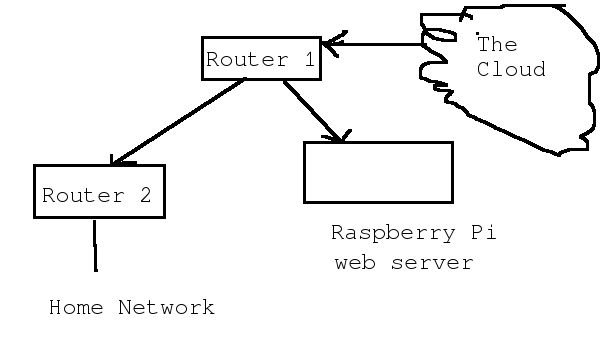
You will want to change the name of your Raspberry Pi or you might get another server from the web. Also I am sure you have already set up your router to set the raspberry pi address. See your router manual on how to do that.
$ sudo hostname
Add oeraspberrypi to the list.
Use ifconfig to get your ipaddress of the RPi
$ ifconfig
eth0 Link encap:Ethernet HWaddr xx:xx:xx:xx:xx:xx
inet addr:192.169.1.41 Bcast:192.168.1.255 Mask:255.255.255.0 < < < < <
UP BROADCAST RUNNING MULTICAST MTU:1500 Metric:1
RX packets:60188 errors:0 dropped:0 overruns:0 frame:0
TX packets:32615 errors:0 dropped:0 overruns:0 carrier:0
collisions:0 txqueuelen:1000
RX bytes:80088549 (76.3 MiB) TX bytes:3105057 (2.9 MiB)
lo Link encap:Local Loopback
inet addr:127.0.0.1 Mask:255.0.0.0
UP LOOPBACK RUNNING MTU:16436 Metric:1
RX packets:32 errors:0 dropped:0 overruns:0 frame:0
TX packets:32 errors:0 dropped:0 overruns:0 carrier:0
collisions:0 txqueuelen:0
RX bytes:2540 (2.4 KiB) TX bytes:2540 (2.4 KiB)
Then you will need to edit your host file to reflect that address.
Step 2: Web server software setup.
There are two basic programs we want to install. Apache2 the web server and PHP a programming language for use with the server.
$ sudo apt-get install apache2 php5 libapache2-mod-php5 php5-cli
That will take a little while to install. Be patient.
Then you need to do a fix for the server.
$ sudo nano /etc/apache2/conf.d/name
For example set add ServerName localhost or any other name:
ServerName localhost
or you could use
Servername yourservername
Save the file and restart Apache 2
$ sudo service apache2 restart
Test the server:
Point a browser to the RPi You should get the setup page.
Now we need to test the PHP install..
$ cd /var/www
You should already see index.html with the code that shows you the home page.
Now we need to create a new page
$ sudo nano phpinfo.php
<see picture>
Save and exit. Now point your browser to yourhostname/phpinfo.php
You should get the PHP status page.
Now you should be ready to roll.
Note: you may need to edit /etc/apache2/apache2.conf and add:
# add php useage
AddHandler application/x-httpd-php .html
Step 3: Get the software.
You need to go to: http://sourceforge.net/projects/flatpress/files/flatpress/ and download the latest version to your pc
Then you need to get the software to your Rpi. For MSWwindows you can use WinSCP, not a MSWindows user so you will have to look at it's instructions.
On linux Send the file to your pi home directory
$ cd downloads
$ scp flatpress-1.0-solenne.tar.bz2 oerapberrypi:~/.
or scp flatpress-1.0-solenne.tar.bz2 pi@oerapberrypi:~/.
Log into the Raspberry pi Go to your home directory to make sure the file is there: (ssh@rpiservername)
$ ssh pi@oeraspeberrypi
$ ls
Desktop flatpress-1.0-solenne.tar.bz2 helloworld.py hw hw.c python_games
$
For more detail: Raspberry Pi simple blog server.