
The Raspberry Pi Smart Target was designed to be hit by the now famous Flying Monkey, but It can be hit by any other light object such as small ball. When the Target is hit the following events happen:
- A random sound effect is played through a small set of speakers connected to the Raspberry Pi.
- A “congratulations” message is displayed in the front LCD screen.
- The Raspberry Pi grabs a snapshot from a network camera (Dropcam) and is posted to a social network.
- A random message is posted along with the picture taken by the Dropcam.
- The whole action is immortalized in the interwebz.
I built the target to showcase the Oracle Social Network Public API, which is a RESTful based API. I used the Target during the Oracle Open World 2012 conference. It was setup at the Oracle Technology Network Lounge, so people stopped by throughout the day and gave the Target a shot (pun intended). If someone hit the Target they also got to keep the monkey as a keepsake.
Since the Oracle Social Network is not released at this point I posted a modified version posting to Twitter.
Step 1: Materials
These are the basic materials I used to build the Smart Target:
- Raspberry Pi (Model B) / Wireless USB dongle / SD Card
- Adafruit Pi Box
- Adafruit Prototyping Pi Plate Kit
- 2 10K Resistors
- 1 Push button
- Wifi USB dongle
- Select Pine Lumber
- Switch with roller
- Driveway reflectors
- 10” Cake Board
- Springs
- Door hinges
- ioBridge LCD 2×16 screen
- Plexiglass
- Red Paint
- Dropcam
- Speakers
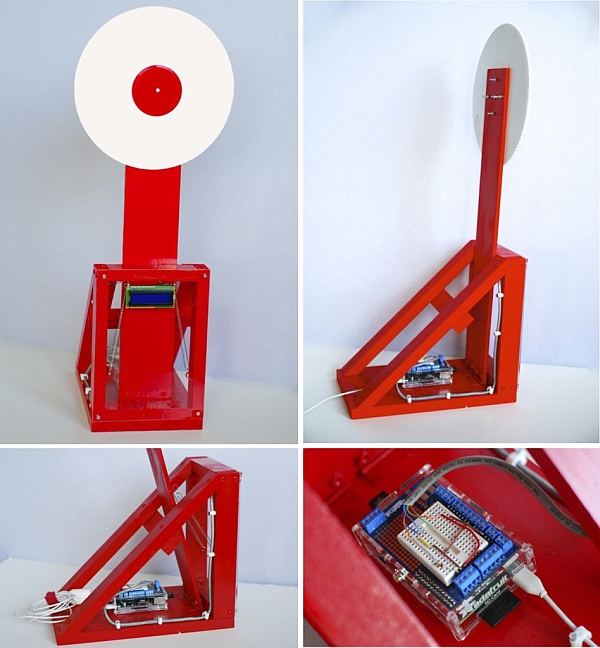
Step 2: Build
The Target base is 12in long, 7in wide and 10 in tall. The Target arm is 24 in. Overall with the Target with circle installed it stands at 2 ft 1/2.
Once all the pieces were cut, I assembled them and used two springs to keep the arm always at a 90 degree position. This forced the switch with a roller to be NC (normally closed) by the pressure the arm against it. The switch is installed on the front top left area (check picture #2 for a better visual).
Once assembled I used the red spray paint to give it a nice finish. Also I mounted the Cake holder using four machine screws and used the red driveway reflector in the middle.
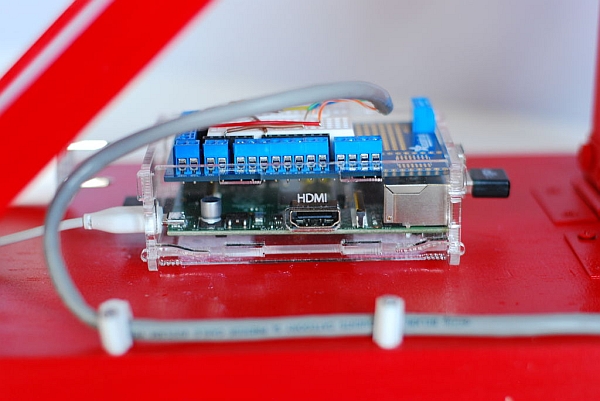
Step 3: Connect
The Target is using 2 GPIO ports. One for the switch with a roller, and another for shutdown button.
The switch terminal NC (normally closed) is connected to GPIO port 123 using a 10k resistor in between. The switch “COMMON” pin is connected directly to the Raspberry PI. The shutdown button is connected the same way. The LCD screen is simple connected to the Raspberry Pi TX pin and is using 5v and ground.
- Switch with roller
- Raspberry Pi GPIO17 pin –> 10k Resistor –> NC terminal
- Raspberry Pi Ground –> Switch Common
- Shutdown switch
- Raspberry Pi GPIO23 pin –> 10k Resistor –> Push button
- Raspberry Pi Ground –> Push button
- ioBridge LCD Screen
- Raspberry Pi TX –> LCD Data
- Raspberry Pi 5v –> LCD 5v pin
- Raspberry Pi ground –> LCD ground
Speakers are connected to the Raspberry Pi audio out mini plug.
For more detail: Raspberry Pi Smart Targe