
Story
The message passing interface standard has long since been a way to perform parallel computing within a cluster of machines. I was interested in doing this project because A) I wanted to learn MPI and B) I was curious about the possibilities of what I can do with a cluster of Raspberry Pis. If you want to learn more about MPI in detail, check out https://computing.llnl.gov/tutorials/mpi/. I've decided to use the python implementation of MPI (http://mpi4py.scipy.org/) for the demo below.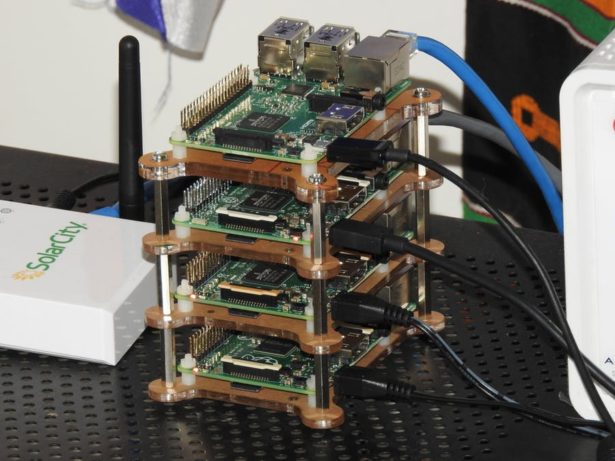
This project will be a circuit of 3 LEDs. Each LED will represent a node (in this case a Raspberry Pi) which will light up when they send signals to the master node. The master node will stay lit to indicate that it's the primary controller sending commands to the other nodes. The circuit will be connected to the master node. The Pis that make up my cluster are shown in the project profile pic.
Here are the steps to get everything up and running:
1. Setting up SSH
You will need to set up password-less communication between all of your nodes. On each node:
- Run the command “ssh-keygen -t rsa”. When it prompts you to enter a passphrase, press enter twice to leave a blank entry. Once finished, your RSA public key will be created in your .ssh directory.
- This public key file will need to be placed on the other nodes. You can accomplish this by running the “ssh-copy-id <IP or MachineName>” command which will automatically place the public key into the destination node's .ssh folder. It will prompt you for the password of the machine that your going to but that will be the only time you need to do that.
- Try connecting via SSH to another node. You should be able to connect to that machine without any prompts for a password.
2. Install MPI4PY on all nodes within the cluster.
MPI4PY needs to be installed on all of the nodes. I've attached an installation script to this project that will download any dependencies you need and install the latest copy of MPI4PY for your convenience. Once installed, you will also need to create a “machinefile”. The only contents in this file are the IP addresses to each node within the cluster. I've attached an example below.
3. Build the circuit
The circuit will consist of the LEDs, Resistors, etc. all connected to the master node of the cluster. The schematic below illustrates the setup.
4. Write the code.
The ledDemo.py will be ran from the master node. The code is listed below.
5. Deploy the code.
Once you're finished coding, you need to make sure that your program is placed in the exact location on each of the other nodes as it is for your master node. Otherwise, MPI will throw file not found errors when you attempt to run it.
6. EXECUTE!
From the master node, run the following command as root (since you are accessing the GPIO pins):
sudo mpirun.openmpi -np 3 -machinefile <location of machinefile> python ledDemo.py
Here's a breakdown of what this command means:
“mpirun.openmpi” is the primary executable to get all the communication started in the cluster.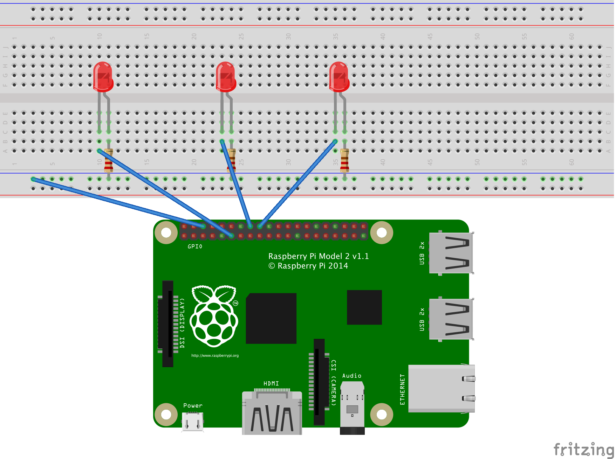
“np” is the number of processes or number of nodes in your cluster.
“machinefile” corresponds to the location of your machinefile storing your cluster IPs.
“python” is of course what you need to run the python implementation of your code.
For more detail: Raspberry Pi Supercomputer with MPI