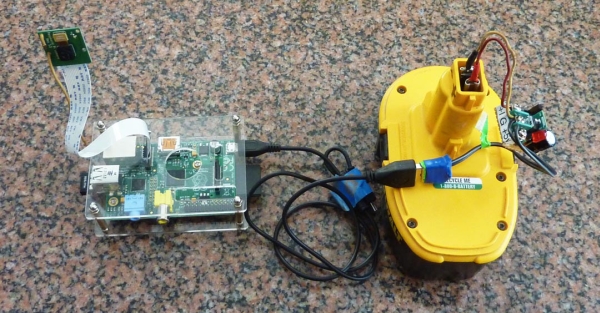
The versatile system-on-a-chip Raspberry Pi board seems to have something for everyone: plenty of ports for display, sound, and USB peripherals; a pin header for relaying inputs and outputs from the physical world; and space for a dedicated camera module, which makes it great platform for all sorts of video experiments.
Still, there’s one thing the Raspberry Pi doesn’t come with: a good battery power supply. Powering the board from a wall wart is fine when there’s AC power handy — but a long-lasting and reliable battery source is essential to getting the Pi away from the desk and out in the world, where it belongs. You can buy compact Pi battery packs, like the Smart Power Base (Maker Shed #MKMTS01 at makershed.com), but I decided to build a big one — and in this project I’ll show you how you can too.

Trial and Error
To use these powerful batteries, you need to bring their 18 volts (or so) down to exactly 5 volts, which the Pi requires. There are several ways to do it, and I tried a few of them. First off, I made a circuit with an a 7805 linear voltage regulator I happened to have in my drawer. This IC is familiar, cheap and simple; it also fails at the task miserably, because it isn’t very efficient at voltage conversion. Mine heated up like a hot plate within minutes, letting off a smell like burning French fries and crashing the Pi (which, fortunately, was not damaged).
I also tried using a car-power charger for an iPod. The gadget I had, which sits in what used to be called a cigarette lighter socket, was rated for up to 24 volts input, and promised to deliver 1,000 milliamps at a 5-volt output: just what the Pi ordered! But alas, it didn’t work: The Pi crashed or lost contact with the server after it had run the camera for just a short time. I suspect that the charger didn’t deliver the power it was rated for, and the Pi, with the camera and the wireless dongle, simply overwhelmed it. It was time to find a better way to get power from my battery — and here’s how I did it.
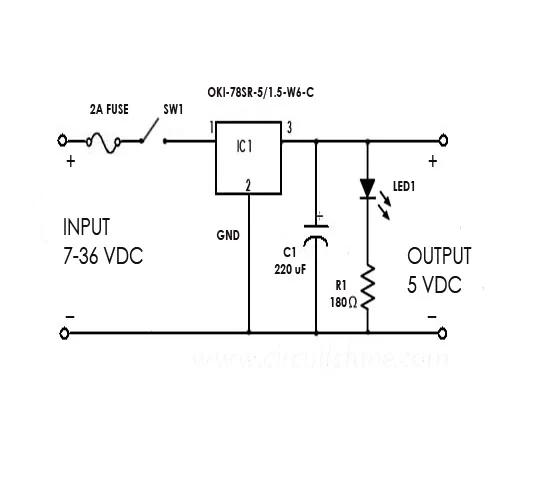
- After checking forums and doing a web search, I found a set of components that worked well: Efficient switching regulators (such as the OKI-78SR Series by Murata) have now largely replaced the old 7800 series ICs. I chose Murata's model OKI-78SR-5/1.5-W36-C, which delivers 1.5 amps at a 5-volt output. It can handle a range of input voltages from 7V to 36V, needs no heat sink, and is around 90 percent efficient.
- To complete my power converter, I added a 220µF electrolytic capacitor to help smooth the output and compensate for spikes in power demand; a mini on-off slide switch; a small red LED and series resistor, to indicate when the unit was powered; and a female USB-A jack (so I could use the same power cord that came with my AC adapter to send 5-volt power to the Pi).
- I also got some 18-gauge stranded wires, with an inline fuse holder and 2-amp fuse, from an auto parts store. And I picked up a small square of perforated circuit board, plus some screw terminals. The schematic for my rather simple circuit is shown here.
For more detail: Raspberry Pi to Go: How to Wire 18v Portable Pi Power


