
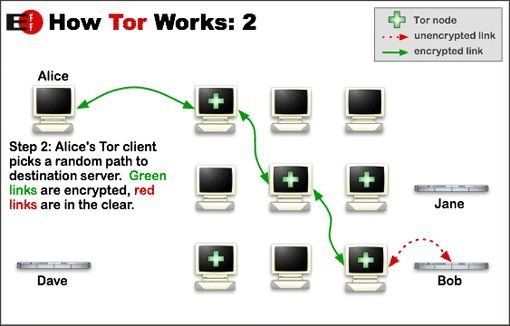
Tor (short for The Onion Router) is a system intended to enable online anonymity. The Tor client software directs internet traffic through a worldwide volunteer network of servers to conceal a user's location or usage from anyone conducting network surveillance or traffic analysis. Using Tor makes it more difficult to trace Internet activity, including “visits to Web sites, online posts, instant messages and other communication forms”, back to the user and is intended to protect users' personal freedom, privacy, and ability to conduct confidential business by keeping their internet activities from being monitored.
So obviously, TOR needs a large amount of servers and as TOR network is not a commercial organisation, it requires voluntary supporters. You can be one of them and turn your Raspberry in a TOR relay.
Step 1: Parts needed
You need the following parts:
– Raspberry Pi
– power supply
– network cable/connection to the Internet
– SDcard with Raspbian (you can find all necessary installation intructions here: http://www.raspbian.org/RaspbianInstaller)
Step 2: Let's start
Open a terminal
apt-get install sudo
adduser tor
passwd tor
this creates the user “tor” and let's you set a password. Please use at least 8 digits (numeric, alphanumeric and special characters)
Now we have to to add the tor user account to the list of sudoers:
nano /etc/sudoers
Add the line
tor ALL=(ALL) ALL
Now we'll install the latest security patchess and updates. Please do this regularly!!!
sudo apt-get update
sudo apt-get upgrade
Step 3: Network configuration
Now that the base setup is done, we have to configure network interface, open a terminal and use this command:
ifconfig
This shows you your actual configuration:
eth0 Link encap:Ethernet HWaddr 00:23:54:40:66:df
inet addr:192.168.0.20 Bcast:192.168.0.255 Mask:255.255.255.0
write down inet addr and mask
then type:
sudo nano /etc/network/interfaces
You will find a line like this:
iface eth0 inet dhcp
So as we see the Raspberry obtains an IP adress from the local DHCP server. If you want a static IP you hould change this to:
iface eth0 inet static
address 192.168.0.20 <- chose an IP that fits to your network! This is only an example!
netmask 255.255.255.0 <- change to the settings that fit to your network
gateway 192.168.0.1 <- type in the correct IP adress of your gateway.
Step 4: Installation and configuration of TOR
This one's quite easy:
sudo apt-get install tor
If you're connected to the Internet a download will be started, this takes some time…..
Now we need to edit the TOR configuration file . You can find it here: /etc/tor/torrc. Open this file with your favourite text editor an add/change these settings:
SocksPort 0
Log notice file /var/log/tor/notices.log
RunAsDaemon 1
ORPort 9001
DirPort 9030
ExitPolicy reject *:*
Nickname xxx (you can chose whatever you like)
RelayBandwidthRate 100 KB # Throttle traffic to 100KB/s (800Kbps)
RelayBandwidthBurst 200 KB # But allow bursts up to 200KB/s (1600Kbps)
For more detail: Raspberry Pi Tor relay