
Have you ever envied your friends' sweet touch screen systems in their car? Do you look at the dash of your old and decrepit 1992 Isuzu Rodeo and dream of having a slick computer system in your car? Well, your in luck. This Instructable will be your guide on building a system that is low cost and easy to build; it doesn't even require special tools.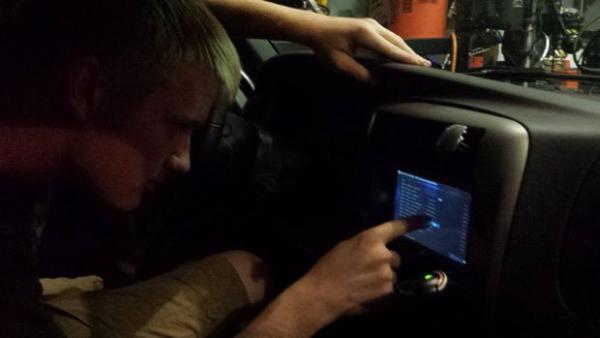
The goal of this Instructable is to create a easy-to-build car computer based on the Raspberry Pi. It does not require special tools and very little knowledge of the Raspberry Pi. I chose not to use advanced tools like 3D printers or laser cutters because, while many do have access to these machines, I have been turned off of projects in the past for using such “out of reach” resources.
The CarPC runs off of a Raspberry Pi Model B running Xbian, a version of XBMC made for the Pi. The touch screen is resistive which, while not ideal, keeps cost down and is easily available through Amazon. It has the capacity to play music, watch videos, look at pictures, play games, and much more.
Supplies
Raspberry Pi Model B
Tontec 7 inch LCD Touch Screen 720×480
Power supplies for both Pi and Screen
Car charger for Pi
SD card
Car stereo (can be stock)
30 feet of wiring fit for your stereo
USB drive
Clothes hanger
Soldering Iron
Gorilla Glue
Tape
Various odds and ends mentioned within the Instructable.
Step 1: Gather Your Materials for Assembly
No, this isn't real programming…
Here is what I used:
Raspberry Pi Model B (Not the model B+, I used it originally and could not get the touchscreen to function properly.)
Tontec 7″ LCD Touch Screen Display
USB Keyboard OR computer that can SSH into Pi
Both AC and DC Pi Power supply (5v 1amp)
LCD Power supply (12v 2 amps DC)
Step 2: Assemble the Screen
This is fairly simple but there is still room for error.
First, grab the LCD screen and the LCD control board. (They are both labeled in the previous step.)
Then, plug the ribbon cable from the screen into the control board with the same orientation as pictured. Make sure to unlock the black tabs first and to lock them after inserting the ribbon. (Screen and board should both lay flat facing up.)
Now, plug the button board for the screen into the control board. It uses the flat white cable to do so.
Now, connect the HDMI cable from the Pi into the the LCD control board.
Lastly, plug in the DC power into the power port when ready to power on.
Step 3: Installing and Attaching the Touch Panel to the Screen
So, here is a strangely simple bit of the process. Most people would use special adhesive strips made for touchscreens for this process, I decided that I didn't want to wait for shipping so I used scotch tape. It surprisingly worked very well.
To do so, lay the touch panel flat atop the LCD screen. Make sure the touch control ribbon is on topside and that the corners are square.
Next, administer tape along the edges of the touch screen in a manner that attaches it to the the LCD module. There should be 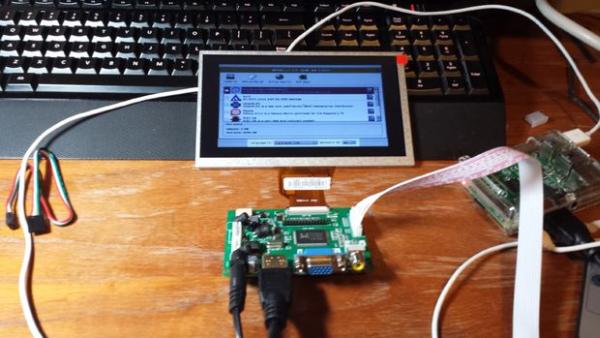 no tape along the front side of the touch screen, only on the sides.
Flatten the tape to make it less noticeable, there should be no wrinkles.
Use more tape to reinforce the tape already supporting the touch panel.
Once the screen is solid and looks nice, you should be done.
Now, attach the ribbon cable from the touch panel to the red-white-green-black cable. Attach that cable to the appropriate port of the touch control board.
Finally, attach the white end of the supplied USB cable to the board. That USB will then go into the Pi.
Step 4: Set up the Raspberry Pi
This one can be a tricky one as it is different depending on the type of computer one does it on, whether it be Windows 7, 8, Mac, or Linux. Rather than cluttering this Instructable with easily obtainable knowledge, here is a link to a tutorial from the Raspberry Pi team themselves.
The image needed is Xbian, which can be downloaded http://www.xbian.org/getxbian/
On the hardware side of things, a Pi compatible power supply is needed (5v, 1 amp or more), an 8gb SD card or greater, and an HDMI cable.
Once the SD card is inserted, the screen plugged in through HDMI, and the power turned on, you should see progress appear on the LCD screen. It will take a bit too load the first time but a setup screen will eventually appear with XBMC in the background. You are now finished with this step.
Step 5: Configure the Touch Screen
The next step involves entering the terminal and typing things. This may seem daunting to some and others feel like the terminal is only for 1337 hackers. These are both false expectations as it is really quite simple as long as you follow instructions. I would highly recommend to SSH for this next step, as it saves a considerable amount of time, although it is not necessary. SSH'ing is the act of wirelessly tapping into your Pi through your home computer; therefore it must be connected to the same network as your computer.
You must have the Pi connected to internet for this, most easily through ethernet.
If you are going to SSH, follow this tutorial to get started.
If you aren't going to SSH, plug in a keyboard and access the terminal by selecting the “exit” option.
Sign into the Pi. Username is “xbian” and Password is “raspberry”.
Anything in brackets you type into the console; do not include the brackets.
type [sudo stop xbmc]
and then [wget https://github.com/brantje/xbian-touch/raw/master…
after that crazy looking code goes by, type [sudo sh install.sh]
Now follow the on screen instructions, you will have to calibrate the touch screen.
Once done, type [sudo reboot]
If you have issues, refer to this, it may help to perform the manual version (I chose the easier automatic version at the bottom of the page). It is the source of this wonderful method. Thanks Markamc!
For more detail: Raspberry Pi Touch Screen Car Computer