
I. Introduction
Even the basic features of consumer devices often require an internet connection as mobile
operating systems shift to cloud-hosted platforms for services like photo storage, messaging,
video playback, etc. While the expansion of mobile data networks has helped to provide “always
on” connections for these devices, users are consuming more and more data at an unanticipated
rate. Mobile carriers have responded by charging for blocks of data (usually in gigabytes) and
phasing out unlimited data plans. As a result, users often fall back to Wi-Fi connections when
available as to conserve their limited allocated data.
Public wireless hotspots, especially at local businesses, are often not set-up or maintained by
networking professionals. This can lead to major security issues such as lack of isolation
between clients, which increase the risk for man-in-the-middle attacks. Unrestricted access to the
router and/or access point’s device administration page could allow an attacker to redirect clients
to fake or malicious websites.
Companies have long required employees to use a VPN in order to access the corporate intranet,
but benefits are also applicable for individuals looking to increase security, bypass georestrictions or censorship, or protect their personal identities while online. For a user looking to
secure multiple devices, this can be a cumbersome and confusing process as software VPN
clients vary in appearance and configuration across operating systems, both desktop and mobile.
In addition, once the software is installed, one must connect and disconnect from the VPN on
each individual device.
The Raspberry Pi is small enough to be packed easily for travel and powered by a standard
micro-USB charger, making it convenient for travelling. Users can configure the Pi to connect to
a public wireless hotspot and then connect their device(s) to the Pi’s hotspot, eliminating the
need for any wired networking connection whatsoever. For places where only wired internet is
available, the Pi also has an ethernet port available. Connection information and configuration
changes can be made through a web interface similar to a consumer’s home router.
With an easily accessible VPN connection, users can protect an ever-growing number of mobile
devices while connected to public wireless hotspots. Since all traffic is routed and encrypted
through the VPN connection before reaching the internet, the threat of traffic snooping or manin-the-middle attacks is greatly reduced. In addition, one could also bypass web filtering
restrictions or throttling that may infringe on net neutrality principles.
II. Requirements
The Pi should provide the end user with the ability to connect their device(s) to a secure wireless
network that routes all traffic through an encrypted tunnel. It should support connectivity for
multiple devices. Furthermore, these devices can be running any operating system, either mobile
or desktop, as long as they support the ability to connect to a WPA2-secured wireless network or
ethernet connection. Unlike traditional software VPN solutions, there is no additional client
software required for user devices to connect.
The user should have the flexibility to connect the Pi to either a wired or wireless internet uplink
depending on what is available. For example, coffee shops almost always provide wireless
access but rarely offer patrons the ability to connect over a wired ethernet connection. In some
cases, a venue may only offer wired access, although this is increasingly uncommon.
Nevertheless, the Pi should support both methods of connectivity to the internet.
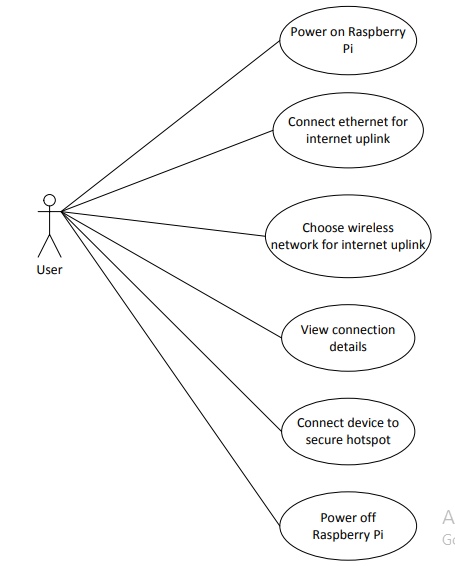
In order to choose a public wireless network, a web configuration page can be accessed by the
user once they are connected to the secure wireless hotspot. It should give them basic connection
information, list available wireless networks, and give them the ability to connect to both
encrypted and unencrypted public networks.
When the Pi is provided an internet uplink, users should be able to connect their devices without
any additional configuration beyond what would normally be required for getting online. The Pi
will host a password-protected wireless hotspot that appears no different than one hosted by a
consumer wireless router. The user shouldn’t need to configure any other network settings other
than simply entering the WPA2 password upon connecting.
Once an end user device is connected to the Pi’s wireless hotspot, they should be able to reach
the internet immediately. They should be able to use any application as they normally would
without any indication that the connection is being routed over a VPN.
III. Use Cases
Public WiFi hotspots have become increasingly accessible by consumers and can be found in a
variety of venues from restaurants to laundromats. Users today expect their devices to remain
continuously connected to the web and often take advantage of these hotspots for internet access.
Those who desire to maintain a secure connection can use the Pi to connect to such hotspots.
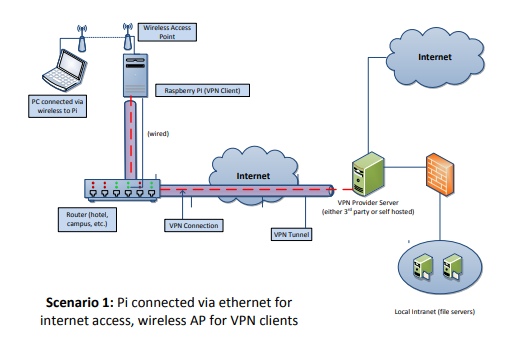
Although not as common by today’s standards, occasionally only wired internet access is
available at a public place, such as a hotel. Or, both wired and wireless are available but the
quality of the wired connection outperforms a potentially weak wireless signal. This could
prevent a user from getting online with mobile devices like tablets or phones, which don’t
normally support a wired ethernet connection. The user can connect the Pi to an ethernet port
provided for internet, and then broadcast a secure wireless hotspot for such devices to use.
Some public networks may have content filtering enabled, blocking access to certain sites or
categories of sites. They might also block certain protocols from being used, such as those used
by BitTorrent or e-mail clients. Even if sites or protocols aren’t outright blocked, certain types of
traffic may be throttled or prioritized by the network. Assuming the Pi is able to establish a VPN
tunnel, these filtering restrictions can be bypassed by the user. The public network would only be
able to see the existence of VPN traffic and not be able to prioritize or discriminate against
specific services used by the user.
VPN traffic routed through the Pi is protected by strong encryption that can prevent adversaries
on the network from snooping or sniffing on the user’s internet traffic. Websites that support
HTTPS can generally be used safely even on public networks, but not all sites use HTTPS by
default or at all. Additionally, there may be applications on a user’s device that make insecure
requests to the web without obvious notification to the user, such as an e-mail client
downloading mail over an unencrypted port. The Pi routes all of this traffic through a secure
VPN tunnel, eliminating the need for a user to worry about their traffic being intercepted.
IV. Design
A. High Level Design
Goals
The goal of this project is to produce a solution that provides secure VPN access for an end user
in a compact and easy-to-use package. The device should be lightweight and portable since it
will be used while travelling, and not require a large power adapter. Nevertheless, it needs to be
powerful enough to run a full Linux operating system and be capable of serving as a network
router for multiple devices. The costs of the hardware required should be kept at a minimum,
while software costs are effectively zero through the use of open-source packages. Security is
also a major motivating factor, requiring the use of strong encryption to protect user data passed
through the device.
Hardware Equipment Required
The primary piece of equipment required in my design is the Raspberry Pi 2 Model B, a small
computer available online for around $35. It is developed by the Raspberry Pi Foundation. It
replaced the original Raspberry Pi 1, and introduced a faster quad-core processor as well as 1GB
of memory. Even though the Pi 2 had only been recently released at the time, I opted to choose
that version given the significant performance improvements over the Pi 1. Specifically, my
project requires the Pi to function as a full-blown wired/wireless router along with the overhead
of VPN encrypted traffic. I knew that the inferior single-core processor of the Pi 1 had the
potential to bottleneck performance.
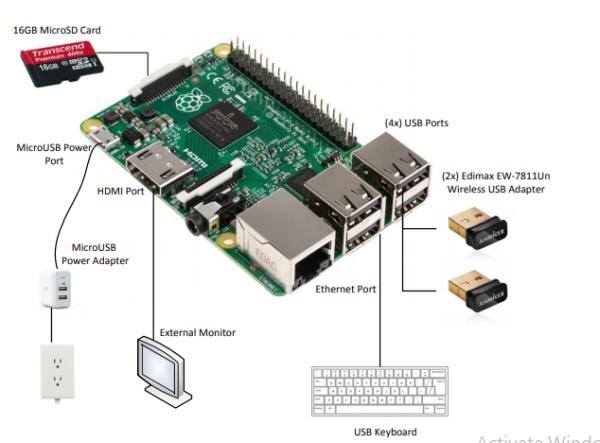
The Raspberry Pi contains 4 USB ports, an ethernet port, HDMI port for display output, and a
Micro SD slot. It requires a 5V Micro USB power supply, which is also used by most non-Apple
smartphones. I purchased a dedicated Anker 24W Dual USB Wall Charger to use for the Pi, and
also used a portable USB power bank for mobile power. For storage, I purchased a 16GB
MicroSDHC Class10 card from which the Pi boots an operating system. The 16GB size is more
than sufficient to contain the operating system and any associated configuration data.
The Pi 2 doesn’t contain any wireless capabilities out of the box, so USB wireless adapters are
required. Two are required: one for connecting to existing public wireless networks, and another
to create a private wireless access point for a user to connect to. I chose the Edimax EW-7811Un
given its known compatibility with the Raspberry Pi and driver support for hosting a wireless
access point. For wired ethernet connectivity, I used the built in 10/100 ethernet port. I used one
of the remaining USB ports for a keyboard, and connected to an external display using the given
HDMI port.
Software Requirements
The Raspberry Pi is designed mainly to use Linux-based operating systems, although Windows
10 now has an embedded version of their operating system available. The Raspberry Pi
Foundation provides an installer called NOOBS that allows for the selection of several different
Linux operating systems to install. I chose to use Raspbian, the official supported operating
system based on Debian. Raspbian is optimized for for the Raspberry Pi hardware, and the
majority of guides/tutorials involving projects on the Raspberry Pi use Raspbian. The OS also
comes with tools that make managing Raspberry Pi configurations easier.
I used a hosted VPN service, VyperVPN, to establish a VPN connection from the Pi to the
internet. I chose to connect via the OpenVPN protocol, which offers better security than PPTP
and faster performance than L2TP/IPsec. This requires the installation of an OpenVPN client
software package on the Pi.
As mentioned previously, the Pi uses one of its wireless adapters to host a private wireless
network for users to connect to. This requires the creation of a virtual, software-based wireless
access point. I used Hostapd, a “user space daemon for access point and authentication servers”
for Linux. A modified package of Hostapd was required that includes a driver compatible with
the Edimax adapters used in this project.
A small web server is also run on the Pi to show a webpage with network statistics such as the
current VPN IP address. I used Flask, a lightweight web framework for Python. Users who
connect to the Pi can access the webpage to see those statistics.
B. Lower Level Design
Operating System Configuration
The Raspbian operating system will run from the 16GB MicroSD card inserted into the
Raspberry Pi. A password will be set for the default login user, Pi. The operating system will run
without a full GUI/window manager, and only a terminal console is visible upon connecting the
Pi to an external display. Configuration changes and additions necessary for this project will be
made via the command line. Packages required for the project will be installed via apt-get, unless
a different version than what is available from the default repositories is required.
OpenVPN Configuration
VyperVPN, the hosted VPN provider selected for this project, provides VPN connectivity for the
chosen protocol OpenVPN. VyperVPN manages their own software, network, and server
infrastructure to provide an anonymized VPN connection to the web for end users. I downloaded
the provided CA Certificate, which is used to verify the authenticity of the server when
connecting, as well as the provided .ovpn configuration file, which is used by the OpenVPN
client software to connect to a remote VPN server. I left almost all settings in this configuration
file as defaults. This includes using AES-256-CBC as the cipher for encrypting packets and
SHA256 to authenticate them. Allowed OpenSSL TLS cipher suites, which are used by
OpenVPN to secure the control channel and exchange encryption keys, include DHE-RSAAES256-SHA, DHE-DSS-AES256-SHA, and AES256-SHA. I added a line to the configuration
specifying the VyperVPN username and password for OpenVPN to authenticate with.
Upon connecting, OpenVPN will create a TUN virtual network adapter named tun0 and assign it
an IP address from VyperVPN via DHCP.
Access Point Configuration
The Pi should have the ability to host a wireless access point which users can connect to like any
other wireless router/hotspot. The software Hostapd provides this functionality, but the default
build doesn’t support the Edimax-branded wireless USB adapters used in this project,
specifically the RTL8188CUS chipset. A custom version supporting this chipset is available
from various sources online and required by the Edimax adapters. I compiled and installed this
version on the Pi. Once installed, the hostapd configuration must be modified. I set the wireless
interface used for the access point to wlan0, SSID to “securepinetwork” WPA2 password to
“tester123”, channel to 1, and hardware settings required for the chipset used by the Edimax
adapters. Finally, I started Hostapd and added it as a service to start whenever the Pi powers on.
Upon connecting to “securepinetwork”, clients should receive an IP address, gateway, and DNS
servers. I used the Dnsmasq package, which is available on most Linux distributions and
provides DHCP and DNS services. After installing Dnsmasq, I set the appropriate configuration
to serve DHCP and also added Dnsmasq as a service on boot.
Network Interface Configuration
The Pi will always have a minimum of three active interfaces: the virtual VPN adapter,
wired/wireless uplink, and secure wireless hotspot.
Tun0: The virtual VPN adapter, receives an IP and gateway via DHCP from VyperVPN.
Anything connecting through this interface gets routed to the internet through a secure VPN
tunnel.
Eth0: Wired uplink interface, receives an IP and gateway via DHCP from the public network.
This provides the Pi with an internet uplink, which it needs to establish a VPN connection to
VyperVPN’s servers.
Wlan0: Wireless hotspot interface, IP is statically set to 192.168.10.1. This represents the
gateway interface used by devices connecting to the secure wireless hotspot.
Wlan1: Wireless uplink interface, receives an IP and gateway via DHCP from the public
network. This provides the Pi with an internet uplink, which it needs to establish a VPN
connection to VyperVPN’s servers.
Firewall/Routing Configuration
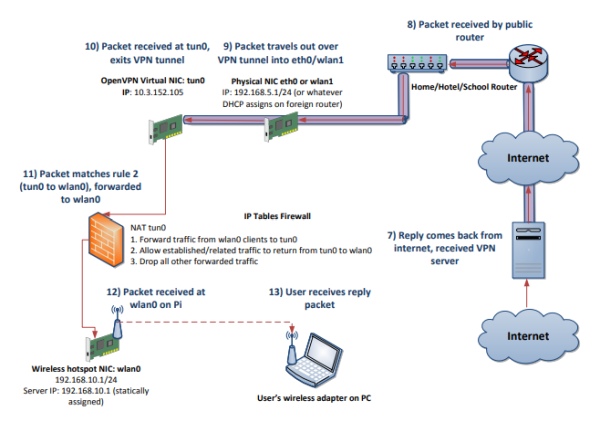
The Pi must be configured to route packets appropriately across each of the above interfaces.To
do so, IP forwarding/routing must be enabled in the Linux kernel.
Additionally, packet filtering rules must be set using iptables. Since the Pi is acting as an internet
router, NAT should be enabled on the VPN and uplink interfaces: tun0, eth0, and wlan1. This
allows the IP address of packets travelling from the internal private network to the outside public
network to be translated appropriately. Iptables should be set to forward new packets from the
private internal network wlan0 out through the VPN interface tun0, and forward returning traffic
from tun0 back to wlan0. This allows clients on the private network to access the public internet,
and blocks unsolicited public internet traffic from accessing the private network.
Figure 3: Software Design Configuration
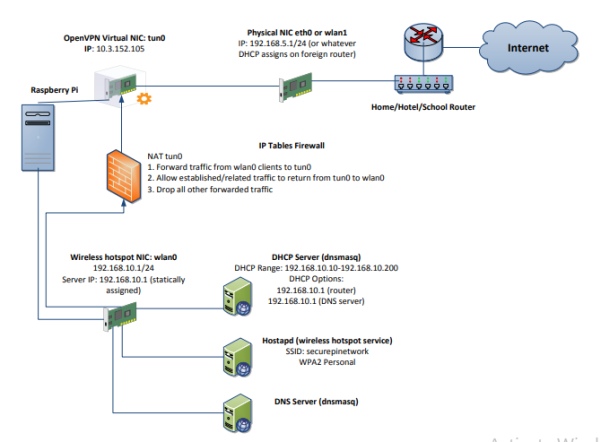
Figure 4A: Tracing a request from secure hotspot client to internet
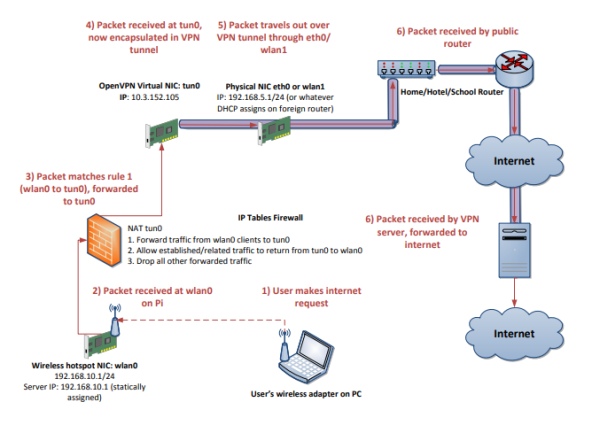
Figure 4B: Tracing reply from internet back to secure hotspot client
Web server configuration
A small web server is run on the Pi, accessible to clients on the secure private network. The
server hosts a configuration/statistics page with information on established network connections.
It is run using Flask, a Python web framework. I chose to install it in virtualenv, which keeps the
project environment (Python version, libraries, etc.) isolated. For development/testing, I set the
server visible on all interfaces and debugging mode enabled. Flask enables the binding of
functions to a URL, which I set to /config. The user will type in the IP address and web server
port of the Pi plus /config to access the configuration page e.g. ‘192.168.10.1:5000/config’.
The application is a single Python script that contains functions to get network interface data
from Linux. I imported Python modules (listed in Appendix C) to retrieve this data from the
system and return it into a usable array.
For the page itself, I render an HTML template that references variables from the Flask
application (Python script). This is achieved by calling the render_template method() in the
application and providing the name of the HTML template along with any variables. In this
instance, I pass network information such as public IP address, VPN IP address, and available
public wireless networks as variables to be shown on the configuration page. There are
placeholders in the HTML template that are populated from these variables. Available public
wireless networks are listed on the configuration page, along with password form fields if the
network is encrypted.
Web server usage
To connect to an encrypted wireless network, the required password must be entered in the
associated form field for that network. Unencrypted networks will not show a password field.
Once the “connect” button is selected, the selected network and password is submitted as a
POST request back to the application. These details are written to wpa_supplicant’s
configuration, wpa_supplicant is reloaded, and a DHCP request is made for the new network.
Once the connection is complete, OpenVPN is restarted to re-establish the VPN connection used
by the secure network. The user can also turn off the Pi by selecting the “Power off” button at the
bottom of the configuration page.
Figure 5: Web Configuration Page

V. Implementation
A. Physical Assembly
The Raspberry Pi should be connected to its power source, the Anker wall charger, via a Micro
USB cable. Both Edimax wireless adapters should be plugged into the USB ports on the side of
the Pi. The MicroSD card should be inserted into the slot on the opposite side of the unit. For
testing/development, a USB keyboard and HDMI cable should be connected for physical console
access.
B. Software Configuration
Operating System Installation
The NOOBS installer can be used to install the Raspbian operating system. It can be downloaded
from the following URL:
I used a MicroSD adapter with the 16GB MicroSD card so that it could be inserted in a regular
SD card reader on my laptop PC running Windows. Once visible to the PC, I extracted the
previously downloaded NOOBS folder onto the SD card volume. When this process completed, I
removed the MicroSD card/adapter from the PC and inserted the card into the Raspberry Pi. I
made sure a keyboard and HDMI display were connected to the Pi, then plugged in the power
supply.
The Pi will then boot and display a list of different operating systems to install. I chose the
Raspbian option, which begins the installation. Upon completion, a configuration page loads
(raspi-config). I changed the user password and set regional settings for U.S. and PST timezone.
I also set “command line” as the boot environment, since we don’t need a desktop GUI. Then, I
continued with “Finish” which brings up a terminal for Raspbian. Most commands in the
implementation require root privileges, and will need to be run with sudo.
I installed vim for use in editing configuration files:
$ apt-get install vim
Initial connection to an internet uplink
Initial connection to an internet uplink Connecting to the internet via ethernet simply involves connecting an ethernet cable into the port on the Pi. The Pi will detect the connection and acquire a public IP address via DHCP.Connecting via WiFi for the first time involves modifications to /etc/network/interfaces and
/etc/wpa_supplicant/wpa_supplicant.conf:
$ vim /etc/network/interfaces
Wlan1 will be the interface used for connecting to a public wireless uplink, and should have the
following:
wlan1
auto wlan1
allow-hotplug wlan1
iface wlan1 inet manual
wpa-conf /etc/wpa_supplicant/wpa_supplicant.conf
We then edit /etc/wpa_supplicant/wpa_supplicant.conf to specify a wireless network for
wpa_supplicant to connect to:
$ vim /etc/wpa_supplicant/wpa_supplicant.conf
Finally, we can restart networking
$ service networking restart
OpenVPN Setup
- Download and install the OpenVPN package:
$ apt-get install openvpn - Download the OpenVPN configuration package from VyperVPN:
22
https://support.goldenfrog.com/hc/enus/article_attachments/205311978/VyprVPNOpenVPNFiles.zip - Extract the zip and save the .ovpn file (I chose the USA – Los Angeles.ovpn file based on
location) to /etc/openvpn/client.conf - Create a login file under /etc/openvpn, with the first line containing the VyperVPN user
and second line the password. This allows OpenVPN to login automatically without
prompting for credentials
$ vim /etc/openvpn/login.txt - Edit /etc/openvpn/client.conf, find the line containing “auth-user-pass” and append
“login.txt” to the end of the line:
$ vim /etc/openvpn/client.conf
auth-user-pass login.txt - Enable the NTP service to ensure the Pi has a matching timestamp for OpenVPN:
$ service ntp start
$ update-rc.d ntp enable - Start OpenVPN as a service and enable startup when the Pi boots:
$ service openvpn start
$ update-rc.d openvpn enable - The Pi should now establish a VPN connection using the supplied OpenVPN connection.
It will be accessible on the tun0 interface
Secure Access Point Setup- Hostapd
Download, extract, and install the custom version of Hostapd with driver support for the Edimax
wireless cards:
$ wget https://github.com/jenssegers/RTL8188-
hostapd/archive/v1.1.tar.gz
$ tar -zxvf v1.1.tar.gz
$ cd RTL8188-hostapd-1.1/hostapd
$ make
$ make install
Edit the Hostapd configuration to contain the following:
$ vim /etc/hostapd/hostapd.conf
Basic configuration
interface=wlan0
ssid=securepinetwork
channel=1
bridge=br0
WPA and WPA2 configuration
macaddr_acl=0
auth_algs=1
ignore_broadcast_ssid=0
wpa=3
wpa_passphrase=tester123
wpa_key_mgmt=WPA-PSK
wpa_pairwise=TKIP
rsn_pairwise=CCMP
Hardware configuration
driver=rtl871xdrv
ieee80211n=1
hw_mode=g
device_name=RTL8192CU
manufacturer=Realtek
Start the Hostapd service and enable startup when the Pi boots:
$ service hostapd start
$ update-rc.d hostapd enable
Secure Access Point Setup-DHCP/DNS
Install DNSmasq:
$ apt-get install dnsmasq
Edit the configuration to set DHCP options. The DHCP server should serve addresses from
192.168.10.10-192.168.10.200. It should push DHCP options for the gateway/router,
192.168.10.1 (the Pi itself) and DNS server, also 192.168.10.1.
$ vim /etc/hostapd/hostapd.conf
interface=wlan0 #wlan0 is our adapter for the hotspot
dhcp-range=wlan0,192.168.10.10,192.168.10.200,2h
dhcp-option=3,192.168.10.1 #router
dhcp-option=6,192.168.10.1 #dns server
dhcp-authoritative #make clients grab a new IP
We will actually start the DHCP server in the next section after the network interfaces are
probably configured first
Network Interface Setup
I configured the interfaces configuration file with the following:
$ vim /etc/network/interfaces
Web Server Setup
First, install Python and Virtualenv:
$ apt-get install python-dev
$ apt-get install python-virtualenv
Create a Python virtual environment for Flask to use (we’ll call “wiconfig”) and activate it:
$ cd /home/pi
$ virtualenv wiconfig
$ . wiconfig/bin/activate
Now install Flask inside the virtual environment:
$ pip install Flask
We can create the folder structure, with “app” containing the application itself:
$ cd wiconfig
$ mkdir app
$ mkdir app/static
$ mkdir app/templates
Next, create an initialization script for the “app” package:
$ vim app/init.py
from flask import Flask
app = Flask(name)
from app import views
This will create the application object and import the “views” module. The views model
responds to requests from clients accessing the web server (e.g. web browsers). Our view
function maps to a single request URL, the default root directory. It should be saved as views.py:
$ vim app/views.py
Finally, we create a script that starts our web server with the application, run.py:
$ vim run.py
!flask/bin/python
from app import app
app.debug = True
app.run(host='0.0.0.0′)
So, our directory structure is as follows:
|—-wiconfig/
|——–app/
|————static/
|————templates/
|————init.py
|————views.py
|——–bin/
|——–include/
|——–lib/
|——–local/
We can start the server by executing run.py from the command line. The webpage itself can then
be accessed at http://192.168.10.1:5000/config when connected to the secure wireless hotspot.
VI. Results/Conclusions
I was able to follow my planned design and successfully connect clients to a secure wireless
hotspot, which then routed all traffic over a VPN tunnel to VyperVPN’s servers. The Pi is able to
use either a public wired or wireless connection for its internet uplink. Connecting to a wireless
internet uplink required more work and implementation for the web server’s configuration page
as a preferred network SSID and password is required. Without the configuration page, a user
connecting to the secure hotspot wouldn’t have a way to tell the Pi which wireless network to
connect to.
Performance for clients connecting to the secure hotspot is overall consistent. Clients are able to
connect quickly and get internet access almost immediately. The range of the secure hotspot is
less than that of a traditional router which has more transmit/receive power, but is more than
enough for the intended short-range use cases. Download throughout was noticeably reduced
compared to connecting a public network directly, but still fast enough for most internet use.
This is likely due to a combination of encryption overhead, hardware limitations, and using
wireless for both the uplink and hotspot. Running this project on a more powerful system (such
as the recently released Raspberry Pi 3) could help improve performance, though the Pi didn’t
appear to be under heavy CPU load during testing.
I encountered some issues initially regarding the power source for the Raspberry Pi. I started by
using a low-cost phone charger, but would occasionally receive errors relating to power in the
Pi’s console session. In some cases, the file system would become temporarily corrupted and
prevent the Pi from booting. Fortunately, a simple run of fsck to repair the MicroSD card’s file
system would alleviate the issue and the Pi would boot normally thereafter. I attributed these
issues to the use of two USB wireless adapters (required for the wireless uplink and hotspot) and
a USB keyboard, all of which likely drew a significant amount of the power from the USB bus. I
purchased a better quality charger and cable to power the Pi, which was much more reliable.
Another potential solution would be to connect the USB devices to a powered USB hub before
connecting to the Pi, but this would add more physical components to the setup.
My original design called for the ability for clients to connect via either a secure ethernet
connection or a secure wireless hotspot, but I made the decision to only provide the wireless
hotspot. Almost all modern day devices have wireless capabilities and the performance tradeoff
is relatively small. Additionally, it would require more configuration and user-required input that
would further complicate the process of connecting.
VI. Next Steps
One of the challenges with first connecting to public networks such as hotels is that they often
employ redirection to a captive portal webpage. The network blocks internet access to the client
until required information such as room number, name, and/or agreeing to a usage agreement is
submitted. This can prevent VPN software from establishing a secure connection, requiring the
user to first be exposed on the public network in order to reach the captive portal page. In the
case of the Pi, it would likely be unable to establish a VPN connection for secure hotspot users
until the captive portal page is filled out. One potential solution would be to clone the Pi’s MAC
address to that of the client device. Since most captive portal systems authenticate clients via
MAC address, once the user’s device accepts the captive portal agreement, the Pi would also be
authenticated (since they share the same MAC address) and able to establish a VPN connection
The Pi VPN configuration page could continue to be improved upon. Additional detailed
network information such as number of connected hotspot clients and connection history could
be added to assist the user in troubleshooting potential connectivity issues. Support would also
be added for connecting to WPA-Enterprise networks such as Cal Poly’s Mustang Wireless. The
configuration page might also keep track of multiple preferred wireless networks and store their
connection details, with the ability to add or remove networks between uses of the Pi.
Much of the development and testing was done in a relatively isolated environment. Additional
security precautions should be taken if the system is used regularly in a public setting. The web
server itself should have debugging mode/logging disabled, and firewalled off from the public
network to limit access only to users on the private network. The web application should also be
moved from Flask’s built in web server to a production-ready server such as Apache or NGINX.
Field validation should be added for the forms shown on the web configuration page and input
sanitized.
Overall performance could be further improved by using a more powerful device than a
Raspberry Pi. Wireless range and throughput would likely increase with higher-powered adapters
than the relatively small Edimax USB adapters. However, this could reduce overall portability
and make it less convenient for users to transport while travelling.
Appendix A. Iptables Rules
*nat
:PREROUTING ACCEPT [82:6649]
:INPUT ACCEPT [21:1600]
:OUTPUT ACCEPT [40:2782]
:POSTROUTING ACCEPT [6:426]
-A POSTROUTING -o eth0 -m comment -j MASQUERADE
-A POSTROUTING -o wlan1 -m comment -j MASQUERADE
-A POSTROUTING -o tun0 -m comment -j MASQUERADE
COMMIT
Completed on Wed Oct 28 20:26:49 2015
Generated by iptables-save v1.4.14 on Wed Oct 28 20:26:49 2015
*filter
:INPUT ACCEPT [981:687162]
:FORWARD ACCEPT [1669:717210]
:OUTPUT ACCEPT [939:205723]
-A FORWARD -s 192.168.10.0/24 -i wlan0 -o tun0 -m comment –comment
“Allow only traffic from clients to tun0” -j ACCEPT
-A FORWARD -i tun0 -o wlan0 -m conntrack –ctstate ESTABLISHED,RELATED
-m comment –comment “Allow only traffic from clients to tun0” -j
ACCEPT
-P FORWARD DROP
COMMIT
Appendix B. Web configuration page source
Views.py (main application)
from future import print_function
from app import app
from flask import Flask, render_template, request, redirect, url_for
import socket
import subprocess
import sys
import os
import netifaces
import wifi
from wifi import Cell,Scheme
@app.route(‘/config', methods=[‘GET', ‘POST'])
def config():
REMOTE_SERVER = “www.google.com”
# adjust for what's the internet interface
# check if eth0 is active, otherwise default to wireless. get IP if active.
try:
addrs = netifaces.ifaddresses(‘eth0')
myip = addrs[netifaces.AF_INET][0]
myrealip= myip[‘addr'] + ” (connected via ethernet)”
except:
myrealip=”N/A”
# check to see if wlan1 is active, get IP if active
try:
addrs = netifaces.ifaddresses(‘wlan1')
myip = addrs[netifaces.AF_INET][0]
myrealip= myip[‘addr'] + ” (connected via wireless)”
except:
myrealip=”N/A”
# check to see if tun0 (vpn) is active, get IP if active
try:
vpn_addrs = netifaces.ifaddresses(‘tun0')
myvpnip = vpn_addrs[netifaces.AF_INET][0]
myvpnrealip= myvpnip[‘addr']
except:
myvpnrealip=”N/A”
try:
# check to see if we can resolve hostname
host = socket.gethostbyname(REMOTE_SERVER)
# connect to the host – can we actually reach it?
s = socket.create_connection((host, 80), 2)
connected=”Connected”
except:
connected=”Not Connected”
#get available wireless networks
networks = Cell.all(‘wlan1')
results = {}
# form to get ssid/password and connect
select_ssid = “N/A”
select_password = “password”
# get current SSID from wpa_supplicant service
wpa_process = subprocess.Popen(“wpa_cli status | grep ^ssid”, shell=True,
stdout=subprocess.PIPE)
stdout_wpa_process = wpa_process.communicate()[0].split(‘\n')[0]
print(stdout_wpa_process[5:], file=sys.stderr)
current_ssid = stdout_wpa_process[5:]
if request.method == “POST”:
try:
# check to see if power off button submitted, if so turn off the Pi
poweroff = request.form[‘poweroff']
if poweroff == “true”:
print(‘powering off…', file=sys.stderr)
subprocess.call([‘poweroff'], shell=True)
return ‘Powering off…'
# get SSID from form
select_ssid = request.form[‘ssid']
# get password from form, assume no password if blank
try:
select_password = request.form[‘password']
except:
select_password = “”
# write configuration file for wpa_supplicant
wpa_config = open(“/etc/wpa_supplicant/wpa_supplicant.conf”, ‘w')
wpa_config.write(“ctrl_interface=DIR=/var/run/wpa_supplicant GROUP=netdev\n”)
wpa_config.write(“network={\n”)
wpa_config.write(‘ssid=”‘ + select_ssid + ‘”\n')
# if no password, the network is assumed to be unencrypted
if select_password == “”:
wpa_config.write(‘key_mgmt=NONE\n}\n\n')
# password provided so set it in the configuration
else:
wpa_config.write(‘psk=”‘ + select_password + ‘”\n')
wpa_config.write(‘proto=RSN\nkey_mgmt=WPA-PSK\npairwise=CCMP
TKIP\ngroup=CCMP TKIP\nauth_alg=OPEN\n}\n\n')
# close configuration file
wpa_config.close()
# tell wpa_supplicant to reload configuration file
subprocess.call([‘wpa_cli reconfigure'], shell=True)
# kill all previous instances of dhcp client subprocess.call([‘killall dhclient'], shell=True) # call dhclient to acquire a public IP via DHCP subprocess.call([‘dhclient wlan1 -v'], shell=True) # restart OpenVPN subprocess.call([‘sleep 5 && service openvpn restart'], shell=True) # return a 302 redirect back to config page after form submitted return redirect(url_for(‘config')) except: # something bad happened print(‘exception', file=sys.stderr) # render template return render_template(‘index.html', connected=connected, myrealip=myrealip, myvpnrealip=myvpnrealip, networks=networks, current_ssid=current_ssid)
Source: Raspberry Pi VPN Travel Router