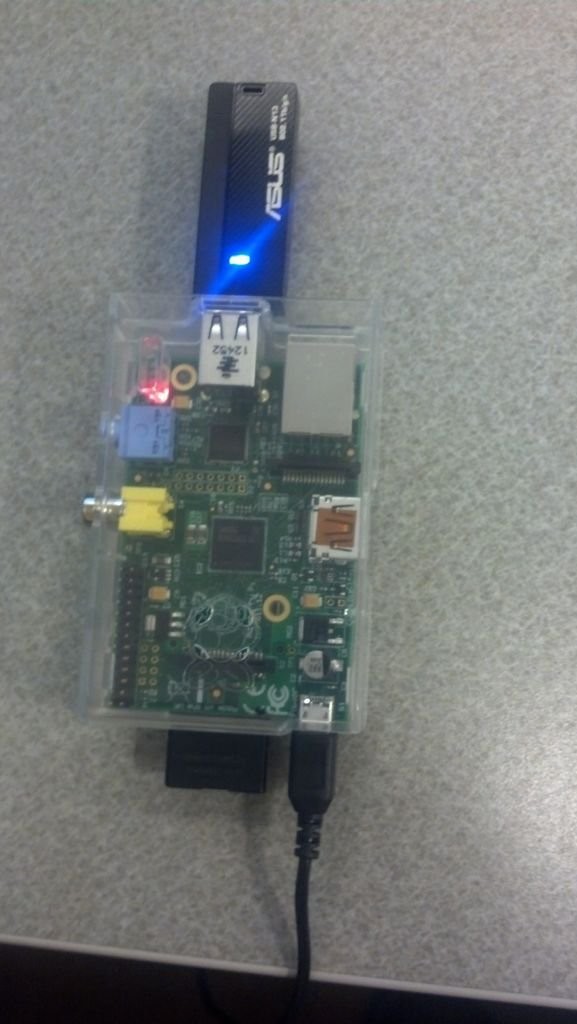
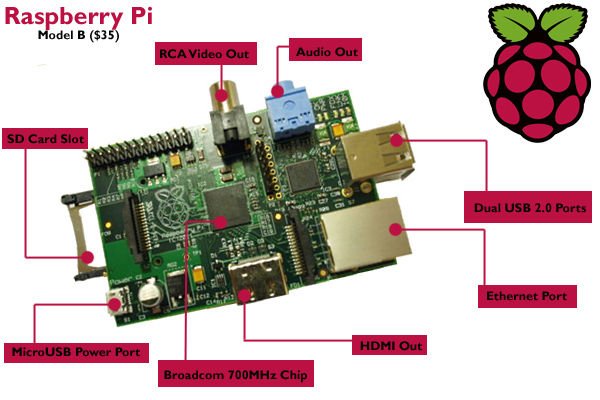
These instructions will provide you with a list of requirements and steps for configuring your own local Wi-Fi media server using the Raspberry Pi. Once complete, you will be able to plug a USB drive into your Raspberry Pi and provide the drive's content across a local wireless area. Anyone within the vicinity will be able to view images, documents, videos and more with their laptops and mobile devices.
Step 1: Materials
Raspbery Pi Model B
Power adapter
SD storage card
WiFi Adapter (ASUS USB-N13)
Ethernet cable
USB storage (USB key or thumbdrive)
Raspbian “wheezy” Linux distribution (2013-02-09-wheezy-raspbian)
Imaging software (ex: Win32DiskImager, http://sourceforge.net/projects/win32diskimager/)
Driver for WiFi (Realtek RTL8192CU)
[optional] Javascript Framework (bootstrap.js)
Step 2: Development Environment
Additional wired Internet connection
Extra USB Keyboard, Monitor (with HDMI port, or adapter) & USB Mouse
HDMI cable (and adapter, if necessary)

Step 3: Download and Burn Linux Distribution Image to SD Card
Download the Raspbian “wheezy” image zip file (http://www.raspberrypi.org/downloads) and unzip it into a directory of your choice.
Linux distribution used: 2013-02-09-wheezy-raspbian
Obtain imaging software that will support SD cards
Ex: Win32DiskImager, http://sourceforge.net/projects/win32diskimager/
Burn an image of the linux distribution to SD card:
1. Open Win32 Disk Imager
2. Click on Directory icon and navigate to downloaded and unzipped image (.IMG) and select ‘Write’ … confirm “Yes” when prompted
3. When complete, a window will pop up saying “Write Successful”. Click OK. Click Exit.
4. Remove SD card.
Step 4: Initial Boot and Configuration of the Raspberry Pi
Boot up the Raspberry Pi for the first time
1. Insert SD card into Pi in without a power supply
2. Ensure that HDMI, keyboard and mouse are connected properly
3. Connect the 5V power supply
4. The Pi should boot as a list of processes and applications begin filling the screen
5. A blue screen appears with ‘Raspi-config’ and several menu options
6. Arrow down to Select ‘expand_rootfs’ and press Enter
7. ‘Root Partition has been resized’, press Enter.
8. Arrow down to Select ‘configure_keyboard’, Press Enter
a. (This takes a moment) Select the proper keyboard from large list of options and press Enter.
i. We are using a ‘Dell USB Multimedia Keyboard’.
b. Keyboard Layout: Select ‘Other’. Press Enter.
c. Select ‘English (US)’. Press Enter
d. Select ‘English (US)’. Press Enter
e. “Key to function as AltGr:” Select ‘The default for the keyboard layout’. Pres Enter
f. “Compose Key:” Select ‘No compose key’. Press Enter
g. “Use Control+Alt+Backspace to terminate the X Server?” Select ‘No’. Press Enter
h. Msg: “Setting preliminary key map” … when complete select <Finish>
i. Press right arrow key twice to select “Finish” and press Enter.
i. “Would you like to reboot now?” Select <Yes>. Press Enter
9. The Pi reboots and list of processes and applications populates. Once complete and a login prompt appears. Type “pi” as the username and press Enter.
10. For Password, type “raspberry” and press Enter
11. Command line will appear “pi@raspberrypi ~ $”
12. Test keyboard configuration by verifying that characters such as the tilde (~) and slashes appear correctly ( / \ ) as well as any other special characters.
13. Type ‘startx’ and Press Enter to bring up the Desktop GUI
Step 5: Configure Internet Access on the Pi
2. Open a Terminal by double clicking on the desktop icon ‘LXTerminal’
3. Type ‘ifconfig’ to ensure and press Enter that the Pi has a valid IP address
4. Type ‘ping 8.8.8.8’ and Press Enter to ensure that the Pi can reach external servers.
a. (Press CTRL+C to stop Ping and any other programs running in the current terminal)
Step 6: Install Web Server with PHP
(This may take several minutes and will ensure that all online software packages and references are up to date.)
2. When complete type ‘sudo apt-get install lighttpd’, Press Enter.
a. “Do you want to continue?” Type ‘Y’ and press Enter.
3. Type ‘sudo apt-get install php5-common php5-cgi php5’ (This installs the 3 packages)
a. Type ‘Y’ and press Enter at prompt.
4. Set permissions on the web directory /var/www/
a. (as seen here: http://www.penguintutor.com/linux/light-webserver)
b. Type ‘sudo chown www-data:www-data /var/www’ Enter
i. FYI: change ownership on /var/www to user & group “www-data”
c. Type ‘sudo chmod 775 /var/www’ Enter
i. FYI: modify permissions for owner (7), group (7) and everyone else (5)
d. Type ‘sudo usermod -a -G www-data pi’ Enter
i. FYI: add user pi to group www-data
5. On a separate computer on the same network as the pi, you should now be able to enter the Pi’s IP address into a browser and receive a ‘Placeholder page’ from Lighttpd.
a. FYI: Type ‘ifconfig’ for interface/IP information
6. Enable PHP scripts: ‘sudo lighty-enable-mod fastcgi-php’ Enter
7. Reload the server ‘sudo service lighttpd force-reload’ Enter
Step 7: Install Wi-Fi Networking & Configure Wireless Broadcast
2. Type ‘sudo apt-get remove hostapd’. Enter. Type ‘y’ if prompted to continue.
a. Installing and removing the application ensures that certain directories and files have been created that will be necessary later.
3. Plug in the wireless adapter to an available USB port on the Pi
a. We are using an ASUS USB-N13
4. In a terminal type ‘lsusb’, Enter to get a list of recognized devices. The USB-N13 should appear on the list
5. Using a Windows machine, Download the zip file of the proper linux drivers for the chipset of the wi-fi adapter.
a. (RTL8192CU) can be found here: http://www.realtek.com.tw/downloads/downloadsView.aspx? Langid=1&PNid=21&PFid=48&Level=5&Conn=4&DownTypeID=3&GetDown=false&Downloads=true
b. Unzip the file and enter the root directory.
c. Open ‘wpa_supplicant_hostapd’, Extract the two zip files found here.
d. Place the root directory on a USB drive and plug the drive into an available port on the Pi
6. Move the USB drive to the Pi, open a terminal and type ‘cd /media’. Enter.
a. Type ‘ls’ to see a list of all available directories in the Media directory. (This is the directory in which USB drives and other
connected media devices will get mounted and named automatically for now)
b. Type ‘cd <the name of the drive listed>’. Enter. You should now see the contents of the USB drive (by typing ls again)
7. Navigate through the USB drive to locate your files (the patched version of Hostapd designed specifically to work with this chipset)
a. Hint: instead of typing out an entire directory name … you can type enough characters of the directory name to be unique
then press <tab>
i. Ex: ‘cd RTL8188C’ and press <tab> to complete the string of characters. This will only work if there is only one possible
match.
b. Type ‘cd wpa_supplicant_hostapd/wpa_supplicant_hostapd-0.8’ Enter
c. When you type ‘ls’ you should see a directory named ‘hostapd’, type ‘cd hostapd’, Enter.
8. Make and Install
a. Type ‘sudo make’ Enter. (This will take several minutes)
b. Type ‘sudo make install’ Enter.
9. Replace file
a. Copy the file “hostapd” from: /usr/local/bin to: /usr/sbin
i. ‘sudo cp hostapd /usr/sbin’
b. Change directory to /usr/sbin
i. cd /usr/sbin
c. Probably need to make “hostapd” executable
i. Type ‘ls’ … if file labeled ‘hostapd’ is not green, run this command ‘sudo chmod +x hostapd’ to make it executable.
10. Edit the “interfaces” file
a. Type ‘cd /etc/network’ Enter.
b. Type ‘sudo nano interfaces’ to open file in text editor
c. Comment (prepend with “#”) the following lines: iface wlan0 init manual
wpa-roam /etc/wpa_supplicant/wpa_supplicant/confd. Add the following lines to the bottom of the file (a modified following of this guide http://sirlagz.net/2012/08/09/how-to-use-the-raspberry-pi-as-a-wireless-access-pointrouter-part-1/ ): iface wlan0 inet static
address 192.168.2.1
netmask 255.255.255.0e. Close and save “interfaces”
i. Control+X, Y, Enter
11. Type ‘cd /etc/default’ Enter
12. Edit the “hostapd” file:
a. Type ‘sudo nano hostapd’ Enter
b. Remove the pound sign (#) that appears before the line ‘DAEMON_CONF=””’ and inside the quotes type
“/etc/hostapd/hostapd.conf”.
c. Close and save
i. CTRL+X, Y, Enter.
13. Type ‘cd /etc/hostapd’ Enter.
14. Create the config file specified
a. Type ‘sudo nano hostapd.conf’, Enter
b. add the following lines
interface=wlan0
ssid=RaspAP
hw_mode=g
channel=6
beacon_int=100
auth_algs=3
wmm_enabled=1
c. Close and save
i. CTRL+X, Y and Enter
15. Test SSID broadcast
a. Directory doesn’t matter … (Type ‘cd /etc’ Enter)
b. sudo service hostapd start
c. sudo service hostapd stop
16. Install and configure dnsmasq (application for managing DHCP)
a. Type ‘sudo apt-get install dnsmasq’, Enter
b. Hit Y when prompted.
c. Type ‘sudo nano /etc/dnsmasq.conf’ to edit dnsmasq configuration and add the following lines to the top of the file:
interface=wlan0
dhcp-range=192.168.2.2,192.168.2.50,255.255.255.0,12h
address=/#/192.168.2.1 #redirect all DNS requests to 192.168.2.1
d. CTRL+X, Y, Enter
17. Start (or Restart) services (you may need to reboot the pi initially after the above installation/configuration steps)
a. sudo service hostapd start
b. sudo service dnsmasq restart
18. Reboot
a. Services should start automatically if all required devices (WiFi interface) are connected
19. Shutdown
a. sudo poweroff
b. or: sudo shutdown … then poweroff
Step 8: Install USBmount
2. Install USBMount
a. type ‘sudo apt-get install usbmount’, Enter, “y”, Enter
This software will replace the current configuration on the Pi which automatically mounts USB drives on ‘/media’ with a
unique name and with limited permissions. Now USB drives will be mounted as ‘usb0’, ‘usb1’, etc.
b. Restart system
(‘sudo reboot')
Step 9: Configure Web Server to Access USB Content
a. Add an alias URL for accessing ‘/media’ directory (and any additional directories): Append the line:
i. alias.url += ( “/media/” => “/media/” )
b. CTRL+X, Y, Enter
c. sudo service lighttpd restart
For more detail: Raspberry Pi Wi-Fi Media Server


