
I have an old iPad which has been dropped so many times that a piece of wire fell out the side, and I think that wire was the WiFi antenna. The iPad can only connect to WiFi when it’s close to the access point or when the signal is very strong. I figured out that my young daughter could still use it in the kitchen, far from the router, if I put a WiFi repeater in the kitchen. As it turns out, this also extends WiFi to the back patio, which is an added bonus.

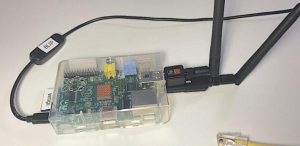
I originally used an old Raspberry Pi 1B for this, and that’s still what I’ve mainly been using. It’s a good use for old hardware. It runs headless, with 2 USB wifi dongles, and sits under a cupboard just like lots of other modern appliances. But I’ve also tried this out with models 2B and 3B. The model 3B has an internal wifi interface, so you only need to add one extra USB dongle. The original wifi dongles did not have antennas, and that limited their range, so I’ve recently upgraded to the ones with antennas, as shown in the picture above.
This page was started in the summer of 2018, when I used Raspbian Stretch on a Raspberry Pi 1B, but the most recent revision was in December 2020 and I’ve made some improvements.1 I originally used instructions from user Dryfire117 on pastebin2. I later found useful instructions on the Raspberry Pi website.3 After going through the process several times and experimenting with variations I have been able to simplify things in several ways. For one thing, you can use either WiFi or wired ethernet for the upstream connection.
I’ve broken this up into several separate pages, because some of these steps are useful for related projects that I’ll be reporting on later, and because I think it’s just easier to follow and understand when it’s broken into separate parts like this. Here are the key steps:
1. Setup a new SD card
After flashing a new image on an SD card, boot it up and perform the “usual” set of configuration steps, as describe in “Raspberry Pi Initial Configuration” or your other favorite source.
2. Configure Network
We need to configure two networks, the “local” network managed by hostapd to be a WiFi Access Point (AP), and the “upstream” network connection to the internet. The upstream connection can either be wired or also via WiFi. The steps required to set this up have grown to the point that they have been put into a separate page, “Network Configuration for a WiFi Access Point.”
3. Install and configure hostapd
When I originally started doing this, you had to build hostapd from source code to get the nl20211 driver, but newer versions of Raspbian now include that driver by default, making things a bit easier. There are still a number of steps required to configure hostapd. Follow the instructions in the article “Configuring hostapd on Raspberry Pi.”
4. Set up DHCP server
The DHCP daemon is what assigns IP addresses to the computers that join your private network. Follow the instructions in the article “DHCP Daemon on Raspberry Pi.”
5. Configure NAT routing
Everything so far sets up an access point. Now we also need to configure the routing tables to perform Network Address Translation (NAT) and add a default route. Follow the instructions in the article “Raspberry Pi Access Point Routing Tables.“
6. Add DNS servers (optional)
The file /etc/resolv.conf contains the names of Domain Name Service (DNS) servers, but on Raspberry Pi this file gets overwritten at each reboot. It will probably contain the IP address of your upstream router, but nothing more. It is useful to have more nameservers for redundancy, in case one of them has a problem. Also, I now have a piHole DNS server on my local network, and I’d like to have anything on my internal network use that. The simplest way to do this is to edit the file /etc/resolvconf.conf and add a line like this:
name_servers=192.168.1.29 1.1.1.1 8.8.8.8
- Take a look at /etc/resolv.conf after a reboot to confirm that these made it into the list.
7. Add Monitoring (Optional)
Since this device will run headless it can be useful to have a status display provided by a web page. This is easily done by adding a web server, either Apache or NGINX, which is described well on the Raspberry Pi website.4 In either case the main web page for the server lives in the directory /var/www/html/. You could make a simple HTML web page in the file index.html, or something more dynamic as a PHP script called index.php (such as this).
8. Save Everything
It’s useful to have a list of all the files you’ve modified to make this all work, so that you can go back and make checks or changes, so that you can make backup copies, and so that you can easily deploy the same files to another machine. I put the list into a file called wifipi_files.txt:
/etc/network/interfaces
/etc/network/interfaces.d/
/etc/default/hostapd
/etc/hostapd/hostapd.conf
/etc/default/isc-dhcp-server
/etc/dhcp/dhcpd.conf
/etc/resolvconf.conf
/var/www/html/index.php
It is then simple to make a tar archive (tarball) containing just these files, using the commandtar -czP --files-from=wifipi_files.txt -f wifipi.tgz
The -P flag preserves the full file path when the file is saved in the tarball. To deploy these files on another machine simply copy the tarball to the other machine and (as root or using sudo) give the commandtar xzf wifipi.tgz
to extract them into place.
Source: RASPBERRY PI WIFI ACCESS POINT