
Concept: The broadband Internet that you use in your house for 24*7 might be costing you around $9 to $35 per month , add another $150 (one time ) to it and you have your own home surveillance system which will monitor your home 24*7 from a strategic point inside your home which you can watch 24*7 from Internet while you are away from your home. What more ? in case it senses something unnatural, it will capture a snap and then sends it all the way to your email. You can even order it to serve some older snaps or you can pan , tilt , zoom or swipe the direction of the cam. All from a remote location even from the other side of the world !
Hardware required:
Raspberry Pi, USB web cam, wires, Stepper motor, fixtures . The Pi cam that is available with Raspberry Pi computer can also be used but it’s a bit costlier now so I’m sticking to my old & cheap USB camera.
Softwares:
Raspberry Pi computer running a Wheezy Linux, a GMAIL account for sending / receiving email for Raspberry Pi , another email like your personal email where while you are on move would like to receive emails. 16 GB or bigger SD card – the bigger the better, VLC player (typically for Windows client for viewing world web cam), administrative rights to tweak your broadband modem – I hope it’s your home so you have every right to tweak it, and a few open source softwares that are freely available in Internet and couple of small PHP scripts by me and an inquisitive mind to explore the world… (lol )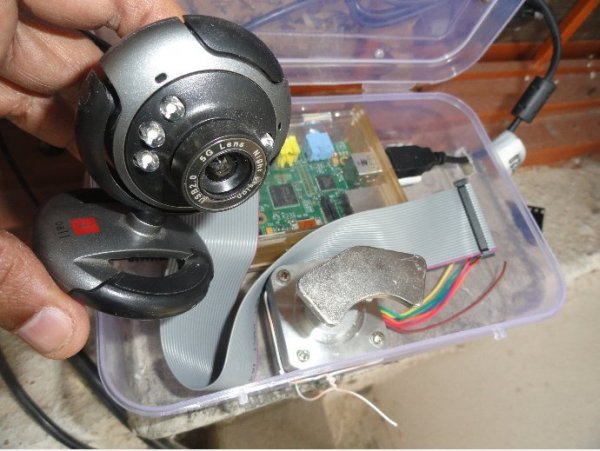
do an update and upgrade of your Raspi.
$sudo apt-get update
$sudo apt-get upgrade
I hope the USB webcam is working alright at this point. To check usb webcam install fswebcam and then see the output.
$> sudo apt-get install fswebcam // this will install webcam
$> fswebcam -d /dev/video0 -r 320×240 test.jpg
Normally the usb webcam will be found at /dev/video0 or /dev/video1
The last command will take a snap shot and save it in the test.jpg file. Check that file for status of your webcam.
Now install these additional softwares on your Raspi.
$sudo apt-get install apache2
$sudo apt-get install php5 php5-dev php5-imap
$sudo apt-get install motion
Install class.phpmailer.php: This is used for sending email using PHP.
Copy the following php mailer library file in the web directory of your Raspi . It’s normally in the /var/www/ directory.
$> sudo cp class.phpmailer.php /var/www/
‘class.phpmailer.php’ //this file is bundled in the source directory
After installing all these softwares, lets start motion software. Ensure the webcam is inserted in the USB. You may use a powered USB hub in case you run short of USB ports. However, I always run Raspi in headless mode therefore, I use only one USB wifi adapter and the other USB port is always free for the USB webcam.
Now you need to edit the Motion configuration file to make it work, so enter the following code in the terminal.
$sudo nano /etc/motion/motion.conf
The Motion configuration file will appear, and you can change a few settings here if you like. Most importantly though, we need to change the following:
daemon OFF (to ON – this can be changed near the top of the file). Save it and exit nano editor and open the next file .
$sudo nano /etc/default/motion
change start_motion_daemon=NO to start_motion_daemon=yes .
Now we need to start the Motion server:
$sudo service motion start ----- Wait for a minute and then navigate to your Raspberry Pi's IP address at 8081 port. Something like this.
http://192.168.1.2:8081 and beyond a shade of doubt you will find your Raspi webcam is churning out streaming pictures.
Check email every 3 minutes:
mailonce.php is our program which checks the GMAIL every 3 minute and if there’s a query for IP address or the snapshot file there , it will send reply email with the IP address or the snapshot file to the sender. For starting our PHP program that will be checking & sending emails at the boot we add it at the crontab level like this. Crontab is a user level program so to start it at the super user level go to the su mode and then at su prompt add it in the crontab.
$sudo su
#crontab -e //this will open the crontab of su. Go to the bottom and add the following line
….
….
0-59/3 * * * * /var/www/mailonce.sh >/dev/null 2>&1
…
…
—— Save it and exit nano.
Prepare the mailonce.sh file now.
$sudo nano /var/www/mailonce.sh
php -f /var/www/mailonce.php
—— save it and exit —–
$sudo nano mailonce.php
[mailonce.php ,mailonce.sh is bundled in the source folder ]
To make the mailonce.sh file executable do the following.
$sudo chmod +x mailonce.sh
—- that’s all for the mailonce program now. You may reboot your Raspi now or can restart the cron job by the following command.
$sudo /etc/init.d/cron restart
----- ----- -----
Well our first part ends here. Next we will ask Motion to fire up an email the moment it senses some motion in front of the lens. The technique that is used in Motion software to sense motion is the changes in number of pixels. Most simple yet very effective. One good way to understand Motion software is to read the motion.conf file from top to bottom. It's all written in simple way.
$sudo nano /etc/motion/motion.conf
find 'threshold' under Motion Detection Settings
the default value is 1500 but for our use make it 6000 so that the line looks like
threshold 6000
Also at this point change the webcam port to 5678 as 8081 is very common port.
webcam_port 5678
Now find 'on_picture_save' line and write in front of it so that the whole line looks like this.
on_picture_save echo 'Alert' | echo %f > /tmp/motion/img.txt | php -f /var/www/sendmail1.php
Well what it does is simple – when the number of pixel-change reaches >=6000 it will take snapshot, write the name of the picture file into /tmp/motion/image.txt and then execute sendmail1.php to send a mail to you ,using a google GMAIL account. That email also contains the URL of the streaming video using the port forwarding through the plain DSL broadband modem for your home Internet. [Instead of snap shot you can also tell it to capture video for a set time ]
Sometimes while port forwarding (that we will talk about later) the external IP address changes. Therefore, while sending the email your Raspi will also take care of the external IP address where the streaming image will appear.
So far this is so simple. We have our mail checking PHP program mailonce.sh will be running at boot and at background to monitor Inbox of this GMAIL . While you on move seeing the email from Raspi simply returns back the same email to Raspi. The moment it gets an email from you with a subject line referring to a picture, it will pick out that file from /tmp/motion/ directory of Raspi and then returns back to you as an attachment, at the same time Raspi marks the mail as read else it will keep churning all the time.
GPIOs:
Now what to do with all the GPIOs which we have not touched yet ? Well, they can be used for more greater purpose now. In the gpio.php we will control some GPIOs to pan our world web cam.
The PHP-imap can be configured such a way that it will purse only those emails that come from a particular email. Then search their subject line for a particular code and when it finds, it will switch off some garden lights (you know birds don’t like lights !) or switch on a backyard light or open a grain box which will pour out some beans for those cute little birds. I’ve made provision for reading the sender’s email but I’ve not used it (look in mailread.php) for any discrimination on the part of the sender.
Caution note:
In case your Raspi reboots then the port forwarding in the Modem will be dissociated and you have to associate those rules again. Open modem page and see figure-2. This happens only when the Raspi is awarded a new IP address by the DHCP.
Many times I find the streaming page was not showing besides no email from Raspi so genuinely I start doubting Raspi but actually what happened was that the external IP address was changed while there was no movement in front of the cam . So no mail to know it’s external IP address. In that case open your office email and reply back one email to Raspi with a subject line as /tmp/motion/ . The return email body will contain the external IP address of Raspi – something like blowing one’s own trumpet !!!
Also GMAIL does not allow to send more than 2000 emails per 24 hours . Therefore, keep the threshold limit in motion config file to a higher figures. I’ve made it 6000 which is barely 7.8% of 320*240 pixels else Raspi will send email every now and then and you will be blocked by GMAIL very soon. However, after 24 hours it will be able to send emails again.
Stepper motor: Servo or stepper motors are very powerful and requires more power to run. Normally weak energy from the GPIOs (which is at the level of 3.3 volt ) is boosted to the higher level by a Darlington or H-bridge package. However, for a small 5Volt stepper motor the output from the GPIOs can directly run it comfortably to pan our small light weight USB webcamera. So in the pan circuit we just put the GPIOs power into the stepper motor.
Ensure that the 5volt DC supply has 1 amp or more power. The bipolar stepper motors has minimum 4 wires or maximum 6 wires. When the central connections are joined together , forms the 5th wire or separated out to form the 5th and the 6th wire. In some low powered motors the central connections is completely ignored and only 4 wires are used. If there is a 5th or 5th or 6th wired together they are to be joined together and would go to 5Volt + . But at the same time one can jolly well ignore it and left unconnected (like my case).
[In case your stepper motor requires more power, put a darlington IC (ULN2003 for normal stepper ) or a double H-Bridge IC (L298 for bi-polar stepper ) in between the GPIOs and the stepper motor connections.
Raspi world webcam and social networking: Our mailonce.php program is so intelligent that if an email with subject as “/tmp/motion/” is sent to [email protected] it will in next 3 minutes reply back the external IP address of itself and the control URL to the sender so that he / she can see the streaming image at Internet. Therefore, you can jolly well publish your world webcam for the whole world at your social networking site. Because the whole thing comes from your Raspberry Pi computer only.
Testing of Motion:
Open your email where Raspi is supposed to send the emails. You may not find any email right now. Do some caricature in front of your Raspi cam and then check your Inbox. Raspi has sent a burst of small emails to you now. Select any one and reply back to Raspi. Wait a few seconds and see a new email has arrived with an attachment. That’s the picture Raspi captured at that moment !
[Remember to enter the GMAIL detail that the Raspi will be using in the following php programs – mailonce.php, mailattach.php, mailread.php, sendmail1.php & ipaddchange.php ]
—- —- —– —–
Port Forwarding: When I asked help from our IT man, he said that he never tried it because he never required it. The problem with these IT guys is that they always come up with ‘why’ even before answering ‘how’. So discounting any wise help from him ,I rolled out my sleeves and opened my Modem’s home page. It’s a GLB-502T Dlink DSL modem. The BSNL Internet comes from the telephone line which has entered into one side of the Modem while the other side has gone back to the Telephone set. The wifi unit is a separate Iball unit connected to the Modem by an ethernet cable. For almost all home type ,the DSL modem opens at http://192.168.1.1 the user name is ‘admin’ and password is ‘admin’
However, the present wifi setup comes in one unit – modem+wifi but surprisingly the features are all the same.
So, Logged in and then open at the ‘Advanced’ section.
Here you will find the ‘Wan connection’ being used for Internet. For my case it’s named as ‘bsnl’. The LAN group is ‘LAN group 1′. The computers connected is shown in the ‘LAN IP:’ pull down menu. In my case my laptop is 192.168.1.3 while the Raspi is 192.168.1.2. so I select Raspi (I.e 192.168.1.2) from the pull down then I select the ‘user’ radio button at the left. The ‘Available Rules’ was originally empty so I click the ‘New’ button at the bottom to create a new rule for my Port Forwarding.
Give the rule a name – and Port detail.
Like this…
Motioncam , Protocol – TCP, Port start – 5678, Port End – 5678, Port Map – 5678.
Webiopi , Protocol – TCP, Port start – 5679, Port End – 5679, Port Map – 5679.
Webpage, Protocol – TCP, Port start – 80, Port End – 80, Port Map – 80.
… Like that you can add more rules for more services.
Finally after adding all the desired services go to the bottom and press the apply button. To save the set up into the modem go to Tools – System Commands – Save all
Well that’s the setup for my modem ,for other kind of Modems this is more or less same. One kind of Modem asks for an external port which will be connected to the internal Port , like 3456 external port is connected to 6789 internal port (for that matter here 5678 external port is connected to 5678 internal port or 8000 to 8000 – simple ) like this how configuration works in some kind of Modems.
Port-forwarding on old mobile phones:
In case you are using mobile broadband for Internet connection on a moderately 3 / 4 years old mobile phone,it may so happen that your old mobile phone modem has the port-forwarding in built in it. Once you use that phone to be on line it will automatically forward your IP address. You need not to do anything further on it. Just install motion and webserver and it will start working all-at-once. For that read my other blog at
https://drive.google.com/file/d/0B3E3LcSKoM-6Nk1mOXJRZ3BjS1U/view?usp=sharing
Having done all this you can be sure that your Raspi web cam is available for the world now.
Testing:
Before that you have to know your Modems external IP address. This can be known from Modem Status – Connection Status.
Alternatively this can be known from some websites like:
http://portforward.com/english/routers/port_forwarding/Dlink/GLB-502T/Utorrent.htm
Point your browser to that URL and that URL when opens ,will tell you what is your external ip address. But our Raspi will use PHP ( ipaddy.php ) internally to know the external IP address and then in an email to you, it will write the same.
Now go to a separate Internet connection and in the browser copy paste that URL
[the email from Raspi will contain the following lines]
http://117.200.149.18:5678 for Raspi Cam
http://117.200.149.18/gpio.php for Raspi cam control
and then be amazed to see the Raspi Cam streaming the images. [Be careful to hold for support else you may fall from the chair due to over excitement !!!]
Oh no nothing happens !
Ensure that you are trying that URL from a different Internet connection. May be your mobile Internet can be a good testing ground. If it’s Windows 7 or later version use it in VLC player. Media – Open Network Stream and then copy paste this URL. For Linux , Unix or Mac open the URL in firefox, safari or any other browser and it will work. For android phone or older Windows computer try with firefox browser.
Testing of Web cam control:
Again PHP comes handy for this. http://your-external-ip-address/gpio.php will open the Web cam control window. The user / Password is pi / pi or whatever you entered in the associated http_auth.php file. Press the control buttons and see the web cam pans from left to right or oscillate non-stop. At the extreme position the ‘limit reached’ indication appears by the help of another onboard GPIO. For controlling the GPIOS we use the powerful wiringpi shell commands in PHP. For that you need to have wiringpi installed on Raspi.
Recommendation:
It’s recommended to copy all the program files in your web document root directory. In apache2 it is usually /var/www/ directory.
Wiringpi & PHP-GPIO (The power of GPIOs together):
Two varieties of wiringpi – The C model and PHP model comes vary handy for Raspberry Pi computer. The wiringpi for PHP model is used to run the stepper motor in the camstepper.php program and the wiringpi for C model is used in camcontrol program in the gpio.php program. However, here we have used only some shell commands (gpio) of the C model by php_exec() commands of PHP. Both are to be installed for this program.
PHP-GPIO is the other useful library for manipulating the GPIOs of Raspberry Pi computer. It’s a simple GPIO.php file , just copy it in your /var/www directory taking from the resources.
For installing the wiringpi C model here’s the link https://projects.drogon.net/raspberry-pi/wiringpi/download-and-install/ follow the simple steps mentioned there.
For installing the wiringpi for PHP model follow the next few lines.
Use git to get the software bundle…
$>sudo apt-get install git
git clone https://github.com/WiringPi/WiringPi-PHP.gt
cd WiringPi-PHP
git submodule update -init
sudo ./build.sh
sudo ./install.sh
cp wiringpi.php /var/ww/
Now wiringpi is installed in your Raspi also it got copied to the /var/www directory but to get it inside PHP we need to load it in the ini file.
Open a wiringpi.ini file in /etc/php5/conf.d/ and write the following lines in it . Save it and restart apache server.
sudo nano /etc/php5/conf.d/wiringpi.ini
extension=wiringpi.so
wiringpi.pinmaptype=PINS
Once the wiringpi is installed you can control it by simple command line controls which we will do it in PHP using shell_exec command of PHP – So simple and it does flawlessly in PHP.
If you study the camstepper.php program you would find that the entire pan of the cam is controlled by just three GPIOs. These are GPIO-18, 21 & 25 .Any other GPIOs can also be considered. Funny, nothing is actually connected to them only internally they are influencing the stepper motor.
For GPIO-18 & 21
0 0 —— that’s no motion
1 0 —— clockwise motion of cam
0 1 ——- anti clockwise motion of cam
1 1 ——- oscillating motion of cam.
The other GPIO-25 is used for indication of end limit. When one extreme end is reached the GPIO-25 changes state Just follow the camstepper.php program and it will be understood clearly.
For more detail: Raspberry Pi world web cam