
This instructable is a demonstration of the settings used to control the hardware Pulse Width Modulation (PWM) on a RaspberryPi. If you are just fading an LED the default settings are good enough, but if you are trying to control a servo, a stepping motor, or anything critical you will want to change some of the settings.
You will need:
1 – A RaspberryPi
2 – Speakers plugged into the speaker jack (Not HDMI)
3 – LED
4 – Resistor for LED, 220 – 560 Ohm in series with the LED
5 – 10 mf 25 volt Electrolitic Capacitor
6 – Digital Multimeter
7 – Oscilloscope
8 – 2 male/female jumper wires
9 – Breadboard
If you don't have a multimeter or an oscilloscope you can still do the experiments. The capacitor is only used in the last experiment.
The fact that the hardware PWM makes noise on the speakers is well documented. A more accurate way of stating it is “The RaspberryPi uses the audio circuitry to create the PWM signal”.
My PWM demonstration program uses the wiringPi libraries, written by Gordon Henderson, for programming the GPIO in C.
wiringPi must be installed.
Instructions for download, install and use are located at http://wiringpi.com
WiringPi uses it's own pin numbering scheme.
All pin numbers are wiringPi numbers unless otherwise specified.
When I specify a physical pin number I am referring to the pin number on the GPIO header.
Pin 1 is the only hardware PWM pin available on all RaspberryPi models. It is physical pin number 12 on the GPIO header and it uses the right channel.
Pin 24 is the second hardware PWM pin available on model B+ only. It is physical pin number 35 on the GPIO header, it uses the left channel.
The default base frequency is 585 Hz, the amount of time the PWM
pin is high within each cycle is called the duty cycle.
Traditional PWM uses Mark:Space mode.
The time the voltage is high is varied. (Modulated)
it looks like this:
________
        _________________________
<-------------------------------> 25% duty cycle
 One cycle of the base frequency
 ________________
                 ________________
 <------------------------------> 50% duty cycle

But the RaspberryPi uses balanced mode PWM as it's default.
Balanced mode PWM looks like this:
 _   _   _   _   _   _   _   _
  ___ ___ ___ ___ ___ ___ ___ ___
 <------------------------------> 25% duty cycle
 _ _ _ _ _ _ _ _ _ _ _ _ _ _ _ _
  _ _ _ _ _ _ _ _ _ _ _ _ _ _ _ _
 <------------------------------> 50% duty cycle

Instead of Modulating the pulse width it actually modulates
the pulse count and spaces it evenly across each base cycle.

The maximum pulse count is refered to as the range or
resolution. The default range is 1024.

The base frequency is controlled by the clock.
The default clock is 32, giving the default
base frequenct of 585 Hz.
Step 2: The Circuit
1 – Plug speakers into the headphone jack. (Not HDMI)
2 – Connect a jumper wire from physical pin number six to the ground rail of the breadboard.
3 – Connect a jumper wire from physical pin number 12 to the positive rail of the breadboard.
4 – Connect the LED with the resistor in series. The anode goes to the positive rail.
5 – The cathode connects to ground.
( I used an LED with the resistor soldered to the cathode lead and a two inch black wire soldered to the other end of the resistor. There is a two inch red wire soldered to the anode.)
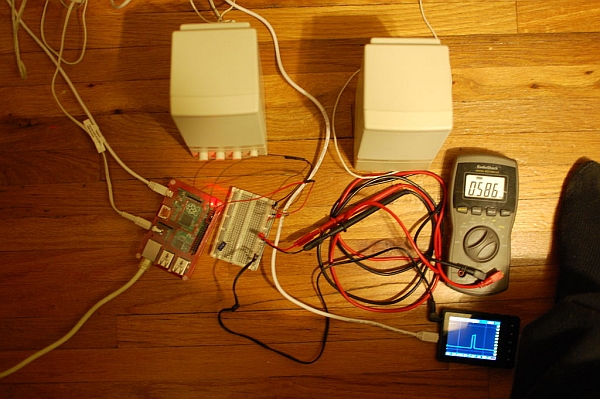
6 – Connect the multimeter and the oscilloscope to the positive and ground rails.
7 – Do not connect the capacitor yet.
Step 3: The Program Code
/***************************************************************************
 * PWMdemo.c:
 *
 * Dependencies: wiringPi must be installed.
 * Instructions for download, install and use
 * are located at wiringpi.com
 *
 * Compile with:  gcc -o PWMdemo PWMdemo.c -lwiringPi
 *
 * All pin numbers are wiringPi numbers unless otherwise specified.
 *
 * Pin 1 is the only hardware PWM pin available on all RaspberryPi models.
 * It is physical pin number 12 on the GPIO header.
 *
 * Pin 24 is the second hardware PWM pin available on model B+ only.
 * It is physical pin number 35 on the GPIO header.
 *
 * There is an LED (with series resistor) connected to PWMpin and ground.
 * An oscilloscope can be connected to PWMpin and ground.
 *
 * You can hear the tones if speakers are connected to the audio jack.
 * Changing the various settings can make the tones very loud.
 *
 * Menu choices:
 *
 *  1 Fade In-Out - Runs through a for loop one time.
 *    It runs from 0 to 100% to 0 of the duty cycle in the
 *    number of steps specified in the range.
 *
 *  2 Toggle the PWM mode between balanced and mark:space.
 *
 *  3 Set the range, the number of duty cycle steps between 0 and 100%.
 *
 *  4 Change the PWM clock.
 *
 *  5 Set the duty cycle. The duty cycle should not be greater than the range.
 *    Duty cycle is 100% if duty cycle equals range.
 *
 *  6 QUIET sets duty cycle to zero.
 *
 ***************************************************************************/
#include <wiringPi.h>
#include <stdio.h>

#define clrscr() printf("\e[1;1H\e[2J") // Clear screen.

int PWMpin= 1;    // 1 right (Or 24 left if model B+).

/***************************************************************************
 * menu() function - Display the menu and execute the choices.
 ***************************************************************************/
void menu(void)
{
  int range = 1024; // value passed to pwmSetRange.
  int clock = 32;   // value passed to pwmSetClock.
  int mode = 0;     // 0=balanced, 1=mark:space
  int duty = 0;     // Duty cycle
  int choice=0;
  int i; // Index for fade for loop.
  int x; // Fade in/out switch.
  while(1) // Display the menu.
  {
    clrscr();
    printf("\n\n                      Pulse Width Modulation Demonstration\n\n\n");
    printf("                      1 - Fade In - Out\n");
    printf("                      2 - Toggle PWM Mode: ");
    if(mode==0) printf("Balanced\n");
    else printf("Mark:Space\n");
    printf("                      3 - Set Range: %d\n", range);
    printf("                      4 - Set Clock: %d\n", clock);
    printf("                      5 - Set Duty Cycle: %d\n",duty);
    printf("                      6 - QUIET\n\n\n");
    printf("                          Press Selection: ");
    scanf("%d", &choice);
    switch(choice) // Execute the choice.
    {
      case 1: // Fade duty cycle within 0 - range - 0.
        clrscr();
        x = 1;
        for (i=0; i>-1; i+=x)
        {
          pwmWrite(PWMpin, i);
          printf("   %d\n", i);
          delay (7);
          if(i > range) x = -1;
        }
        pwmWrite(PWMpin, 0);
        duty=0;
        break;
      case 2: // toggle PWM mode Mark:Space/Balanced.
        mode = !mode;
        if(mode==0) pwmSetMode(PWM_MODE_BAL);
        else pwmSetMode(PWM_MODE_MS);
        pwmWrite(PWMpin, duty);
        break;
      case 3: // Change the range. (number of steps for duty cycle)
        printf("\n\n\n                          Enter Range: ");
        scanf("%d", &range);
        pwmSetRange(range);       // Default 1024 (unsigned int)
        pwmWrite(PWMpin, duty);
        break;
      case 4: // Change the clock.
        printf("\n\n\n                          Enter Clock: ");
        scanf("%d", &clock);
        pwmSetClock(clock);       // Default 32 (int)
        pwmWrite(PWMpin, duty);
        break;
      case 5: // Set the duty cycle.
        printf("\n\n\n                          Enter Duty Cycle: ");
        scanf("%d", &duty);
        pwmWrite(PWMpin, duty);
        break;
      case 6: // Quiet, set duty cycle to zero.
        duty = 0;
        pwmWrite(PWMpin, duty);
        break;
    }
  }
}
/*********************************************************************
 * main() function
 *********************************************************************/
int main(void)
{
  wiringPiSetup();
  pinMode (PWMpin, PWM_OUTPUT);
  menu();
  return 0;
}
 PWMdemo.c4 KB
Step 4: Using the Program
Menu Choices:
1 – Fade In – Out – Steps the duty cycle from zero to range and back to zero. There is a seven millisecond delay at each step. Remember to turn the volume down if you are in Mark:Space mode, it will get very loud. The QUIET menu option will not stop the Fade In – Out. It will run through it's entire cycle.
2 – Toggle PWM Mode – pwmSetMode([PWM_MODE]) There are two possible modes PWM_MODE_BAL and PWM_MODE_MS. PWM_MODE_MS is the traditional Mark:Space PWM Mode, but the balanced mode, PWM_MODE_BAL, is the default PWM mode on the RaspberryPi.

3 – Set Range – pwmSetRange([int PWMpin], [unsigned int RANGE]) This sets the resolution, the number of steps between 0 and 100% duty cycle. The default value is 1024.
4 – Sets Clock – pwmSetClock([int PWMpin], [int CLOCK]) Setting the clock sets the base PWM frequency. The base frequency is inversely proportional to the clock. The magic number is 18750. Dividing 18750 by the clock will give you the Base frequency. Dividing it by the base frequency will tell you the clock. The default value is 32 which gives you a base frequency of 585 Hertz.
5 – Sets the duty cycle, uses the function pwmWrite([PWMpin], [DUTY]). Duty must be between zero and the range. The duty cycle you enter will be active until you change it.
6 – Sets the duty cycle to zero with the function pwmWrite([PWMpin], 0).
You can look at step 9 to see pictures of the Oscilloscope tracings.
Most multimeters can measure the frequency and the duty cycle.
For more detail: RaspberryPi Pulse Width Modulation Demonstration