
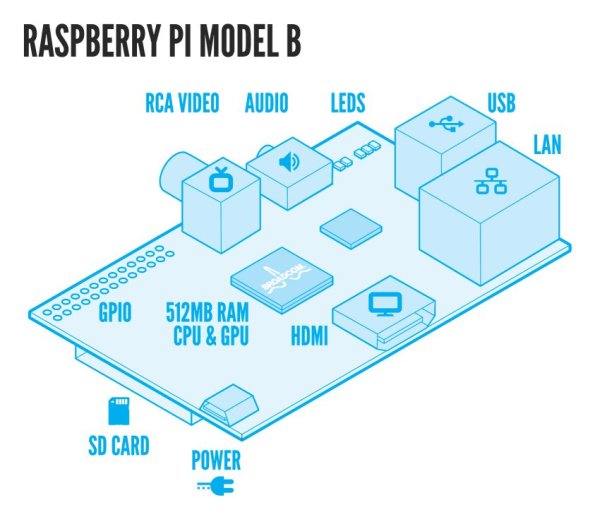
I have a couple of spare USB hard drives lying around, and of course a Raspberry Pi (headless). I put them to use as a wireless NAS / Media server. I'd also like my clients to be able to make the Pi automatically download torrents and save them on the NAS. I've already posted a guide to set up your Pi as a wireless access point. Just ignore the bit about 3g if it's not relevant!
To do this, I'll use Samba to share the files over my network (a mixture of Linux and Windows clients), and MiniDLNA to manage media serving. MiniDLNA will allow any UPnP compatible device on your network, such as a television or games console, to access the shares on your Pi. qBittorent will be used as the torrent client. Fsniper will be used for auto-download feature..
I also use fsniper to automatically sort all locally downloaded content into the appropriate files on the NAS.
As an alternative to this, you could use an operating system like FreeNAS orXMBC. I prefer to keep Raspbian and bolt on the extra bits I need.
This guide assumes you are using the 06-12-12 of Raspbian. It should also work on the latest version, but I can't guarantee that as I've not had chance to test it yet. I used the following IP scheme:
Pi Ethernet Port: 192.168.1.10/24
Pi wlan0: 10.0.0.1/24
Note: external hard drives on the Pi should be connected via a powered hub.
Step 1: Automount USB hard disks & ntfs-3g
To use USB hard disks in your NAS setup, we need to make sure they auto-mount at boot. We also need to make sure that if the use the NTFS file system, we are allowed to write to them – this is what ntfs-3g is for. Install ntfs-3g from the terminal:
sudo apt-get install ntfs-3g
Create mount point directory
First, we need to make some folders for the disks to be mounted to. As an example, we'll assume there is a USB hard disk with a single partition, formatted with a NTFS file system. It contains all of your legally owned videos and music, so we will call it ‘Media'. Make a folder for the drive to be mounted to, and change the permissions so everyone on the network can read and write to and from it:
sudo mkdir /media/Media
sudo chmod 777 /media/Media
Setup auto-mount
Now, let's set the disk to auto-mount to that folder at boot. We will edit a file called fstab, which deals with all the file systems that are mounted at boot on your Pi. We need to gather some information about the drives first, so in a terminal type:
sudo blkid
blkid is a tool we can use to a drives metadata – specifically the UUID. This is what we are going to make fstab use to identify the drives. Drives are automatically assigned to files in the /dev folder, but these assignments are not guaranteed to be the same every time your Pi boots, so we will use the UUID.
We are interested in the UUID of each drive/partition you wish to mount on your NAS. My drives were formatted and partitioned on a Windows client some time ago, and are easily identifiable by their labels. Copy the full output of blkid, then type:
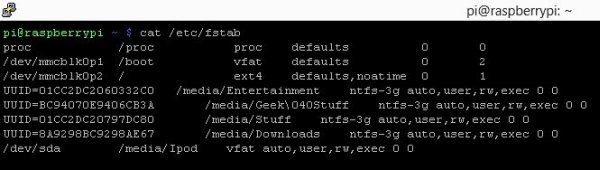
sudo nano /etc/fstab
This will open the fstab file for editing. Bellow the text that is already there, leave a bit of space then paste the output form blkid. We will be deleting this later, but I think it's easier to have all the info infront of you – this won't be an issue on a Pi setup with a monitor, but I was doing this headless so it worked better in that situation.
Entries in fstab are in this format:
Device Name | Mount Point | File System | Options | Dump Options | FS Check Options
One of my entries as an example:
Device Name Mount Point FS Options DO | FSC O
/dev/sda /media/Ipod vfat auto,user,rw,exec 0 0
In the device name column, UUID= and Label can also be used. All entries are seperated by a single tab. Your entry should be structured like this:
Device Name: Use the UUID identified in the blkid output, without the quotes.
Mount Point: In the Mount Point column, enter the location of the mount point we created earlier.
File System: The information for the File System column can be found in the blkid output, after the word TYPE. The file system for FAT32 drives is vfat, and for NTFS drives you should use 3g-ntfs.
After these three columns, paste auto,user,rw,exec 0 0
So the entry for the fictional ‘Media' drive would be (I'm just gonna make up a UUID):
UUID=5d2047b5-6eaf-46de-9a52-a3a19dfc3706 /media/Media ntfs-3g auto,user,rw,exec 0 0
Repeat this process (including creating a mount folder) for each drive or partition you want to share. Be sure to delete the output from blkid that you pasted in before you save and exit.
To test your new entries in fstab, in the terminal type:
sudo mount -a
df -h
This will attempt to mount all entries in fstab, unless they are already mounted. The second command will output information about currently mounted drives, which will indicate wether or not the entries in fstab are valid. If you see the mount folders you created listed in the output of df, navigate to them and list their contents to confirm all is well.
Make sure you have nailed this part before carrying on – your Pi will have problems booting if there are faulty entries in fstab. If this occurs, you should be given the option of a terminal prompt, at which point you can open fstab in nano like before and remove the bad entry.
Step 2: Install and configure Samba
Samba is a suite of programs that allows Linux and Windows clients to easily use the same shares. There's a lot more too it than that, so check the Samba website for more info if you're interested.
Install Samba from the terminal:
sudo apt get install samba
Samba config
Once it's finished downloading and installing, we need to configure it. I make a backup of the ‘out of the box' config file, delete the original and then start with a blank canvas:
sudo cp /etc/samba/smb.conf /etc/samba/smb.conf_bak
sudo rm /etc/samba/smb.conf
sudo nano /etc/samba/smb.conf
Paste the following into nano:
#### GLOBAL CONFIG #####
workgroup = home
netbios name = nas
server string = %h
wins support = yes
dns proxy = no
security = user
null passwords = yes
guest account = nobody
hosts allow = 127.0.0.1 192.168.137.0/24 10.0.0.0/24
hosts deny = 0.0.0.0/0
interfaces = eth0 wlan0 lo
bind interfaces only = yes
#### PUBLIC SHARE #####
[Media]
comment = Media Drive
path = /media/Media
browseable = yes
guest ok = yes
writeable = yes
public = yes
available = yes
create mask = 0666
directory mask = 0777
The text above is a really simple Samba config that works for me. I've highlighted the parts that will need your attention:
Hosts Allow defines the networks or individual hosts which will be permitted to access the shares.
Hosts Deny defines the networks or individuals not permitted. The entry I've used explicitly denies everyone not in the allow list.
Interfaces defines the interfaces Samba will allow connections on – if your Pi has a direct connection to the internet, do you want your Samba shares to be accessible via that interface?
Bind Interfaces Only tells Samba to use only those interfaces in the Interfaces list.
Make a public share for each drive or partition you mounted with fstab. Once you have finished with smb.conf, save changes and exit (ctrl+x, y, Enter). Restart the Samba service to apply the changes:
sudo service samba restart
If you have a Windows machine on the same network as the Pi, open a command prompt and type:
net view \\10.0.0.1
Replacing the IP address with that of your Pi's. This should show a list of the shares you defined in smb.conf, confirming your shares are accessible. Samba can be a bit of a mysterious beast at times, so if you have any problems leave a comment and I'll try and help you. I am by no means an expert though 🙂
Windows
Each flavour of windows has a slightly different route to provide the credentials required to access the Samba shares on your Pi via the gui, so I am going to avoid that completely and use the command line. If that disturbs you in any way and you really want to do it via the gui, let me google that for you!
Open a command prompt, and type:
net view \\IP_ADDRESS_OF_PI
This will list the shares published by Samba on your Pi. In order to map the drive so you can see it in My Computer we will use the net command, type the following (I'm continuing to use the ‘Media' share example):
net use z: \\IP_ADDRESS_OF_PI\Media /pi:raspberry raspberry /P:Yes
The ‘z:' argument specifies which drive to assign the share to. I'm assuming you don't have a ‘Z' drive. The next part specifies the location of the Samba share on the network. The following part supplies the credentials in the format USER:DOMAIN PASSWORD. I have used the Raspbian default credentials in this example – change as necessary for your setup. The final argument, ‘P:Yes' tells net to auto-connect the share at start up.
For more detail: Raspbery Pi Wireless Auto-Sorting NAS/Media Server using MiniDLNA and Samba