
For a school project in my bachelor MCT at Howest Kortrijk, I made an RC car.
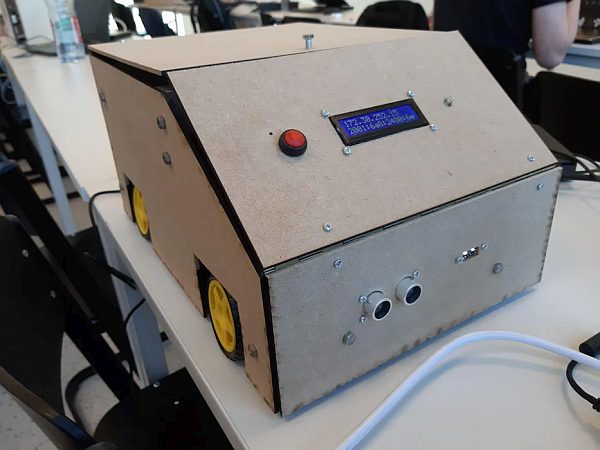
This project is a RC car with extra features. The car can be controlled via a web dashboard, has collision detection and stops automatically when it detects a red light. The car also has four-wheel drive.
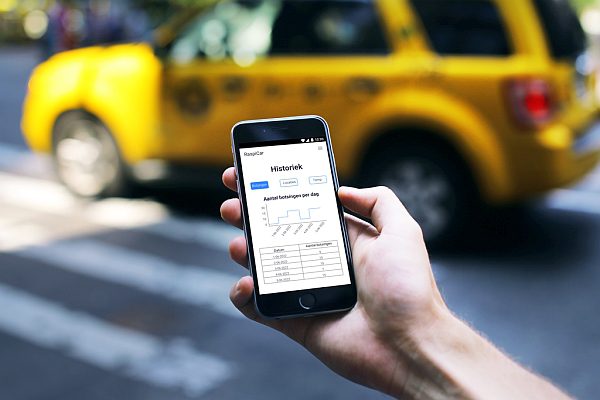
Next to being able to control the car via the web dashboard, the web dashboard will also show data. The web dashboard will show live data like the acceleration, orientation, location and temperature from the car. The web dashboard will also display data from the database. The amount of collisions in a day will be visualized in a graph and table, the average temperature of day will be visualized in a table and graph and the location where the car has been will also be shown in a table. The project can safely be shutdown with a button on the project and with a button on the web dashboard.
The github repository from this project: https://github.com/howest-mct/2021-2022-projectone-PattynRuben
For a school project in my bachelor MCT at Howest Kortrijk, I made an RC car.
This project is a RC car with extra features. The car can be controlled via a web dashboard, has collision detection and stops automatically when it detects a red light. The car also has four-wheel drive.
Next to being able to control the car via the web dashboard, the web dashboard will also show data. The web dashboard will show live data like the acceleration, orientation, location and temperature from the car. The web dashboard will also display data from the database. The amount of collisions in a day will be visualized in a graph and table, the average temperature of day will be visualized in a table and graph and the location where the car has been will also be shown in a table. The project can safely be shutdown with a button on the project and with a button on the web dashboard.
The github repository from this project: https://github.com/howest-mct/2021-2022-projectone-PattynRuben
Supplies
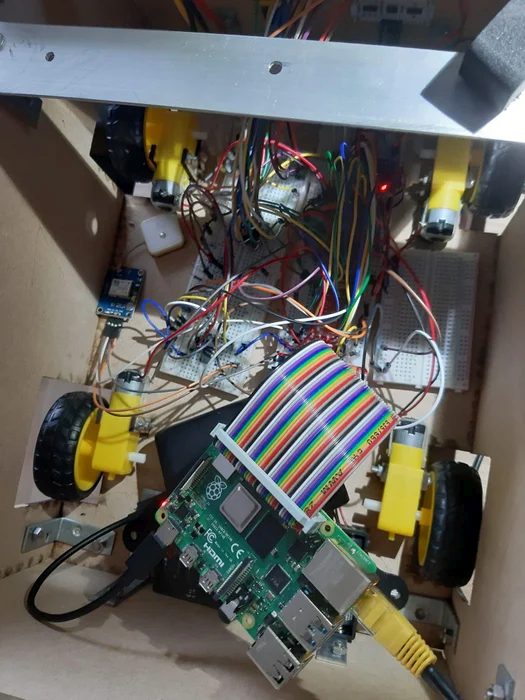
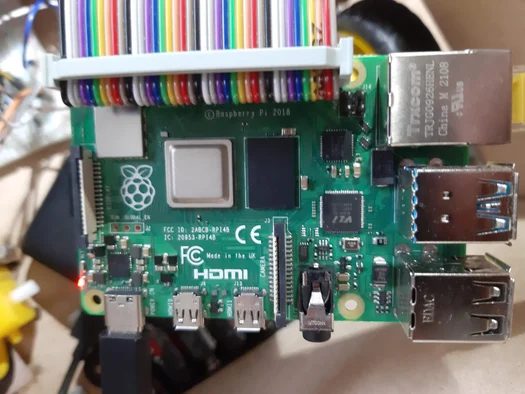
Raspberry Pi Model 4 Model B
For this project I used a Raspberry Pi with a configured image.
LCD Display 16×2
I used a LCD display to show the IP address from the car.
HC-SR05
I used this sensor to detect how far an object is from the car.
GY-NEO6MV2 GPS Module
The GY-NEO6MV2 is a module that can get information from gps. A small disadvantage from this module is that it can only work outside or close to a window.
MPU6050
This sensor can measure the acceleration and orientation in 3 directions. It can also measure temperature.
TCS34725
This is a sensor that can detect colors. It can measure the RGB-value from the light.
PCF8574
In this project I used 2 of these components. One is used to control the LCD and the other one for an RGB-led and a button.
L293D Motor driver
I used 2 L293D motordrivers to control the 4 motors for the car.
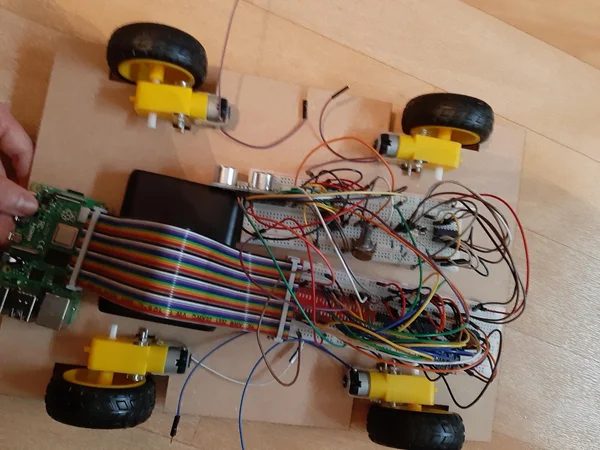
DC Motors
I used 4 DC motors to drive the car. For each wheel there is one motor.
Active Buzzer
This buzer can make noise if necessary.
Step 1: Gather Material
Gather the sensors and actuators on the list of supplies above.
Step 2: Schematic and Wiring
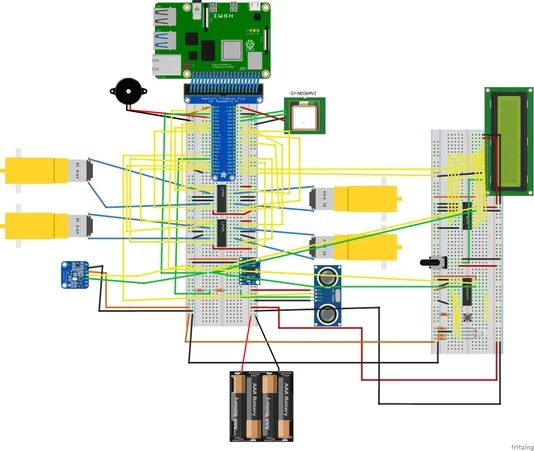
I drew an electronic schematic and breadboard schematic with the program Fritzing. It is a program that is easy to work with. These schematics give a clear image of how the sensors and actuators are connected to the Raspberry Pi.
Step 3: Database Design
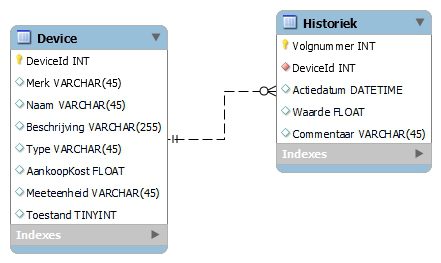
I used a pretty basic database model to save certain data in this project.
There is a table where you can see things like the id, name, price and unit of measurement from each sensor and actuator.
Ther is also a history table where you will be able to see measured values from the sensors and instructions for the actuators.
Step 4: Setup Raspberry Pi
Before we can run the code, the Raspberry Pi has to be prepared.
1.Raspberry Pi OS
The first step you will have to do is downloading an image Raspberry Pi OS. You can find this file via this link:
https://www.raspberrypi.com/software/operating-systems/
When the file is downloaded, you can write it to your sd card. This can be done via the Win32 Disk Imager or with the Raspberry Pi Imager (https://www.raspberrypi.com/software/).
After that you should configure the SD card.
Find the boot disk on the folder from the SD Card. Create a new file ssh, without extension and add ‘ip=169.254.10.1' to the end of the file and save it.
2.Connect to Raspberry Pi
When the Raspberry Pi is configured correctly, you should be able to connect with the Raspberry Pi.
Connect an internet cable from your pc to the Raspberry Pi. Open Putty and enter the ip address of the Raspberry Pi. You should be able to login with the username ‘pi' and password ‘raspberry'.
3.Configuration
Enable I2C, Serial and SPI on the Raspberry PI with:
sudo raspi-config
Also navigate to Localisation Options and change timezone and WLAN Country.
When this is done you should reboot the Raspberry PI with
sudo reboot
Add your home wifi to the Raspberry Pi. This can be done via VNC Viewer or via the command line with putty.
If you choose to do it via Putty, you an do it with the following commands:
sudo wpa_passphrase 'Networkname' 'Password' >> /etc/wpa_supplicant wpa_supplicant.conf
wpa_cli -i wlan0 reconfigure
You can check the coonnection by requesting the ip-address (wlan0).
ifconfig
Make shure that the operatin system from Raspberry Pi is up to date by executing the following commands
sudo apt-get update
sudo apt-get upgrade
4.Packages for python
Install the following packages:
pip install flask-cors
pip install flask-socketio
pip install mysql-connector-python
pip install gevent
pip install gevent-websocket
pip install selenium
sudo apt install chromium-chromedriver
5.Database
Install apache with the following command:
sudo apt install apache2 -y
Install MariaDB with the following command:
sudo apt install mariadb-server mariadb-client -y
Secure MariaDB with the following steps
sudo mysql_secure_installation
Enter -> Type a password -> y -> y-> y- > y
Create a MariaDB user:
sudo mysql -u root -p
create user 'USERNAME'@'localhost' identified by 'USERNAME';
grant all privileges on *.* to USERNAME@localhost;
flush privileges;
exit;
Configure MySQlWorkbench:
Start MySQLWorkBench on your pc and make a new connection.
Choose Standard TCP/IP over SSH as Connection Method
SSH Hostname:169.254.10.1
SSH Username: pi
SSH Password: raspberry
MySQL Hostname:127.0.0.1
MySQL Server Port:3306
Username: pi
Password: raspberry
7.Automaticallystarting the script up
If you want the project to automaticly start when you boot up the Raspberry Pi, you should execute the following steps.
Create a file ‘myproject.service' with the following code:
 [Unit]
Description=ProjectOne Project
After=network.target
[Service]
ExecStart=/usr/bin/python3 -u /home/pi/2021-2022-projectone-PattynRuben/backend/app.py
WorkingDirectory=/home/pi/2021-2022-projectone-PattynRuben/backend
StandardOutput=inherit
StandardError=inherit
Restart=always
User=pi
[Install]
WantedBy=multi-user.target
Copy this file as root user to /etc/systemd/system with the command:
sudo cpmijnproject.service /etc/systemd/system/mijnproject.service
You can test the file by starting it with the following command:
sudo systemctl start myproject.service
You can stop the file with the following command:
sudo systemctl stop myproject.service
If everything works fine, you can start the script after booting up by the following command:
sudo systemctl enable myproject.service
Step 5: Programming the Backend
I used Visual Studio Code to program all the code for this project. I installed the extension VScode Remote SSH to remotely code on the Raspberry PI via Visual Studio Code.
I used threading to execute multiple task at the same time, socket.io to send live data to my web dashboard and made routes to acces data from the database.
Step 6: Programming the Frontend
To make the front-end part in this project, I started by making wireframes of pages I wanted to make. Having the wireframes makes it easier to code in HTML and CSS because you already have a clear idea of what you want to make.
to make the frontend of the project I used JavaScript, HTML and CSS.
I used the following libraries for the website ApexCharts.js , Chart.js and https://github.com/bobboteck/JoyStick.
Step 7: Making the Case for the Car
The last step in the project was to put everything together in a case and test the car.
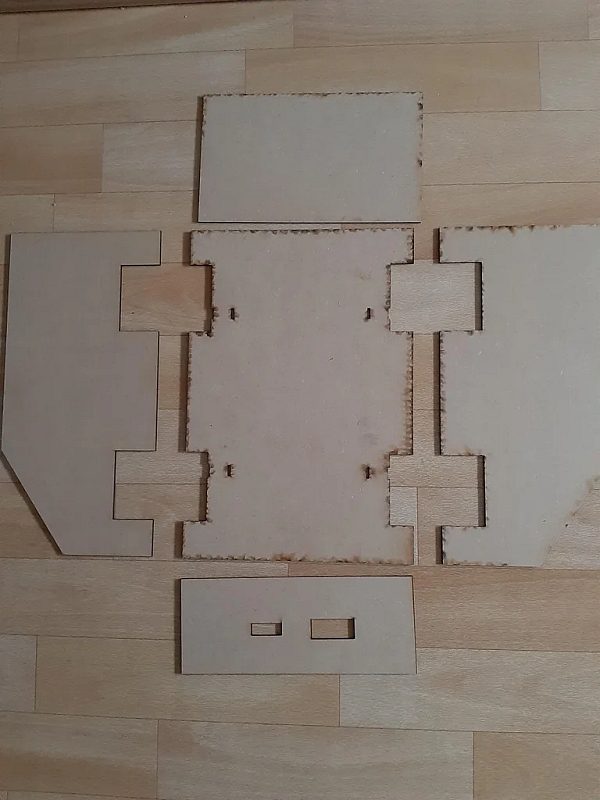
I started out by making sketches of what I wanted the car to look like. After that I started laser-cutting the necessary parts for the case with 3mm MDF
After having lasercutted the parts of the car I put them together with hinges, bolts and nuts and put the electronics in the case.
Source: RaspiCar ( RC Car With 4WD)