
INTRODUCTION
In the recent years, proliferation of technologies like WiMAX , IEEE 802.11, 3G and Bluetooth has directed much attention to wireless audio streaming. Nowadays audio streaming via radio waves and Bluetooth has particularly gained momentum. But these technologies have limitations such as, the destination device for the streaming system can‟t go too far from the audio source and their range cannot exceed 10 meters .These systems are also not secure, as by tuning in to the used frequency level, any intruder can get the streamed feed.
In particular, IEEE 802.11 WLAN has become the prevailing technology supporting many real-time multimedia applications like Voice over Internet Protocol and video conferencing. With data rates in the order of 11 Mbps, which is considerably higher than cellular base stations, WLAN is favored more.
This project intend to integrate voice streaming to a remote location through secured channel which will abate the growing need of a secured, low-cost and compact embedded device for voice transmission. The proposed system has features such as feeding recorded audio directly into a remote computer in real-time from the Raspberry Pi [1].
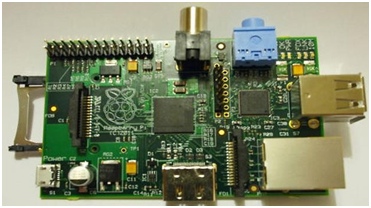
The Raspberry Pi is a credit-card-sized single-board computer developed for many of the things that a standard desktop does. It is designed to be plugged into a TV or HDMI monitor. This project has been implemented with a Raspberry Pi model B. It has a Broadcom BCM2835 SoC, which includes ARM1176JZF-S 700 MHz processor, 512 Megabytes of RAM and does not include any built-in hard disk or solid-state drive; instead it relies on SD card for booting and long-term storage. This board can run most of the Linux kernel based operating systems. This model has two USB port, an HDMI port and a 10/100 Ethernet controller. This module doesn‟t have a dedicated switch for powering it on. Therefore, it has to be plugged in to a power source of 5V 1.2 Amp with a mini USB connector. There have been various SD Card images released that can be loaded onto an SD Card to produce an operating system. The image used in this project is based on Linux version of Debian OS called “Raspbian wheezy” [2].
II. ADITIONAL HARDWARE RESOURCES USED COMPARTIBLE TO RASPBERRY PI
For the project use of Raspberry Pi is not enough. For voice input and connectivity some other devices are required.
A. USB voice input device
There is no arrangement for audio input in Raspberry Pi, which is a major requirement for this project for capturing audio, but a USB mic or sound-card or USB CAM could be connected via USB port. The Microsoft Life Cam HD-3000 USB cam is being used in this project.
B. Wi-Fi Adapter
Wireless USB adapters is needed for connecting raspberry Pi and remote desktop and internet without any wires hassle. For the project edimax-ew-7811un [3] wireless-802-11b-g-n nano usb-adapter is used. It is World‟s smallest, has green power saving mode and supports WPS,WPA2,802.11b/g/n with data rates up to 150 Mbps.
C. SD card
The SD card is installed with Raspberry Pi‟s operating system “Raspbian wheezy”. Here TRANSCEND SD 4GB CLASS 4 MEMORY CARD (the class indicates how fast the card is) is used.
D. Ethernet cable
In this project an Ethernet cable of 5 meter length is used to connect the Raspberry Pi with the computer for programming.
III. IMPLEMENTATION METHODOLOGY
For Capability of gathering audio from an USB microphone and transmit to another remote computer in real time we need to configure microphone and also connect to the Raspberry Pi from remote PC using SSH(Secure SHell).But before that Raspberry Pi needs to be prepared with the required OS and software packages. Then Connection of the Raspberry Pi to the laptop with a Ethernet cable needs to be done to View the Raspberry Pi desktop on remote pc using PuTTy[4]. At last for recording and playing voice from Raspberry Pi Configuration of the USB microphone, Wi-Fi connection and a GUI is desired.
A. Installation of the “Raspbian wheezy” OS on the Raspberry Pi module
Raspbian is a Debian-derived free OS optimized for the Raspberry Pi hardware. Raspbian uses a Linux kernel also popular as the Debian GNU/Linux distribution. It comes with over 35,000 packages and pre-compiled software bundled in a format that is easy for installation on the Raspberry Pi. The “wheezy-raspbian.Zip” file can be downloaded from Raspberry Pi‟s official website.To extract the OS image file into the SD memory card, an image writer application “win32diskimager-v0.9-binary”[5] can be used. This software is used to write a raw disk image to a removable memory device. It is a freeware and the program for it is open source. It has been proved useful for embedded development as the source code can be branched and modified as per the requirement. After writing to SD card is finished, it is put in the SD card slot of Raspberry Pi and switch it on so that initial booting can start.
B. Connection of Raspberry Pi to the laptop with a Ethernet cable
As Raspberry Pi needs to be used as a headless embedded device here, without monitor attached finding IP address will be a complex task. Again the module has to be prepared by connecting it to a computer system with an Ethernet connection. But first the module has to be configured with a static IP address to avoid finding out dynamic IP address which changes with each new connection. The SD-Card is inserted into a card reader and plugged into a PC. The static IP address configuration is added to the last line of the “cmdline.txt” file of the boot folder in the SD card. For DHCP enabled network settings where the IP address is obtained automatically, an address in the range 169.253.0.0– 169.253.255.255 is used: IP=169.253.0.3. Then the card is inserted back in the Raspberry Pi. The network cable is then connected to both the computer and Raspberry Pi and then the module is power up.
C. SSH protocol and PuTTY installation
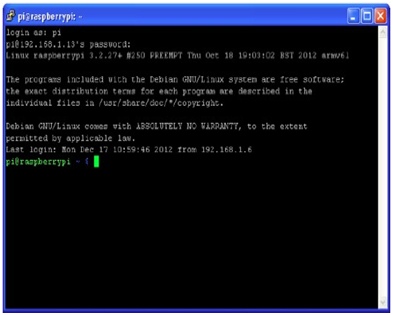
After the Ethernet connection is established Raspberry Pi is powered on .Then to reach the module from PC a secured connection is established using SSH (Secured Shell) protocol. The SSH protocol is developed as a secure, encrypted replacement for the non-secure RSH (Remote SHell) protocol. It is used for remote shell access to a UNIX based system with strong security. The need for remote login and control of Raspberry Pi from a remote computer arises when it is used as a headless device (device not requiring a keyboard, mouse and monitor). A remote system with SSH client can login into a device running SSH server. Raspbian OS comes with SSH server pre-installed in it. A SSH client “PuTTY” is installed at the remote PC side. In the Session menu in the PuTTY type in the static IP address defined earlier of the Raspberry Pi and leaves the port at default 22 for SSH to login. During connection it will give a warning the first time it tries to connect and then prompt for the username (“pi”) and password (“raspberry”) of Raspberry Pi.

D. Configuration of USB microphone
The Raspberry Pi does not have a microphone socket, which is inconvenient when you wish to record sound. To fix this you will need a USB Sound Card, for which Microsoft Life Cam HD-3000 USB cam is connected to one of the USB port of Raspberry Pi. To check whether that the computer can see the card, “lsusb” command is used in the Raspberry Pi‟s terminal window.
e.g.
$lsusb
Bus 001 Device 002: ID 0546:6782 Standard Microsystems Corp. Bus 001 Device 001: ID 3k8c:0562 Linux Foundation 1.0 root hub Bus 001 Device 003: ID 0457:cg60 Standard Microsystems Corp.
Bus 001 Device 004: ID 086d:c42f Microsoft Life Cam HD-3000 USB cam
For sound card setting and control Advanced Linux Sound Architecture (ALSA)[6] is used. It is a graphical user interface program for Linux systems which is used to configure the sound settings. It supports multiple sound cards with multiple devices. The commands used for recording and playbacks are:
• alsamixer – to set the record and playback levels with GUI
• amixer –to set the record and playback levels through Command Line
• alsactl – to save the settings which has set in alsamixer or amixer, for using again after a reboot
• arecord – to record the sound
• aplay – to playback the recordings
The Raspbian image already has the alsa-utils (ALSA mixer utility) for sound installed. To set-up the microphone port on the card in alsamixer, open the alsamixer GUI by typing this command: $ alsamixer.F6 key on the PC keyboard can be used to select the sound card from the list. Here in the example, the one to pick was: USB Device 004: ID 046d:c52e .Select the Mic option on the ALSA GUI and increase the volume to desired level.
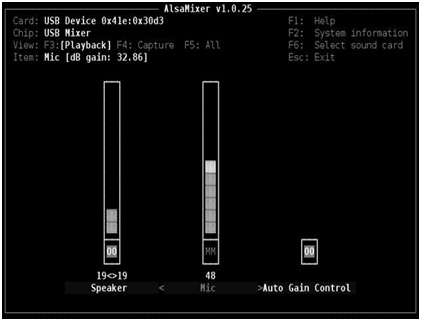
To exit and save the setting, press the Esc key and run this command: “$ sudo alsactl store 1”, where 1 is the card number. To check whether arecord sees the configured sound card, run the “arecord -l”command, which shows the list of sound card connected to Raspberry Pi.
e.g.
$arecord-l
**** List of All CAPTURE Hardware Devices ****
card 1086d:c42f: Microsoft Life Cam HD-3000 USB cam [USB Device 0x46d:c52e], device 0: USB Audio [USB Audio]
E. Wi-Fi configuration of Raspberry Pi
The USB Wi-Fi adapter is connected to one of the USB port of Raspberry Pi. Then the Raspberry Pi‟s network interface settings are configured according to desired Wi-Fi network.
• Wi-Fi connection with router present in the network
Mostly enterprise area and home networks connect to Wi-Fi network through gateway (router). These networks have certain settings and to connect them the Raspberry Pi must be configured accordingly. All the interfaces( local loop, Ethernet, Wi- Fi interfaces) are defined inside the network directory. Changes can be made to these using a nano editor with running the command:
$ sudo nano /etc/network/interfaces
The default configuration usually looks like this: allow-hotplug wlan0
iface wlan0 inet manual
wpa-roam /etc/wpa_supplicant/wpa_supplicant.conf iface default inet dhcp
If the Wi-Fi network have a DHCP server on the WLAN (normally the DSL/Cable router), then this interface file may be modified using the following configuration,
allow-hotplug wlan0 auto wlan0
iface wlan0 inet dhcp
wpa-roam /etc/wpa_supplicant/wpa_supplicant.conf
If there is a need of static IP address assigned to the Raspberry Pi in absence of a DHCP server, the following configuration matching the IP, Netmask and Gateway of the network.
allow-hotplug wlan0 iface wlan0 inet manual
address
netmask gateway
wpa-roam /etc/wpa_supplicant/wpa_supplicant.conf
Finally, to edit the WPA configuration to update it for SSID and WPA password of the network. these SSID and password have to be be put in the wpa_supplicant.conf by running “sudo nano /etc/wpa_supplicant/wpa_supplicant.conf” in the terminal window.
network={
ssid=”SSID of network” proto=RSN key_mgmt=WPA-PSK pairwise=CCMP TKIP group=CCMP TKIP
psk=”WIFI-PASSWORD phrase”
}
• Ad-hoc Wi-Fi connection when router not present in the network
In the absence of router or any access point in the Wi-Fi network, Raspberry PI can be configured as a host to a Wi-Fi Ad-hoc (Wi-Fi direct) network. The interfaces file needs to be modified with “sudo nano /etc/network /interfaces” command with configuration as given below;
allow-hotplug wlan0 iface wlan0 inet manual
address
netmask wireless-channel 1
wireless-essid “Ad-hoc network name” wireless-mode ad-hoc
wpa-roam /etc/wpa_supplicant/wpa_supplicant.conf
The WPA configuration is made in the similar way mentioned before. E.g.
ap_scan=2 network={
ssid=”SSID of the ad-hoc network” mode=1
proto=WPA key_mgmt=WPA-NONE pairwise=NONE group=CCMP
psk=”the password phrase”
}
This creates a Ad-hoc network and the PC can detect this network when Raspberry Pi is active on the network and connect to it with proper IP configuration.
F. Starting VNC server on Raspberry Pi during BOOT
A VNC (Virtual Network Connection) client (installed on remote PC) can access VNC server(installed on Raspberry Pi) for directly viewing GUI desktop of Raspberry Pi remotely through a SSH connection. There are a numerous options available for VNC server applications and the one here used is called “tightvnc”. VNC server software can be installed using the SSH connection that has been established earlier using PuTTy..To install VNC server on Raspberry Pi , the following command must be entered into the SSH terminal :
$ sudo apt-get install tightvncserver
The Tightvnc Server can be run by SSH terminal with typing “$ tightvncserver”. This will prompt to enter Password. We have to enter a password here. Then the VNC server can be initialize from the shell with typing : $ vncserver :1 -geometry 1920×1080 – depth 24
The “:1” implies that the server can be accessed from window number 1 and geometry command initializes the window size and resolution. Now a VNC client supporting tightvnc server can be installed on the PC .The remote PC can login with username , password and VNC server address of Raspberry Pi. This VNC sever address is in the format, < IP address of Raspberry Pi> :< window port>Here the port is “1” ( or default port “5901”) as defined during initializing .VNC server. But with this arrangement , each time the remote view is used , the VNC server on Raspberry Pi has to be initialized before VNC client login .To avoid that VNC server can be started during boot time of Raspberry Pi. To achieve this a file named “tightvncserver” needs to be created at the path “/etc/init.d/” which will contain the code to start VNC on start-up, by typing the below command line in the Raspberry terminal:
$sudo nano etc/init.d/tightvncserver
Then the code given below to program VNC server start during boot process should be saved in this file. export USER='pi„
eval cd ~$USER # this Checks the state of the command (which can be either start or stop) case “$1” in
start) # if the state is start, then vncserver is started
su $USER -c ‘/usr/bin/vncserver :1 -geometry 1280×800 -depth 16 -pixelformat rgb565'
;;
stop) #if the state is stop, then the process is terminated pkill Xtightvnc
;;
*)
echo “Usage: /etc/init.d/vncserver {start|stop}” exit 1
;;
esac exit 0
Then the file needs to be made executable by modifying it permissions with running this in command line:
$ sudo chmod 755/etc/init.d/ tightvncserver
This file is added to the list of start-up actions with the following:
$ sudo update-rc.d tightvncserver defaults
After rebooting the Raspberry Pi, this arrangement will take effect such that the VNC client can login without manually starting server before.
G. Recording, playing and streaming voice with commands in terminal
For recording, playing and streaming audio from the Raspberry Pi with a SSH connection from a remote PC in the network, certain commands need to be executed in SSH session terminal window of Raspberry Pi. For a test recording of sixteen second duration, the command given below can create an audio file named as test.mp3 in Raspberry Pi‟s home directory.
$ arecord -D plughw:1 –duration=16 -f cd -vv /test.mp3
The “arecord” function records the voice from the USB port with sound card passed through “plughw” with its previously saved number and “-f” passes the file type. The path of directory in the Raspberry Pi can be pass in the format “cd –vv
~//.”.To playback the recording at the Raspberry Pi audio output jack with “aplay” command, the format used is,”$ aplay ~/.”. To playback through the USB sound card, the device to the card number is set like in arecord: “$ aplay -D plughw:1 ~/.”
For streaming the voice in real-time from Raspberry Pi to a remote PC with a Linux or debian based OS a SSH connection is established. The command used for this purpose is :
$ arecord -D plughw:1 –duration= -f dat | sshpass -p ssh -C @ aplay -f dat
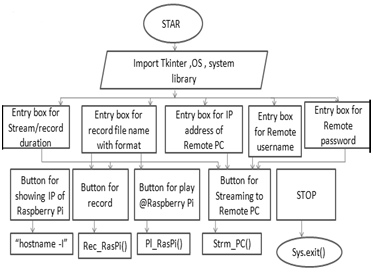
H. Graphical User Interface programming
For the ease of Recording, storing, playing and streaming voice with Ethernet connection a GUI is programmed using Python language. It is a common practice to use Visual Basic, #.NET, Eclipse using C, C++ or java platform to design graphical interfaces, but the programming becomes a tedious task with lots of memory management handling with objects and pointers. Further, It largely depends on the DE (desktop environment) being used for running the GUI. For instance, The Linux based OS does not support Visual Basic or #.Net platform but uses GTK+; and since GTK+ is written in C, many Linux GTK+ GUI apps use that. On the other hand another tool kit KDE, which is mostly based on Qt, written in C++.
However, the choice of language doesn't matter much; it's more the toolkit that DE supports and easy-to-use program structure. Here, Python [7] stands out with its Linux compatibility, easy-to-use feature and vast online support with a large collection of predefined module. Programming in Python faster compared to other language as automatic memory management with object-oriented programming feature. Unlike C and C++, Python is interpreter based language, which does not put compiling time overhead over processor.
Python is a widely used general-purpose, high-level programming language. Python is open source . Python is a highly readable language. It is designed to have an simple visual layout with a smaller number of syntactic exceptions and special cases than C/C++.Python has a large collection of library or predefined modules for GUI designing, internet connectivity and e-mail, which satisfies all requirements in this project.
This GUI code is written in the Python 2.7 IDE with the help of “OS”, “Tkinter”, “system” and “command” library modules. The Tkinter module is used for coding GUI in Python environment with in-built Class methods to work with multimedia file and handling the events on the button such as clicking the button. The OS and command module lets Linux commands run in the terminal from the Python environment. Through this OS module, the Linux commands for recording, playing and streaming are executed.
The GUI program is stored and executed on the Raspberry Pi on Python interpreter. The remote laptop has to use SSH protocol for accessing this GUI residing on the Raspberry Pi. This arrangement does not require the remote desktop to have any special settings or configuration software.
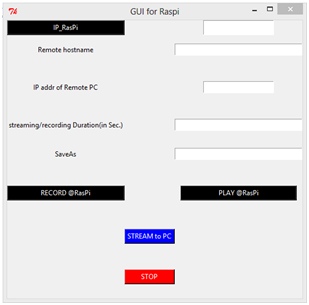
Iv. RESULTS
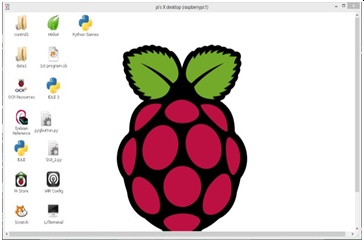
GUI for playing, recording and streaming functions are shown in the Fig. 7. Details such as IP address of remote PC, streaming/recording duration desired(in seconds), filename with format can be put into their respective text fields. Independent buttons are defined for recording, playing and streaming. Also the IP address of Raspberry Pi can be displayed in a text box when “IP_RasPi” button is clicked.
v. CONCLUSION
In this phase of the project, a secure connection, with the help of SSH protocol using PuTTY software, was established between Raspberry Pi and the laptop with a Wi-Fi connection. With the help of this connection, voice was recorded, played and streamed on and from the Raspberry Pi to a laptop using a Python based GUI successfully. The attempt to access the desktop view of Raspberry Pi from the remote PC was successfully achieved through VNC server/client implementation maintaining operation of Raspberry Pi as a headless embedded system. The usage of open source, freeware programs and OS kept the project cost low.
In the future work phase, the main focus can be to working in a wider range wireless network with the Raspberry Pi having features to configure itself with the available connections in its range. Synchronization of audio files between Raspberry Pi and PC can also be an added feature. The efficiency of this embedded system can be improved by providing flexibility to the user to choose between different wireless connections and the device sending its location and connection information to the user by a secured messaging service.
ACKNOWLEDGMENT
This project required genuinely efforts. Nevertheless, it would not have been realizable without the assistance and help from many individuals and organizations. Various tutorials and resources given in the official website of Raspberry Pi have made initial works easier. We would also like to acknowledge with much appreciation the crucial role of the project coordinator, Mrs. R. Manohari as well as the panels especially in the project presentation that has improved some features by their comments and tips. Last but not least, my thanks and appreciations also go to my colleagues who have willingly helped me out with their abilities.
REFERENCES
- Matt Richardson, Shawn Wallace, “Getting Started with Raspberry”, Brian Jepson, O'Reilly Media Inc., United States of America, first edition, pp.10-31,December 2012.
- Available [online]: http: // www. raspberrypi. org /downloads
- Available [online]: http: // www. edimax. com/en/produce_detail.php?pd_id=347&pl1_id=1
- Available [online]: http://www.chiark.greenend.org.uk/~sgtatham/putty/download.html
Available [online]: http://sourceforge.net/projects/win32diskimager/
- Available [online]: http://www.alsa-project.org/main/index.php/Download
- Available [online]: https:// www. python. org /download/releases/2.7.6/
- Dipti Javale, Bharti Dixit ,Pankaj Javale, “Performance evaluation of wireless transmission using embedded system”, IEEE paper, November 26 ,2009.
- S.Sundar D.C.E, M. Krishna Kumar, P.Selvinpremkumar, M.CHINNADURAI,“VOICE OVER IP VIA BLUETOOTH/WI- FI PEER TO PEER”, IEEE paper, March 30, 31, 2013.
- Wenbo Zhai,Jian Wang,”An Application of VoIP Communication on Embedded System”,International Conference on Computer Application and System Modeling (ICCASM),2010.
- Chin-Shiuh Shieh, Huang-Pin Huang, Mong-Fong Horng, Yuh-Chung Lin, “Implementation of Voice Broadcasting Systems Using Microcontrollers and SIP protocol”,IEEE International Conference on Granular Computing,2011.
- Daniel Jakubisin,Marshall Davis,Casey Roberts,Dr. Ivan Howitt,”Real-Time Audio Transceiver Utilizing 802.11b Wireless Technology”,IEEE,2007.
- Arun Biradar,Dr. Ravindra C. Thool, Dr. Rajappa Velur,”Voice Transmission over Local Area Network Using Bluetooth”, IEEE, 2009.
- Bhushan R., “Proposed System for Placing Free Call over Wi-Fi Network Using VoIP and SIP”, Jichkar Int. Journal of Engineering Research and Applications, ISSN:2248-9622, Vol. 4, Issue 1( Version 3), January 2014, pp.132-135.