
It won’t replace your beloved Rasbperry Pi, but it’s worth saying hello to this “Strawberry Jam”, straight out of Japan. It’s an equally delicious way to get people interested in the basics of coding.
My hackerspace friend Jim is a lucky bloke, for last year he was able to take an extended holiday through a succession of East Asian countries. We were treated to online pictures of beautiful scenery and beaches, city lights, and of course exciting tech destinations such as hardware markets and hackerspaces. On his return he tossed a package on the table in front of me and said “Jenny, you might like to take a look at that, these are big in Japan!” Inside was an electronic kit and a few pieces of documentation, with Japanese text.
A DIFFERENT WAY TO GET KIDS CODING
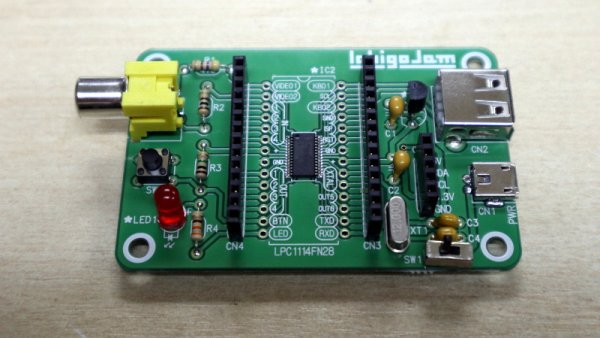
What he’d given me was an IchigoJam (Best translation I’ve been given is “Strawberry Jam”), a small single-board computer aimed at young people. In the style of the 8-bit machines of the 1980s, it runs a comprehensive BASIC interpreter and plugs into a TV set, though it brings itself up-to-date with a USB-A socket for a keyboard. At its heart is an NXP LPC1114F102 ARM Cortex-M0 microcontroller with 32KB of Flash and 4KB of SRAM, and though the board Jim passed to me has a surface-mount example it’s clear that it was also designed for the now-obsolete DIP variant of the chip. If you were to think of this as an odd hybrid of a BASIC Stamp, a Raspberry Pi, and one of the smaller MBED boards, you probably wouldn’t be too far from the mark. What follows is my impression of it based on the information at hand. Sadly the IchigoJam website and forum seems only available to Japanese viewers and returns an error code from my European perspective.
BUILDING THE KIT COMPUTER
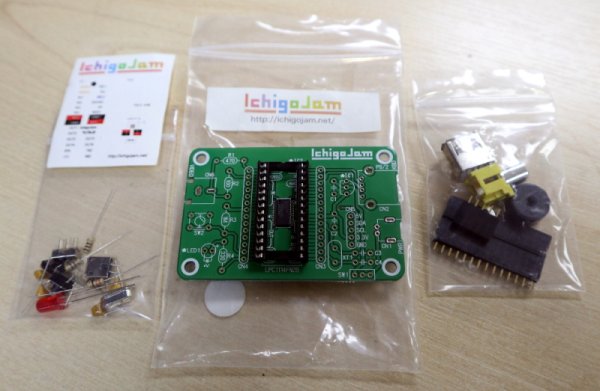
Aside from the pre-installed SMD microcontroller, all the IchigoJam’s components are through-hole. The sockets are a micro-USB for power, a USB-A for keyboard, and a phono for video, otherwise aside from a few passives there is a crystal, a regulator, an LED and a power switch. There is also a small piezoelectric speaker, though this is intended to be plugged directly into the device’s I/O lines. Unexpectedly a DIP socket is included for the processor, no doubt a BoM hangover from the days when a DIP processor could be supplied (ARM DIP packages are no more). Seemingly this is used in the standard build as a carrier for a sticker bearing pin assignments. The English assembly instructions Jim had sourced with the kit were pretty sparse, but fortunately this is in no way a challenging kit to assemble. Resistor values are clearly marked upon the board, capacitors are easy enough to identify, and every other component has an obvious board outline into which it fits. It took me a leisurely quarter hour to build, achieving a tidy result. My tiny portable CRT TV is a UK-market 625-line model so wouldn’t sync to the IchigoJam’s monochrome 525-line video when I powered it up, but every flat-panel TV I tried it with had no problems. I was greeted with a copyright message and a BASIC interpreter prompt, the little board was working.
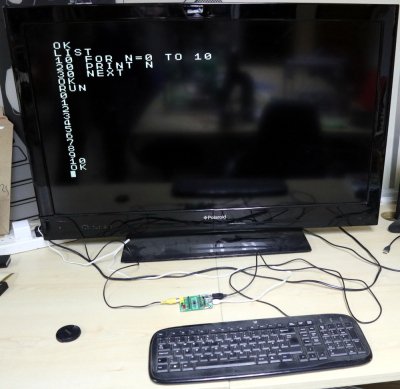
The sharp-eyed among you may have noticed that the LPC1114 has no USB capability, and this led to my being caught out when I first powered up my IchigoJam from a USB phone charger. The board only works with USB keyboards with PS/2 backward compatibility, on one hand a clever hack but something that is not always obvious by looking at a keyboard. After shuffling through my makerspace’s pile of spare ‘boards I was able to find one that worked, and set to with a bit of classic BASIC remembered from my youth. 10 PRINT “Hello World”, 20 GOTO 10
A teenage me fresh from a Sinclair Spectrum would have gone straight for the IchigoJam’s graphics and sound capabilities, but of more use for Hackaday in 2019 was the LED keyword suggested as a hardware test by the documentation. In no time I was able to flash the onboard LED, and my IchigoJam hardware odyssey had begun.
IMAGINE YOUR 8-BIT MICRO HAD COME WITH MODERN GPIOS
So the IchigoJam can do most of what I could do on my 8-bit home computer back in 1983. The question is then, what can it do that the Spectrum, Commodore 64 and their ilk couldn’t? The most obvious place to start would be with the board’s interface sockets, but before we go down that road it’s worth taking a diversion. A part of 8-bit computing that many people will remember was the use of audio cassettes to store software. The IchigoJam eschews that but doesn’t lack storage, instead it can store code in its internal Flash memory. It can store up to four programs on board, and there is reference to an external EEPROM board probably using the LPC1114’s I²C interface. The lack of ability to see the website means I can’t pursue the EEPROM board any further, but a guess is that it offers the facility to swap code between users.
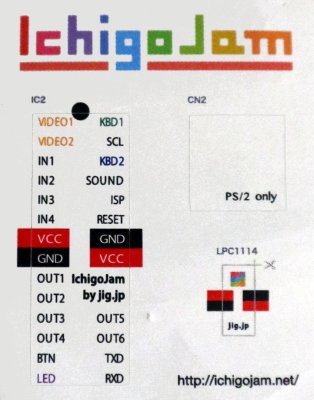
To those interfaces then. The IchigoJam sports three single-in-line 0.1″ pitch sockets, two of which replicate directly the pins of the LPC1114 and one of which provides I²C as well as 5V and 3.3V rails. Onboard are a single button and an LED each connected to their own GPIO lines. Four of the remaining GPIO lines are configured as inputs while six are outputs, and there are also a pair of lines configured as a serial port. All pin configurations are clearly marked upon the board, or with the pin assignment sticker if the builder has chosen to use it.
Programming these hardware functions is easy enough, through BASIC keywords for each one. For those of you who had to use PEEK and POKE to access hardware mapped to memory locations in the 8-bit days, this offers unheard-of convenience. LED and BTN are the “Hello World” of IchigoJam hardware because they require no extra wiring, but the rest of the lines are not left behind with both IN and OUT keywords. Analogue functions are not forgotten either, an ANA keyword reads voltages on input pins while PWM as its name suggests provides a PWM output capability. A bit of fun with some LEDs and wires confirmed the potential in these functions.
Then there is that I²C interface, something which I think sets this at the same table as some of the more accomplished boards. Suddenly we’ve moved on from having a fun retrocomputer or a board for kids with a few GPIOs, this interface opens up the IchigoJam to a huge range of devices and breakout boards through the simplest possible of programming. An I2CR and an I2CW command both allow any device to be read and commanded from within BASIC.
BUY ONE, IF YOU CAN FIND ONE
The IchigoJam then is a very simple yet surprisingly capable board from Japan that obviously provides its intended purpose of giving Japanese kids a taste of coding. It’s never going to displace the boards you’re used to, but it should appeal to anyone who appreciates the old 8-bit BASIC machines. It will also have use for anyone who wants a simple but versatile easy-to-program microcontroller board. The use of analogue video and PS/2 capable USB keyboards indicates that it could perhaps use an update of some kind on those interfaces, but neither of those is an unsurmountable issue. I rather like it, and will be sorry when the time comes to hand the review model back to its owner.
At this point in a review I would normally suggest that you buy one, then give you a price and a local supplier, but sadly the IchigoJam does not seem to be available outside Japan. Happily though you can order one from the PCN, the Japanese equivalent to Code Club, for JPY1890, which comes to $17.38, or £13.25 without any postage or import duties added. They also carry some add-on boards, including multimedia and networking peripherals. Further searches reveal tantalising glimpses of an ecosystem, with a Javascript variant, a minimalist headless version, and a version designed to take an IoT module. For those of you wanting to try without waiting for a parcel from Japan there’s an online emulator into which you can type BASIC listings.
During the research for this article I happened to mention the IchigoJam on Twitter and was contacted by its originator, Taisuke Fukuno. He pointed me to his write-up of its appearance at Maker Faire Bay Area in 2017, but for now these remain Japanese market only products. There seems little prospect of them emerging in the American or European stores you’d expect such as Adafruit or Pimoroni, and to me that’s a crying shame, because while it might lack the power of a Raspberry Pi or the versatility of an Arduino it’s still a pretty cool board. I appreciate only too well that the support liability for offering a kit internationally is a heavy one for a small company, so it’s possible we’ll never officially see it on our side of the planet. Still, if your travels take you to Japan try to pick one up. You won’t be disappointed.
Source: ICHIGOJAM SINGLE BOARD COMPUTER