Lab Outline
-
Download WiringPi libraries
-
Understand the pin layout for the RPI
-
Understand why you must use a voltage converter in this lab, and how to use it
-
Create a program to determine the type of TTL gate being tested
DUE BY NEXT LAB
Wiring Pi Libraries
If you have not downloaded the WiringPi libraries, you must do so as you cannot write a program to work with the GPIO pins otherwise. Instructions are below:
If you have Internet connection follow these steps.
Connect to your Pi and, in the terminal, type:
sudo aptitude install git-core
Allow the installation of git, and once it is installed, type:
git clone git://git.drogon.net/wiringPi
cd wiringPi
./build
If you do not have Internet connection, ask your PSO instructor for a flash drive containg the wiringPi libraries and connect it to you Pi. Or you can just as easily go to the url: https://git.drogon.net/?p=wiringPi;a=summary and select the “snapshot” of the top most version. Unizip the download, put it on a USB stick. Then type the following:
sudo mkdir /mnt/usb
sudo mount /dev/sda1 /mnt/usb
cp -r /mnt/usb/wiringPi .
cd wiringPi
./build
The build script included in the wiringPi package will automatically install wiringPi for you.
You can make sure the installation worked correctly by typing:
gpio -v
gpio readall
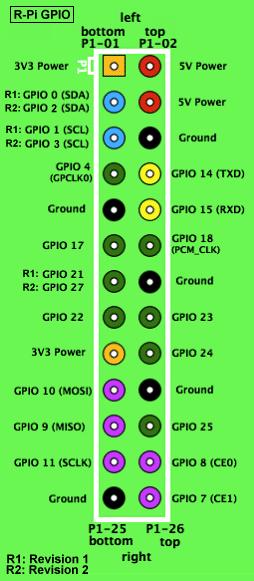
GPIO Pin layout for RPI
Important: The most essential thing you must remember first before anything is that your RPI cannot handle voltage above 3.3 volts. You have previously been using 5 volts on your breadboard. Thus the necessity for a voltage converter which will be discussed in the next section. Simply stated, your RPI will output 3.3 volts on any GPIO output pin, your TTL gates require 5 volts(thus a conversion is needed) and then going back into your RPI will require the 5 volts to be converted back to 3.3 volts.
The information below explains how the GPIO pins work and how there numbering works, you have to read it a few times to get it:
Dealing with the pins on the Pi can be somewhat tricky, as there are three different pin numbering systems to keep track of on the Pi. They are:
-
The Pi's internal pin numbering,
-
The GPIO pin labels, and
-
wiringPi's internal pin numbering.
In short, when programming using wiringPi, use the wiringPi pin number associated with a particular Raspberry Pi pin to control it – i.e. setting pin 0 to high in wiringPi sends 3.3V to pin 11 on the Pi.
Provided below is a table3) that contains all of the relevant pin numbers for each pin.
| wiringPi pin | GPIO pin | Name | Pi pin (bot row) | Pi pin (top row) | Name | GPIO pin | wiringPi pin |
|---|---|---|---|---|---|---|---|
| – | – | 3.3V | 1 | 2 | 5V | – | – |
| 8 | 2 | SDA0 | 3 | 4 | 5V | – | – |
| 9 | 3 | SCL0 | 5 | 6 | Gnd | – | – |
| 7 | 4 | GPIO 7 | 7 | 8 | TxD | 14 | 15 |
| – | – | Gnd | 9 | 10 | RxD | 15 | 16 |
| 0 | 17 | GPIO 0 | 11 | 12 | GPIO 1 | 18 | 1 |
| 2 | 27 | GPIO 2 | 13 | 14 | Gnd | – | – |
| 3 | 22 | GPIO 3 | 15 | 16 | GPIO 4 | 23 | 4 |
| – | – | 3.3V | 17 | 18 | GPIO 5 | 24 | 5 |
| 12 | 10 | MOSI | 19 | 20 | Gnd | – | – |
| 13 | 9 | MISO | 21 | 22 | GPIO 6 | 25 | 6 |
| 14 | 11 | SCLK | 23 | 24 | CE0 | 8 | 10 |
| – | – | Gnd | 25 | 26 | CE1 | 7 | 11 |
Source: RPI: Use GPIO pins and a program to determine TTL gates


