
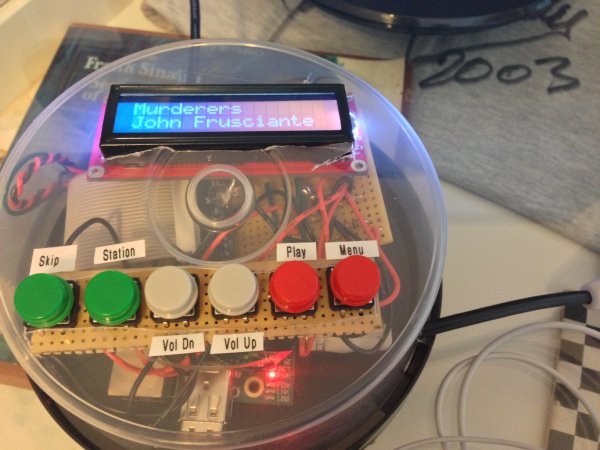
Overview – What is it
Using a Raspberry Pi you can create a pretty cool stand alone Pandora Streamer. Its a pretty easy project to put together and will only take an evening. Even though this project is basic from a Electrical Engineering standpoint you will learn the basics of GPIO, Python, BASH and basic Circuts. The best part is you can totally use this project on a daily basis. This version also will allow you to use the device as a Airplay reciever when you are not using Pandora.
I do not just want to show you what i did but show you where i went wrong and how i got the correct answers so you will feel confident trying this stuff yourself. This project cost me about $50 – $75 USD and was a blast.
I originally found this project on Instructables (http://www.instructables.com/id/Pandoras-Box-An-Internet-Radio-player-made-with/?ALLSTEPS). I started with this but re-wrote most of the code. I also changed the circuts to remove components that were unnessicary.
What you will need
- Raspberry Pi (sparkfun, Element14, adafruit)
- Breadboard
- PI Cobbler
- LCD Screen
- Buttons
- Resistors (10k and 1k)
Optional
Lets get started
Step 1 – Get the Raspberry Pi Prepped
A. Flash the Raspberry Pi’s SD Card with the latest version of Raspbian Weezy. First, download the latest OS. Second, put it on the SD Card.
B. Next, Stop the OS from writing to the UART, which we will need to drive the LCD:
In LXTerminal:
sudo nano /boot/cmdline.txt
And change:
dwc_otg.lpm_enable=0 console=ttyAMA0,115200 kgdboc=ttyAMA0,115200 console=tty1 $
to:
dwc_otg.lpm_enable=0 console=tty1 $
Next:
sudo nano /etc/inittab
And change:
#Spawn a getty on Raspberry Pi serial line
T0:23:respawn:/sbin/getty -L ttyAMA0 115200 vt100
to:
#Spawn a getty on Raspberry Pi serial line
#T0:23:respawn:/sbin/getty -L ttyAMA0 115200 vt100
Reboot the Pi
C. Adding Serial Communication to Python, This lets us talk to the LCD:
In LXTerminal:
sudo apt-get install python-serial
D. Enhancing BASH’s GPIO Capabilities, This lets BASH talk to GPIO. This is because we only launch the Python files if we detect HIGH on GPIO pin 22 or we know buttons are connected:
In LXTerminal:
sudo apt-get install git-core
git clone git://drogon.net/wiringPi
cd wiringPi
git pull origin
./build
Go Wireless (optional)
If you choose to go wireless (much cleaner) plug the WIFI adapter into one of the USB ports. Log into the Pi using a keyboard/mouse and HDMI connection. You want to be using the actual Linux GUI not SSH. On the desktop use the “WiFi Config” tool to set up the connection to your wireless network. I was not successful setting it up on my network using just ssh.
Step 2 – Install Pianobar
Pianobar is a command line interface for Pandora. It is super lightweight and will work well with Python.
A. Download and Install
sudo apt-get install pianobar
Accept all of the prompts to install. Type “Pianobar” at the prompt after installation to see it run. It will ask for your email and password but we will automate that in a minute. After starting it will ask which station to play. Select your favorite. After selecting it you will see a 18 digit code in parenthesis next to the station name, copy this we will need it for the config file. Type “?” after it starts to see a list of commands.
B. Set up a config file for Pianobar
If you have been logged into the Pi as the user “Pi” then Pianobar has installed into “/home/pi/.config/pianobar”. Under the Pianobar folder is a config folder, we will put a config file in there that will allow the app to auto-signin. Download the config file below.
In the User section replace user = [Your Email], password = [Your Password] with your credentials. Also, replace autostart_station = [Favorite Station ID] with the ID of the station you want the device to tune to first. Enter the 18 digit code you copied from the last step.
Step 3 – Set Up FIFO
What i learned: In this section i tried creating the FIFO file as a standard one, not using the mkfifo command. I spent a long time trying to figure out where i went wrong.
FIFO is a file that allows communication between Pianobar and our Python scripts. Basically Pianobar is always looking at this file for changes and will treat the text in the file as user input. The config file we added points Pianobar to the folder for FIFO.
fifo = /home/pi/.config/pianobar/ctl
This folder does not exist yet so create it with:
mkfifo /home/pi/.config/pianobar/ctl
To test that everything is working correctly, restart Pianobar. In another terminal window, enter:
echo ‘n’ >> /home/pi/.config/pianobar/ctl
You should be able to fully control Pianobar this way. Once you full understand this concept then the Python scripts will make more sense.
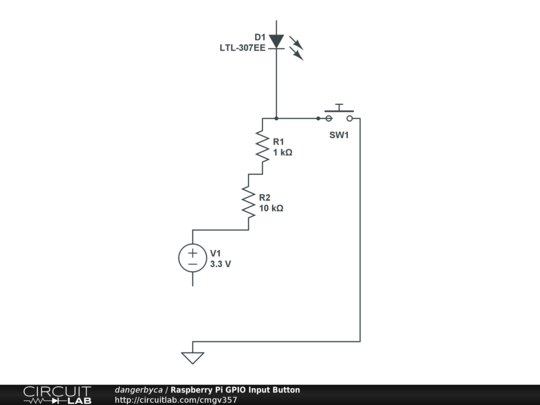
Step 4 – Connect the LCD
What I learned: The original circuit called for a 3.3v voltage regulator connected to the 5v bar. I realized this was not needed since the LCD i used could use direct 3.3v from the Raspberry PI. That circuit got simple at that point with only a 1k resistor between Tx and Rx.
A. Connect Power
Connect the 5V on the LCD to the 3.3V rail (5V label on this exact model of LCD is a misprint, it is actually 3.3V)
Connect GND to the Ground Rail.
B. Connect Tx
Connect Rx from the LCD to Tx on the Pi using a 1K resistor (Brown, Black, Red, Silver/Gold) in between.
Connection Diagram
Edit: In this Diagram GND should be connected to the GND rail not SDA, sorry.
For more detail: Rspberry Pi Project 1 – Pandora Streamera