
I bought a Chinese K40-style laser cutter about three weeks ago and I’ve been spending quite a bit of time playing with it learning how best to use it.
It’s an eminently hackable design, and while mine could cut 3mm acrylic OK ‘straight out of the box’, there are many things that can be done to make it better, easier to use and more user-friendly. I’ve had great fun doing a whole host of upgrades and improvements to it, but that’s not what I’m focusing on today. Last week, Les Pounder published a blog article here where he showed the setup they use at the Blackpool MakerSpace. He described the use of K40 Whisperer by @scorchworks and from the screenshots I could tell he was using it in Linux.
I’d come across a page mentioning K40 Whisperer while researching K40 upgrades, but hadn’t downloaded it or tried it out so far. But the fact that Les had it up and running made me think “OK that’s definitely worth a look then.” And then I thought “I wonder if it runs OK on a Pi? That would be cool!” Not just cool, but really helpful too. My laser cutter occupies half of my workbench (until I can work out where to move it to)…
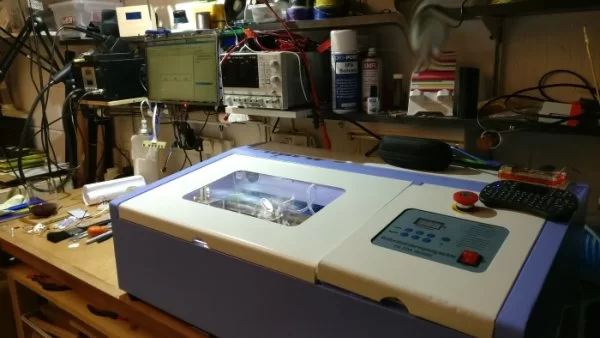
My K40 laser cutter takes up about half the space on my LARGE workbench. This is NOT sustainable
…and the old XP laptop running it takes up a lot of the remaining available space. So being able to run it on a Pi and SFTP job files to it instead of using a USB stick would be very useful.
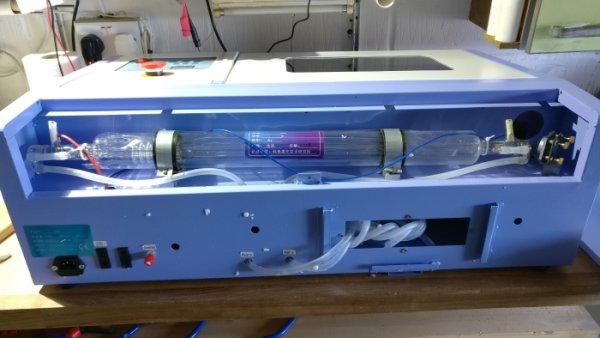
My K40 Laser engraver/cutter turned around so you can see the laser tube
Let’s Backtrack – What’s Wrong with the Supplied Software?
Why would you need alternative software to drive your laser cutter? Good question. And in reality, I don’t NEED it, but maybe it’s easier to use? I spent the first week learning how best to use the included Corel Laser software (complete with USB security dongle) and managed to create a workflow that let me do what I wanted to do.
However, I spent a lot of time ‘piddling about’ before I realised my software was set on the wrong control board. Once I’d got that fixed it was a bit easier. But the workflow using the Corel Laser package (based on a, frankly, suspicious copy of Corel Draw with a dongle-protected laser engraving and cutting plugin) is rather lengthy and complex – and it only works on Windows.
The software is a bit fussy. There are lots of settings to get wrong and, initially I wrote myself a 3 page procedure so I wouldn’t forget how to do it.
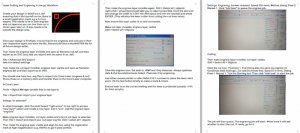
3 page procedure for Corel workflow
It’s fairly involved. Oh – and did I mention, even when you have the “cut inside first” box ticked, sometimes it will cut the perimeter first and ruin your job for you (at no extra charge)? The way round this issue is to set up the final perimeter cut in a separate layer which gets done last. But it’s an additional faff I can do without. Enough ranting about Corel Laser!
So when someone waves an ‘open source laser cutter control package that might work on a Pi‘ under my nose, I owe it to myself to at least take a look at it. So I did.
Downloading and Installing K40 Whisperer
I read the Linux installation instructions and it really didn’t look too scary. I was also delighted to see that K40 Whisperer is written in Python. This means that if I ever want to change anything, there’s a fighting chance I might be able to. YAY!
The most complex thing in the Linux installation instructions is adding a udev entry to help with USB permissions, so it’s really no big deal. I went through the procedures in the instructions and amended them slightly because I got some error messages. There were a couple of ‘assumed’ packages missing. So here is my amended version of the installation instructions (which I will be sharing with @scorchworks in case he wants to include/amend the instructions for use on Pi).
I used a fairly clean installation of Raspbian Stretch and, before starting ran…
sudo apt-get update
sudo apt-get upgrade
Then over to the official instructions, with my additional comments in bold and italic
Setting up K40whisperer on Linux (by Dr. med. Jan Schiefer):
# Requirements
Prerequirements:
* python 2.7.x
* unzip
* udev
* inkscape
## Instructions
1. Create a group for the users who are allowed to use the laser cutter:
sudo groupadd lasercutter
2. Add your yourself to this group, replace [YOUR USERNAME] with your unix username:
sudo usermod -a -G lasercutter [YOUR USERNAME]
3. Eventually add other users who will use the laser cutter to the group
4. Plug in your laser cutter to your computer
5. Find out the usb device id of your laser cutter:
lsusb
lsusb will output something like this:
Bus 002 Device 003: ID 04f2:b34c Chicony Electronics Co., Ltd
Bus 002 Device 002: ID 8087:0024 Intel Corp. Integrated Rate Matching Hub
Bus 002 Device 001: ID 1d6b:0002 Linux Foundation 2.0 root hub
Bus 001 Device 003: ID 8087:07da Intel Corp.
Bus 001 Device 002: ID 8087:0024 Intel Corp. Integrated Rate Matching Hub
Bus 001 Device 001: ID 1d6b:0002 Linux Foundation 2.0 root hub
Bus 004 Device 001: ID 1d6b:0003 Linux Foundation 3.0 root hub
Bus 003 Device 003: ID 1a86:5512 QinHeng Electronics CH341 in EPP/MEM/I2C mode, EPP/I2C adapter
Bus 003 Device 001: ID 1d6b:0002 Linux Foundation 2.0 root hub
“QinHeng Electronics CH341 in EPP/MEM/I2C mode, EPP/I2C adapter” is your laser cutter in this case.
In this example “1a86” is the VENDOR ID and “5512” the PRODUCT ID.
6. Create a udev control file for your laser cutter as root (i will use gedit in this example):
sudo gedit /etc/udev/rules.d/97-ctc-lasercutter.rules
I don’t have gedit on my pi, so used nano. So it became
sudo nano /etc/udev/rules.d/97-ctc-lasercutter.rules
Put the following text into the file and replace [VENDOR ID] and [PRODUCT ID] with the information you obtained from lsusb:
SUBSYSTEM==”usb”, ATTRS{idVendor}==”[VENDOR ID]”, ATTRS{idProduct}==”[PRODUCT ID]”, ENV{DEVTYPE}==”usb_device”, MODE=”0664″, GROUP=”lasercutter”
Now save the file. (ctrl+o, ctrl+x)
6. Reboot your computer!
6a. For Raspberry Pi
sudo apt-get install libxml2-dev libxslt-dev
sudo apt-get install inkscape
(the dev packages are omitted from the instructions)
7. Download the K40whisperer source code, for example “K40_Whisperer-0.17_src.zip”
I used this wget command from the Pi directly
wget http://www.scorchworks.com/K40whisperer/K40_Whisperer-0.17_src.zip
(0.17 was the current version at the time of writing. You will need to change the number to a newer version, e.g. 0.23 – you can find that on this page)
8. Unzip the source code, for example:
unzip K40_Whisperer-0.17_src.zip -d /home/[YOUR USERNAME]/
Already in /home/pi, I just used unzip K40_Whisperer-0.17_src.zip
9. Go to the K40 whisperer source directory, for example:
cd /home/[YOUR USERNAME]/K40_Whisperer-0.17_src/
10. Install the required python packages:
pip install -r requirements.txt
11. Run K40whisperer: python2 ./k40_whisperer.py OR python ./k40_whisperer.py
For some reason the udev thing didn’t seem to grant the pi user permission to use USB, so it failed when I tried to initialise the laser cutter. But then I tried…
sudo python k40_whisperer.py
…and that worked perfectly. I know many people frown on running things with sudo. But I don’t care as long as I can make the machine do what I want it to.
12. Go to Setting –> General settings
13. Select your laser control board name (usually LASER-M2)
14. HAPPY CUTTING!
I’m sure there’s a way to sort out the udev/sudo thing, but I was after a quick result so I haven’t pursued that yet. I got this software up and running and was cutting Perspex within an hour. That’s the kind of result I like.
What is the Workflow? How Well Does it Work?
My usual workflow looks something like this…
- Create design in QCAD (on my Mac) and save as .dxf and .svg (to get usable .svg you need to purchase a license for QCAD, but for .dxf you don’t. K40 Whisperer can open .dxf as well)
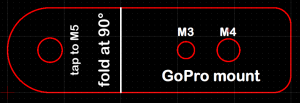
A quick design for a GoPro shelf mount
- Add any graphical elements to the .svg in InkScape (on Mac & Pi, certain fonts like the RasPi.TV and RasP.iO font Mandela only work as graphics, so I can’t use .dxf for those) black for engrave, blue for vector engrave, red for vector cut
- SFTP the completed .svg to the Pi (which is always on)
- Switch on the laser cutter and its peripheral devices (extraction, lighting etc.)
- Position the material to be cut and align it with the bed and the laser
- In K40 Whisperer, load the .svg we sent to the Pi
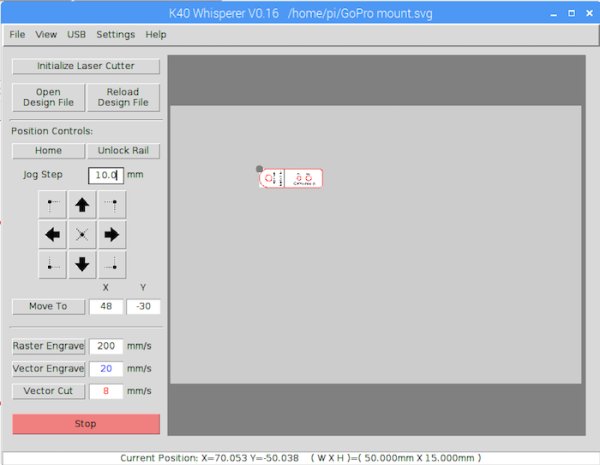
K40 Whisperer GUI control panel
- Position the laser head so it’s aligned on the material so that top-left of our loaded .svg is the starting point
- Run Raster Engrave (engraves all BLACK elements in the .svg) at 8% power (manually set) and 200 mm/s (software set)
- Run Vector Cut (cuts all RED lines in the .svg) at 16% power and 8 mm/s
- Remove the workpiece
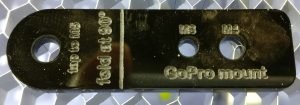
GoPro shelf mount freshly cut
- Do any additional operations required (e.g. thread tapping, heat bending etc.)
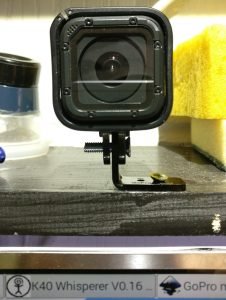
Completed GoPro shelf mount after heat bending and tapping
Your optimum power and speed settings will not be the same as mine. They will depend on quality, age and condition of laser, lens, mirrors, setup and alignment of everything. So there is some experimentation required. It’s good to have some scrap material handy for such experimentation and tweaking.
How Well Does it Work?
In general I find it has improved my workflow considerably. There is a lot less piddling about needed to get an engrave and a cut both done on the same workpiece. I love the fact that I can send job files to the cutter by SFTP. This saves time as well. The adjustable ‘jog-step’ feature is excellent for helping to get your laser positioned quickly.
I’m using a Pi 3B. Sometimes it can take a minute or so to generate the raster lines for a complex or large engraving, or to import and process a large cut file, but it’s perfectly usable. A Pi Zero would work too if you were patient enough (I’m not).
I’m using K40 Whisperer routinely now instead of the supplied software. It meets my needs better and saves me time. WIN!
You can also use inkscape or even (Illustrator – EUW!) to create your designs, but I prefer a CAD package because I’ve already learnt how to use it. The point is, you have choices.
If you need to tweak anything in the .svg files you can also use inkscape locally on the Pi. It works at a perfectly usable speed.
Anything Bad?
Nothing much to report in the way of negatives…
- Sometimes you get USB timeout errors, but I haven’t had one spoil a cut yet.
- I have to run it as sudo for the moment, but I expect that’s relatively easily fixed by someone who knows about all things USB and permissions.
Summary
If you have a K40 laser cutter (and they’re becoming ever more popular) then you should seriously consider ditching the supplied software and running it with K40 Whisperer on a Pi.
Raspberry Pi Bases Made with K40 Whisperer
I’ve actually just launched two simple bases for the Raspberry Pi B and Zero models. Both of these are cut using K40 Whisperer. I don’t know of any other Raspberry Pi cases or bases being manufactured using a Pi. I think this might be a first. They’re available in the RasPiO online shop or you can add them to your cart right from this page…
Run a K40 Laser Cutter from Your Raspberry Pi with K40 Whisperer