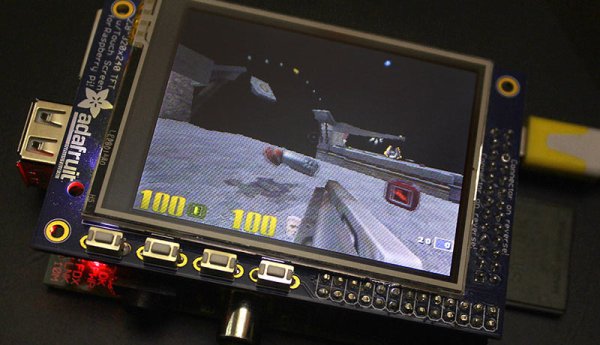
The Ideal: Adafruit’s PiTFT displays are razor sharp. Whereas small composite screens on the Raspberry Pi usually require some video scaling (resulting in blurriness), PiTFT uses the GPIO header, digitally controlled pixel-by-pixel for a rock steady image. Though not a lot of pixels, it works great for retro gaming (and the display neatly stacks above the board, no side protuberances for video cables).
The Downside: this GPIO link entirely bypasses the Pi’s video hardware, including the graphics accelerator. Many games and emulators rely on the GPU for performance gains. So the PiTFT has traditionally been limited to just a subset of specially-compiled emulators that can work and run well enough without the GPU.
The Solution: our latest PiTFT drivers, along with a tool called fbcp (framebuffer copy), careful system configuration, and (optionally) the much more potent Raspberry Pi 2 board open the doors to many more gaming options. Existing emulator packages (such as RetroPie, with dozens of high-performance emulators and ports) — previously off-limits to the PiTFT — can run quite effectively now!
The Plan
You’ll need:
- Any model of Raspberry Pi computer (Model A, B, A+, B+ or Pi 2).
- A 320×240 pixel PiTFT display (2.8″ resistive, 2.8″ capacitive, 2.2″ HAT). For gaming we won’t be using the touchscreen features, but still need to distinguish among the various models. The 3.5″ PiTFT (480×320) is not recommended for this project — more pixels means slower refresh.
- A 4GB or larger microSD card (or full-size SD for “classic” Model A or B).
- An HDMI monitor and USB keyboard are used temporarily during installation and setup.
Emulators require game ROM files. These are not included. RetroPie includes Pi-native ports of Doom, Duke Nukem 3D, Quake and Quake 3 that work without additional software.
Steps will include:
- Download and setup RetroPie using the temporary HDMI monitor.
- Download and setup additional Adafruit software “over” RetroPie.
- Configuration to redirect game output to the PiTFT screen; HDMI screen is no longer needed then.
Though we focus on RetroPie, some of these steps should be applicable to other software.
Current Cupcade or PiGRRL users…
If you’d like to try this, we suggest using a separate SD card…don’t upset your working Cupcade installation. Set your original card aside for safekeeping! This guide is still experimental. If it all works out well, we’d like to make this our “official” method for gaming with the PiTFT, but not yet…it might not work for everyone, configuration may be troublesome, or the performance might not feel as snappy on some systems.
Two important things to know:
- Any MAME ROMs you’re currently using with Cupcade or PiGRRL might not work with RetroPie — they’re based on different versions of MAME, and the ROM file format changed along the way. You may need to convert or acquire new ones.
- You’ll need to configure the controls repeatedly — once for EmulationStation (the graphical front-end for selecting different emulators), then again for each game or emulator (since these all operate independently, not using the same configuration files). That’s just how it works for now. It’s explained a bit more on the EmulationStation web site…we’ll provide links as we go along…
RetroPie Setup
Let’s begin our adventure on the Retropie downloads page. Fetch the version appropriate to your Raspberry Pi board type — there are separate SD card images optimized for the Raspberry Pi Model A, B, A+ and B+, and another for the Raspberry Pi 2.
If you’ve used RetroPie before and think you might already have a card image, make sure you have the latest version for this (2.6 or newer). The PiTFT package we’ll install later relies on recent features of the underlying Linux distribution, and probably won’t work with older versions.
While that downloads, you can get started with formatting a 4GB or larger microSD card (or full-size SD if using a “classic” Model A or B).
After downloading and uncompressing the RetroPie image, you can write it to the SD card as you would any other operating system. It’s explained in this guide.
Initial Setup…
Insert the SD card in the Raspberry Pi. Plug in an HDMI monitor, USB keyboard, then connect power.
On first boot, you should see some Linux console messages scroll by, followed by a RetroPie splash screen. It’ll go back to Linux messages for a moment, then the EmulationStation splash screen.
After a minute or so of booting, EmulationStation will prompt you to configure an input device. We don’t need to do this right now…press F4 to exit EmulationStation and get a Linux prompt. Then we’ll do some basic system configuration…
The following raspi-config options are required:
- Expand Filesystem
- Under “Advanced Options,” disable Overscan, enable the Device Tree, SPI (load SPI kernel module by default), and force audio through 3.5mm jack (since HDMI will be disconnected later).
These steps are optional but recommended:
- Change User Password (since everyone knows the default).
- Under “Internationalization Options,” select Change Locale, Change Timezone and Change Keyboard Layout to your liking. If keys aren't producing the expected characters, this is why.
- Under “Advanced Options,” change Hostname if desired (default is “retropie”) and enable SSH (for remote administration)
DO NOT select:
- Overclock. We can enable this later, but there are some important details that need explaining with the PiTFT first! Start out at the default speed.
- Memory Split. In the past when using the PiTFT you'd want this as small as possible (16 MB). But now that we're actively using the GPU, we want some GPU memory, so don't touch this!
When you’re done, tab to “finish” and reboot when prompted.
Networking
After rebooting, you can then set up networking to your liking. “F4” again to exit EmulationStation for a command-line prompt.
At the very least, you'll need an Ethernet cable connected. This will let you retrieve packages needed for further installation. If you have a Model A or A+ with no Ethernet connection, it’s easiest to set everything up on a Model B/B+ and then move the card over.
If you want wireless networking, set that up however you like it…either using ‘startx’ and the WiFi Config tool on the desktop (requires a USB mouse), or manually by editing the wpa_supplicant configuration file. Here’s a guide for basic network setup on Pi.
Personally I like to install netatalk, which can make it a little easier to access the system on the local network. It’s explained a bit in this guide.
For more detail: Running OpenGL-based Games & Emulators on Adafruit PiTFT Displays


