
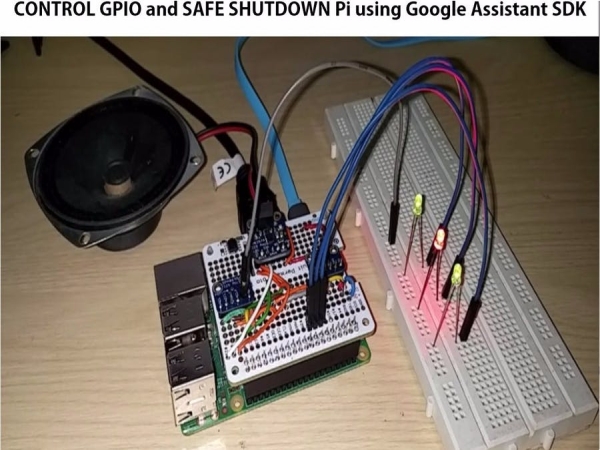
Safe shutdown Raspberry Pi and control Raspberry Pi GPIO by voice using Google Assistant SDK without API.AI, IFTTT and Google Actions.
The GPIO control and safe shutdown by voice are the key distinguishable features between the AIY Projects and the Google Assistant SDK. Now, with these features added, the SDK is on par with the AIY projects.
I have given below a copy of the Git's README.MD. For more details, visit the Git page and for detailed info watch the video.
GassistPi — Google Assistant on Raspberry Pi
Features:
- Headless auto start on boot
- Locally Control GPIOs without IFTTT, API.AI, ACTIONS
- Startup audio and audio feedback for wakeword detection
- Safe shutdown RPi using voice command
LET'S GET STARTED!
FIRST, CLONE THE PROJECT
git clone https://github.com/shivasiddharth/GassistPiStep-1: Install and Config files
1. Update Kernel
sudo apt-get update
sudo apt-get install raspberrypi-kernel
2. Restart Pi
3. Choose the audio configuration according to your setup. (Run the commands till you get .bak notification in the terminal).
- USB DAC users
sudo chmod +x /home/pi/GassistPi/audio-drivers/USB-DAC/scripts/install-usb-dac.sh
sudo /home/pi/GassistPi/audio-drivers/USB-DAC/scripts/install-usb-dac.sh - AIY-HAT users
 sudo chmod +x /home/pi/GassistPi/audio-drivers/AIY-HAT/scripts/configure-driver.sh
 sudo /home/pi/GassistPi/audio-drivers/AIY-HAT/scripts/configure-driver.sh
sudo chmod +x /home/pi/GassistPi/audio-drivers/AIY-HAT/scripts/install-alsa-config.sh sudo /home/pi/GassistPi/audio-drivers/AIY-HAT/scripts/install-alsa-config.sh - USB MIC AND HDMI users,
sudo chmod +x /home/pi/GassistPi/audio-drivers/USB-MIC-HDMI/scripts/install-usb-mic-hdmi.sh
sudo /home/pi/GassistPi/audio-drivers/USB-MIC-HDMI/scripts/install-usb-mic-hdmi.sh - USB MIC AND AUDIO JACK users,
sudo chmod +x /home/pi/GassistPi/audio-drivers/USB-MIC-JACK/scripts/usb-mic-onboard-jack.sh
sudo /home/pi/GassistPi/audio-drivers/USB-MIC-JACK/scripts/usb-mic-onboard-jack.sh - CUSTOM VOICE HAT users,
sudo chmod +x /home/pi/GassistPi/audio-drivers/CUSTOM-VOICE-HAT/scripts/custom-voice-hat.sh
sudo /home/pi/GassistPi/audio-drivers/CUSTOM-VOICE-HAT/scripts/custom-voice-hat.sh
sudo chmod +x /home/pi/GassistPi/audio-drivers/CUSTOM-VOICE-HAT/scripts/install-i2s.sh
sudo /home/pi/GassistPi/audio-drivers/CUSTOM-VOICE-HAT/scripts/install-i2s.sh
Those Using HDMI/Onboard Jack, make sure to force the audio:
sudo raspi-configSelect advanced options, then audio and choose to force audio:
4. Restart Pi
5. Check the speaker's working in terminal:
speaker-test -t wav Step-2:
CONTINUE after SETTING UP AUDIO
- Download credentials—>.json file (refer to this doc for creating credentials https://developers.google.com/assistant/sdk/develop/python/config-dev-project-and-account)
- Place the .json file in/home/pi directory DO NOT RENAME
- Use the one-line installer for installing Google Assistant Pi3 and Armv7 users use the “gassist-installer-pi3.sh” installer and Pi Zero, Pi A and Pi 1 B+ users use the “gassist-installer-pi-zero.sh” installer. 4.1 Make the installers Executable
sudo chmod +x /home/pi/GassistPi/scripts/gassist-installer-pi3.sh
sudo chmod +x /home/pi/GassistPi/scripts/gassist-installer-pi-zero.sh
4.2 Execute the installers Pi3 and Armv7 users use the “gassist-installer-pi3.sh” installer and Pi Zero, Pi A and Pi 1 B+ users use the “gassist-installer-pi-zero.sh” installer. When Prompted, enter your Google Cloud console Project-Id, A name for your Assistant and the Full Name of your credentials file, including the json extension.
sudo  /home/pi/GassistPi/scripts/gassist-installer-pi3.sh
sudo /home/pi/GassistPi/scripts/gassist-installer-pi-zero.sh - Copy the google assistant authentication link from terminal and authorize using your google account
- Copy the authorization code from browser onto the terminal and press enter
- After successful authentication, the Google Assistant Demo test will automatically start. At the start, the volume might be low, the assistant volume is independent of the Pi volume, so increase the volume by using “Volume Up” command.
- After verifying the working of assistant, close and exit the terminal
HEADLESS AUTOSTART on BOOT SERVICE SETUP
- Open the service files in the /home/pi/GassistPi/systemd/ directory and add your project and model ids in the indicated places and save the file.
- Make the service installer executable
sudo chmod +x /home/pi/GassistPi/scripts/service-installer.sh- Run the service installer
sudo /home/pi/GassistPi/scripts/service-installer.sh - Enable the services – Pi3 and Armv7 users, enable the “gassistpi-ok-ggogle.service” and Pi Zero, Pi A and Pi 1 B+ users, enable “gassistpi-push-button.service” To stop music playback using a pushbutton connected to GPIO 23 enable stopbutton.service
sudo systemctl enable gassistpi-ok-google.service
sudo systemctl enable gassistpi-push-button.service
sudo systemctl enable stopbutton.service - Start the service – Pi3 and Armv7 users, start the “gassistpi-ok-ggogle.service” and Pi Zero, Pi A and Pi 1 B+ users, start “gassistpi-push-button.service” To stop music playback using a pushbutton connected to GPIO 23 start stopbutton.service
sudo systemctl start gassistpi-ok-google.service
sudo systemctl start gassistpi-push-button.service
sudo systemctl start stopbutton.service
RESTART and ENJOY
Step-4: Voice Control of GPIOs and Pi Shutdown
The default GPIO and shutdown trigger word is “trigger” if you wish to change the trigger word, you can replace the ‘trigger' in line 85 of the main.py code with your desired trigger word.
Similarly, you can define your own device names in line 35 under the variable name var.
The number of GPIO pins declared in line 36 should match the number of devices.
Source: Safe Shutdown, Control Pi GPIOs Using Google Assistant SDK