
A contribution to maintaining a safe distance and the health of people in the time of COVID-19 crisis.
Introduction
The current state of emergency due to COVID-19 has affected our world in several ways. In matter of days we have had to change the way we live. Even now when things are slowly getting back to normal, it is important to maintain safe distance between people to prevent spreading of the virus. No matter where we are: universities, libraries, banks,… problem of maintaining safe distance remains great challenge. Also, industry has to adapt and restructure work processes and production facilities. In this project we propose system that would help institutions, businesses and industry to adapt their working space in order to offer safe environment where appropriate distance between people can be achieved.
Solution
Our solution uses an algorithm to identify the places where the most interactions between people take place. It measures where and how many times the safe distance was not meet, and records people's paths through workspace. At the end of selected time period, our system sends pictures with drawn daily routes (heatmap) and critical areas to preselected e-mail address. Based on that informations managers of institutions, businesses and industry is able to correctly adapt working space respecting social distancing.
Description
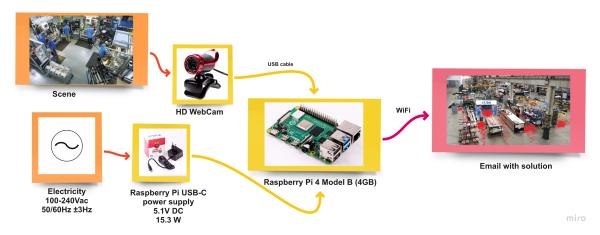
The system consists of web camera and Raspberry Pi 4. The number of cameras depends on the size of the workspace. The algorithm is programmed to show the path of the person and to display is the social distance was safe or not. When algorithm detects a social distancing problem, it alerts and reports the incident to identify frequent hotspot in workplace. The algorithm below is consists of several main steps: detection, perspective transformation, measurement and sending e-mail.
Perspective transformation is used because input video is taken from a single camera and the perspective view should be changed into bird’s eye view to determine the exact distance between people.
The YOLO algorithm is used to detect the object in real-time. This algorithm has an image classification with a number of different categories (e.g. human, box, machine).
Hardware
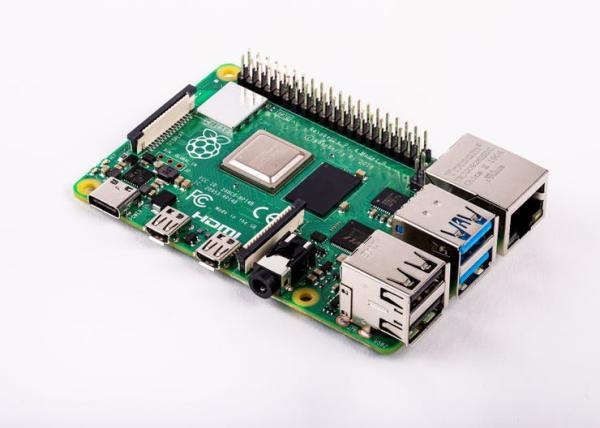
For this project we decided to use Raspberry Pi 4 Model B (4GB) without any case protection. In our case we got processing speed of 2.2 FPS using Raspberry Pi 4. We also tested Raspberry Pi 3 Model A+ which offered speed of 1.4 FPS. Due to higher processing power we suggest using Raspberry Pi 4. Also boosting its power with Google Edge TPU coprocessor would not be a bad idea.
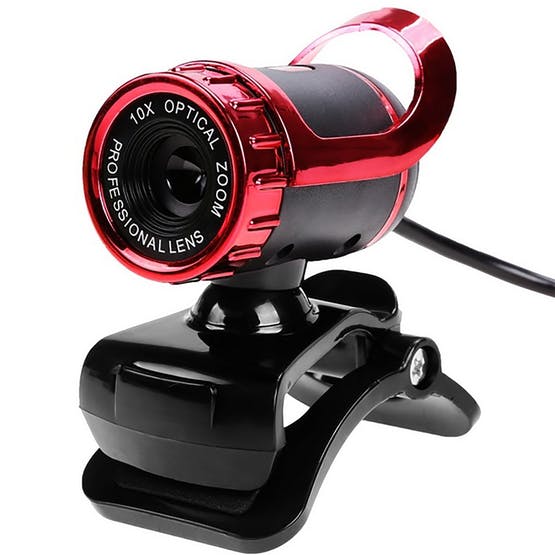
Also, we used webcam YoLuke EL-PN-47320338 HD WebCam 10X Optical Zoom. We connected it to Raspberry Pi with USB cable. It has HD picture quality and 12 million pixel video resolution capable of recording up to 30FPS. Its 360-degree rotating head allows us to make any point of view possible which comes very useful especially in this specific project. We found this camera to be completely satisfactorily. Note that also other webcams can be used (providing at least 720p). With higher camera resolution more accurate people detection is expected.
Wiring & Power
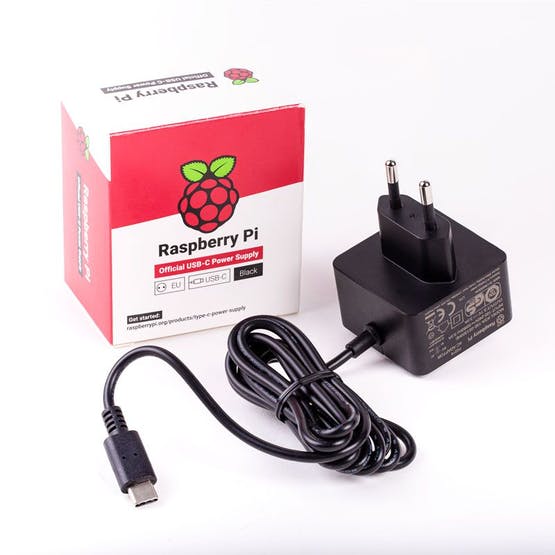
For connecting our webcam to Raspberry Pi we used camera's built in USB cable. To power Raspberry Pi board we used its official Raspberry Pi USB-C Power Supply. We strongly recommend using official power supply due to damages that other power adapters may cause to Pi board.
Connectivity
For transferring and sending data from device to user's email we used WiFi connectivity option. Raspberry Pi offers 2.4 GHz and 5.0 GHz IEEE 802.11ac wireless technology. Since we are not sending data in real time WiFi connection seems to be reliable enough. Using wireless connection is also very convenient since you are not dependant from length of Ethernet cable. This allows you to position and install this device to almost every place you want (where there is electricity of course).

How does it work?
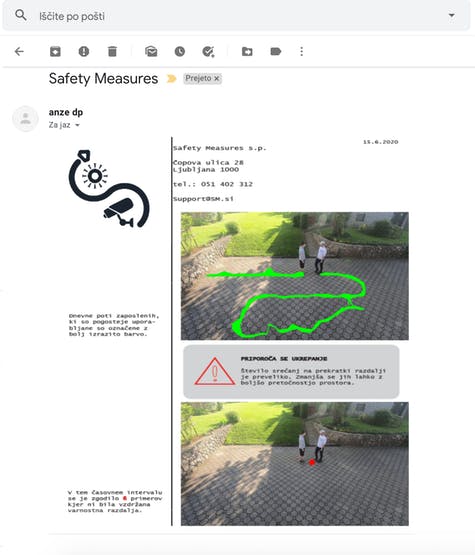
Our solution is an integrated system that would record the path of employees in industrial premises and show critical points. We will simulate how the algorithm works on a video we recorded ourselves. The algorithm recognizes people in the video (green dot below the person) and remembers their locations and calculates the distance between them. If the distance between them is too small, a red dot is drawn, which represents a critical point. This is shown at the end of the video where the two people get too close to each other.
At the end of the video or code execution two photos are generated. First one represents path of people (workers) while second one shows critical areas where interactions between people happened. Then these two photos are send to preselected email. In email text can also be included. Sample mail can be seen below.
How to do it?
In this section we will present step-by-step guide to construct final solution. Note that here are stated only main steps with separate parts of code. Complete python code is listed in the end of this project.
Step 1: Connectinghardware
First connect webcam to Raspberry Pi using USB cable. Then plug Pi board to its power supply and turn it on.
Step 2: Installing software
Once hardware is connected you need to prepare software. Import python code (published in last section of this project) to Raspberry Pi and save it as “.py” file. Then install all needed libraries and packages.
import cv2
import numpy as np
import time
import random
import math
from random import randrange

import smtplib
from email.mime.text import MIMEText
from email.mime.multipart import MIMEMultipart
from email.mime.base import MIMEBase
from email import encoders
import os.path
Step 3: Adding weights
In order for algorithm to work you need to add two weights. Files with weights have to be saved in the same directory as python code.
#Load Yolo, importing weights
net = cv2.dnn.readNet(r"path-to/yolov3.weights",
                      r"path-to/yolov3.cfg")
classes = []
Step 4: Loadingvideo or camera
If video you want to analyse is prerecorded, add path to it. For video from webcam use “VideoCapture(0)”.
# Loading prerecorded video or web camera (put VideoCapture(0))
cap = cv2.VideoCapture(r"path-to/video.mp4")
Step 5: Sendingemail
Sending final analysed results requires sender mail, password for senders mail and receivers mail.
#Email
email = 'sender mail'
password = 'password of that mail'
send_to_email = 'receiving mail'
subject = 'This is the subject'
message = 'message'
Step 6: Allowinggmail access
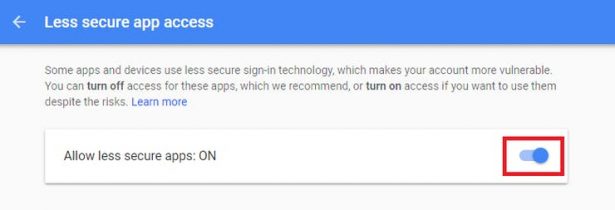
When using Gmail as a sender's email, “less secure app access” has to be switched on.
Step 7: That'sit
Now you just have to run the code and wait for results to be send via email.
What's next?
We believe that current solution presented in this project is solid base from which can be build up to “next level” solution. For next updates we would like to:
- Optimise algorithm to get higher processing speed (FPS)
- Design better user interface that could be send via email (as seen below)
- Implement perspective transformation in order to get more accurate and precise measurements
- Test our solution in real life industrial facilities
- Add extra features like mask detection (who does and who doesn't wear mask)
- Implement more advance data analyse
Conclusion
We are happy to present this project to public and make our solution available for everyone. As said before, additional upgrades and optimisation would bring this solution to next level. We encourage everyone to participate and suggest any constructive ideas that would help us make this project better and more useful. Together we can achieve great things and fight against corona virus until it's all gone. Thank you!
Code
import cv2
import numpy as np
import time
import random
import math
from random import randrange

import smtplib
from email.mime.text import MIMEText
from email.mime.multipart import MIMEMultipart
from email.mime.base import MIMEBase
from email import encoders
import os.path


#Load Yolo, importing weights
net = cv2.dnn.readNet(r"path-to/yolov3.weights",
                      r"path-to/yolov3.cfg")
classes = []


#Importing classes, in this case only "person"
with open(r"path-to/coco.names", "r") as f:
    classes = ["person"] #[line.strip() for line in f.readlines()]
layer_names = net.getLayerNames()
output_layers = [layer_names[i[0] - 1] for i in net.getUnconnectedOutLayers()]
colors = np.random.uniform(0, 255, size=(len(classes), 3))


# Loading prerecorded video or web camera (put VideoCapture(0))
cap = cv2.VideoCapture(r"path-to/video.mp4")

length1 = int(cap.get(cv2.CAP_PROP_FRAME_COUNT))

font = cv2.FONT_HERSHEY_PLAIN
starting_time = time.time()
frame_id = 0
list_1 = []
list_2 = []
list_3 = []
list_4 = []


# Frame reading
while(frame_id < length1):
    _, frame = cap.read()
    print(frame_id)
    frame_id += 3


    height, width, channels = frame.shape

    # Detecting objects
    blob = cv2.dnn.blobFromImage(frame, 0.00392, (320, 320), (0, 0, 0), True, crop=False)

    net.setInput(blob)
    outs = net.forward(output_layers)

    # Showing informations on the screen
    class_ids = []
    confidences = []
    boxes = []
    for out in outs:
        for detection in out:
            scores = detection[5:]
            class_id = np.argmax(scores)
            confidence = scores[class_id]
            if confidence > 0.5:
                # Object detected
                center_x = int(detection[0] * width)
                center_y = int(detection[1] * height)
                w = int(detection[2] * width)
                h = int(detection[3] * height)


                # Rectangle coordinates
                #x = int(center_x - w / 2) #for rectangle
                #y = int(center_y - h / 2) #for rectangle
                x = int(center_x)
                y = int(center_y)
                #cv2.circle(frame, (x, y), 1, (0, 255, 0), 3) #for circle
                list_1.append([x, y])

                boxes.append([x, y, w, h])
                confidences.append(float(confidence))
                class_ids.append(class_id)
                list_2.append([x, y])

#Calculating the distance between people
    for k3 in range(len(list_2)):
        for k4 in range(len(list_2)):
            if k3 != k4:
                dx2_1 = (list_2[k3][0] - list_2[k4][0])**2
                dy2_1 = (list_2[k3][1] - list_2[k4][1])**2
                distance2 = math.sqrt(dx2_1 + dy2_1)
                if distance2 < 50 and distance2 > 10:
                    dx2_2 = (list_2[k3][0] - list_2[k4][0]) / 2
                    dy2_2 = (list_2[k3][1] - list_2[k4][1]) / 2
                    x_1 = round(list_2[k4][0] + dx2_2)
                    y_1 = round(list_2[k4][1] + dy2_2)
                    list_3.append([x_1, y_1])
                    list_4.append([x_1, y_1])


#Drawing red dots if distance is too small
    for k5 in range(len(list_4)):
        cv2.circle(frame, (list_4[k5][0], list_4[k5][1]), 8, (0, 0, 255), 15)

    indexes = cv2.dnn.NMSBoxes(boxes, confidences, 0.4, 0.3)

    list_2.clear()
    list_4.clear()


#Drawing paths of people
    for i in range(len(boxes)):
        if i in indexes:
            x, y, w, h = boxes[i]
            confidence = confidences[i]
            g = random.randint(0, 255)
            b = random.randint(0, 255)
            r = random.randint(0, 255)
            #color = colors[class_ids[i]]
            #cv2.rectangle(frame, (x, y), (x + w, y + h), color, 2)
            #cv2.rectangle(frame, (x, y), (x + w, y + 30), color, -1)
            cv2.circle(frame, (x, y), 1, (0, 255, 0), 3)
            #cv2.putText(frame, label + " " + str(round(confidence, 2)), (x, y + 30), font, 1, (255, 255, 255), 3)

    elapsed_time = time.time() - starting_time
    fps = frame_id / elapsed_time
    cv2.putText(frame, "FPS: " + str(round(fps, 2)), (10, 50), font, 1, (0, 0, 0), 3)

    cv2.imshow("Image", frame)
    key = cv2.waitKey(1)
    if key == 27:
        break

_, frame1 = cap.read()


#Drawing all paths in video
for k1 in range(len(list_1)):
    for k2 in range(len(list_1)):
        dx2 = (list_1[k1][0] - list_1[k2][0])**2
        dy2 = (list_1[k1][1] - list_1[k2][1])**2
        distance1 = math.sqrt(dx2 + dy2)
        if distance1 < 15:
            cv2.line(frame1, (list_1[k1][0], list_1[k1][1]), (list_1[k2][0], list_1[k2][1]), (0, 255, 0), 2)

cv2.imshow("Image", frame1)
#Saving image
cv2.imwrite(r"path-to\frame_name.jpg", frame1)

_, frame2 = cap.read()


#Drawing all closer encounters in video
for k6 in range(len(list_3)):
    cv2.circle(frame2, (list_3[k6][0], list_3[k6][1]), 8, (0, 0, 255), 15)

#Saving image
cv2.imwrite(r"path-to\frame_name2.jpg", frame2)

key = cv2.waitKey(10000)
cap.release()
cv2.destroyAllWindows()


#Writing email
email = 'sender mail'
password = 'password of that mail'
send_to_email = 'receiving mail'
subject = 'This is the subject'
message = 'message'
file_location = r'path-to\frame1.jpg'
file_location = r'path-to\frame2.jpg'

msg = MIMEMultipart()
msg['From'] = email
msg['To'] = send_to_email
msg['Subject'] = subject

msg.attach(MIMEText(message, 'plain'))


# Setup the attachment
filename = os.path.basename(file_location)
attachment = open(file_location, "rb")
part = MIMEBase('application', 'octet-stream')
part.set_payload(attachment.read())
encoders.encode_base64(part)
part.add_header('Content-Disposition', "attachment; filename= %s" % filename)

# Setup the attachment 1
filename1 = os.path.basename(file_location1)
attachment1 = open(file_location1, "rb")
part1 = MIMEBase('application', 'octet-stream')
part1.set_payload(attachment1.read())
encoders.encode_base64(part1)
part1.add_header('Content-Disposition', "attachment; filename= %s" % filename1)


# Attach the attachment to the MIMEMultipart object
msg.attach(part)

server = smtplib.SMTP('smtp-mail.outlook.com', 587)
server.starttls()
server.login(email, password)
text = msg.as_string()
server.sendmail(email, send_to_email, text)
server.quit()


# Attach the attachment to the MIMEMultipart object 1
msg.attach(part1)

server = smtplib.SMTP('smtp-mail.outlook.com', 587)
server.starttls()
server.login(email, password)
text = msg.as_string()
server.sendmail(email, send_to_email, text)
server.quit()