
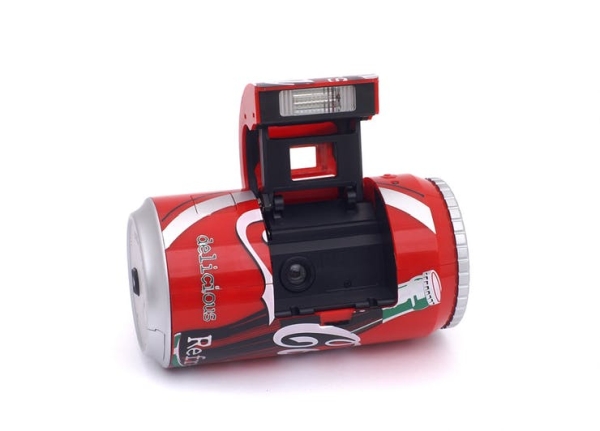
Take a Raspberry Pi Zero and a webcam cram it into a Coke bottle while making it continue to appear like a normal Coke bottle!
Inspiration
For this project, the inspiration started when I came across a mini Pi Zero camera online. The obvious application for such a camera is to make a “Spy Cam”. A spy cam is normally a camera that's disguised as something else. Then the question became: “what should I disguise my camera as?” I've seen cameras hidden in Coke cans before, but I thought it'd be cool to hide one behind the label of a Coke Bottle, while making it look like liquid was still in it. So in a nutshell, that's the journey of this project.
Making a Tiny Pi Camera
This project hinges upon being able to make a Raspberry Pi Zero W and a Raspberry Pi camera fit behind the label of a Coke Bottle. There are a lot of different Coke bottle shapes and sizes, but the US version of a 20 oz Coke bottle was the perfect size to house the Pi. The results may differ depending on your country, so be sure to do proper measurements before attempting this.

The camera I chose is a very small form factor camera intended for the Raspberry Pi Zero. It's perfect for fitting everything into a tight space.
Now it's just the standard matter of setting up the Pi. So taking a 4gb or larger micro SD card, download the Raspbian operating system and burn it to the SD card using Etcher.io. Insert the SD card into the Pi zero, and connect the camera, keyboard, mouse, monitor, and finally the power.
Once you see the Raspbian desktop, the first thing you want to do is connect to your wireless network. Then if you right-click on the wireless icon, you can select “Wired and Wireless settings”, and give your Pi a static IP address so that you know how to connect to it later. After that, click on the menu and go to Settings > Raspberr Pi configuration. Under the “Interfaces” tab, make sure both Camera and SSH are enabled. Then you can save it and restart your Pi.
Now you can hop over to a different computer and connect to your Pi through an SSH client such as Putty.
What we want to do is create a script that activates the camera and serves it to a web page so that we can access it from any web browser. There are plenty of different ways to do this (Motion, Raspivid, etc), but I found a simple Python script that does everything I need it to do and doesn't require any extra software or libraries to install. The best thing about it is that the lag time is practically unnoticeable.
spi_cam.py
# Web streaming example
# Source code from the official PiCamera package
# http://picamera.readthedocs.io/en/latest/recipes2.html#web-streaming
import io
import picamera
import logging
import socketserver
from threading import Condition
from http import server
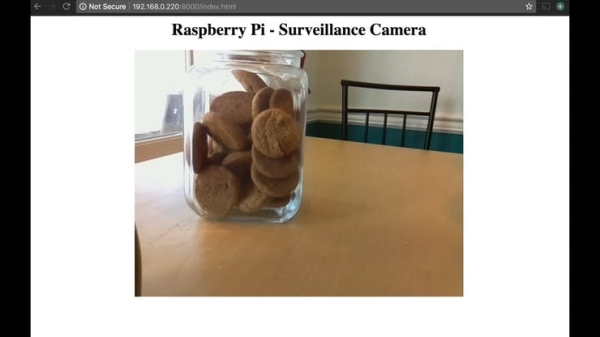
PAGE="""\
<html>
<head>
<title>Raspberry Pi - Surveillance Camera</title>
</head>
<body>
<center><h1>Raspberry Pi - Surveillance Camera</h1></center>
<center><img src="stream.mjpg" width="640" height="480"></center>
</body>
</html>
"""
class StreamingOutput(object):
def __init__(self):
self.frame = None
self.buffer = io.BytesIO()
self.condition = Condition()
def write(self, buf):
if buf.startswith(b'\xff\xd8'):
# New frame, copy the existing buffer's content and notify all
# clients it's available
self.buffer.truncate()
with self.condition:
self.frame = self.buffer.getvalue()
self.condition.notify_all()
self.buffer.seek(0)
return self.buffer.write(buf)
class StreamingHandler(server.BaseHTTPRequestHandler):
def do_GET(self):
if self.path == '/':
self.send_response(301)
self.send_header('Location', '/index.html')
self.end_headers()
elif self.path == '/index.html':
content = PAGE.encode('utf-8')
self.send_response(200)
self.send_header('Content-Type', 'text/html')
self.send_header('Content-Length', len(content))
self.end_headers()
self.wfile.write(content)
elif self.path == '/stream.mjpg':
self.send_response(200)
self.send_header('Age', 0)
self.send_header('Cache-Control', 'no-cache, private')
self.send_header('Pragma', 'no-cache')
self.send_header('Content-Type', 'multipart/x-mixed-replace; boundary=FRAME')
self.end_headers()
try:
while True:
with output.condition:
output.condition.wait()
frame = output.frame
self.wfile.write(b'--FRAME\r\n')
self.send_header('Content-Type', 'image/jpeg')
self.send_header('Content-Length', len(frame))
self.end_headers()
self.wfile.write(frame)
self.wfile.write(b'\r\n')
except Exception as e:
logging.warning(
'Removed streaming client %s: %s',
self.client_address, str(e))
else:
self.send_error(404)
self.end_headers()
class StreamingServer(socketserver.ThreadingMixIn, server.HTTPServer):
allow_reuse_address = True
daemon_threads = True
with picamera.PiCamera(resolution='640x480', framerate=24) as camera:
output = StreamingOutput()
#Uncomment the next line to change your Pi's Camera rotation (in degrees)
#camera.rotation = 90
camera.start_recording(output, format='mjpeg')
try:
address = ('', 8000)
server = StreamingServer(address, StreamingHandler)
server.serve_forever()
finally:
camera.stop_recording()
Save the file, and run it by typing
sudo python3 spi_cam.py
Then on your browser you can go to http://[your pi's IP address]:8000 to view your webcam.
Assuming that it's working, the next step is to make it executable.
chmod +x spi_cam.py
Then add it to your rc.local file to make it auto-start everytime the Pi starts up.
sudo nano /etc/rc.local
#add this before exit0 at the end of the file
sudo python3 /home/pi/spi_cam.py &
Now every time the Pi boots up, the spy camera should auto-launch and you should be able to view it from your browser!
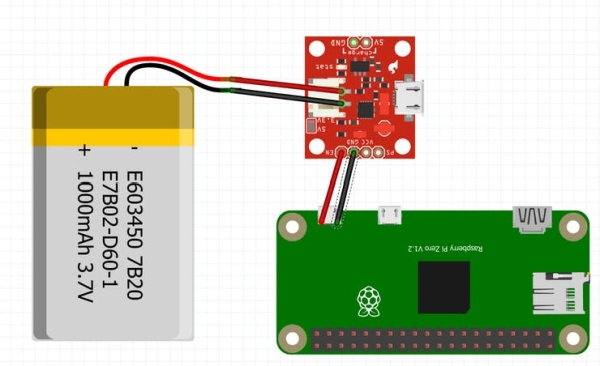
Making It Portable
Since the camera is intended to be “in” a Coke bottle, having wires coming out of would kind of ruin the effect. The only wire that it requires at the moment is power, so what we need to do is set it up to run off of battery power.
For this task, I used a 1500maH Lithium Polymer battery, an Adafruit Lithium Polymer charger, and a simple slide switch. I connected the battery to the charger, and soldered some wires from the charger, to the switch, and then on to the back of the Pi, using the PP1 (+) and PP6 (-) connector pads on the back of the Pi.
Making The Camera Container
With our Pi camera set up, working, and portable, we can now work on how we're going to work it into the Coke bottle. My idea is to cut out the middle of the bottle and replace it with a 3D printed container that the Pi is housed in. This container will have a hole for the camera, and a lid so that you can easily separate the bottle to charge the battery and switch it on and off.
What I did was measure the height of the label and the width of the middle of the bottle. Taking those measurements and subtracting 2 mm from each, I created a cylinder which I then cut the top off of and hollowed out so that it could house the Pi and it's required components.
I modeled everything in Tinkercad, which was super simple, but the end result was less than stellar. You can see that the cylinder is very jagged and not smooth. The model required subdivision, which Tinkercad currently isn't capable of doing. If I did a version 2 (or if you want to make your own), I would use Fusion 360 instead.
Source: Secret Coke Bottle SPY CAM!