
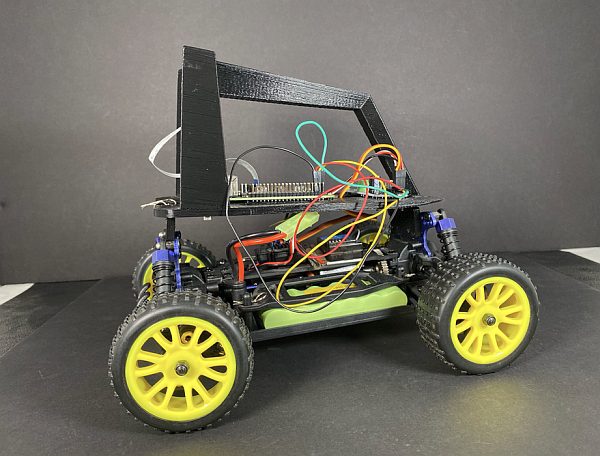
Donkey is a self-driving car platform meant to convert RC cars into autonomous ones. It's a self-driving library written in Python. Its Open Source hardware allows anyone, including myself, to build their own car!
This project was created by Sanjhee Gupta in association with Berbawy Makers. Sanjhee is an ambitious high school senior who plans on pursuing Computer Science with an emphasis in Machine Learning and Data Science in order to produce deep learning algorithms that make life more efficient.
A special thank you to Ms. Berbawy, her Principles of Engineering class, Berbawy Makers, and everybody who helped me overcome the challenges I faced. This project would not succeed without them 🙂
Supplies
- You can use other models. Please refer to this.
3D Printer (Prusa i3 MK3S+ used)
PLA Filament (Prusament PLA used)
M2x6 Screws and Nuts (8)
M3x10 Screws and Nuts (3)
Female to Female Jumper Wires (5)
Step 1: 3D Model Parts for Chassis
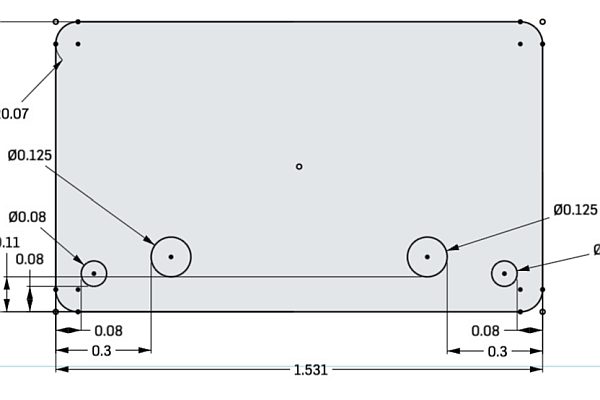
While we do have the RC car's chassis, we need two extra platforms: one to mount the Raspberry Pi and PCA9685 on, and one to mount the Raspberry Pi camera on. The Donkey Car team has made CAD files available but I chose to work on the models myself. Although the Top Plate might seem over-dimensioned, it is not as all holes are placed based on the size of the boards. I used OnShape but you can use any CAD software of your choice. Although I'm including screenshots of the CAD drawings, the adapters required extruded sketches on top of bodies, meaning you should definitely check out the file here for full information on the dimensions! You can use other 3D modeling software if you wish!
Step 2: 3D Print Parts
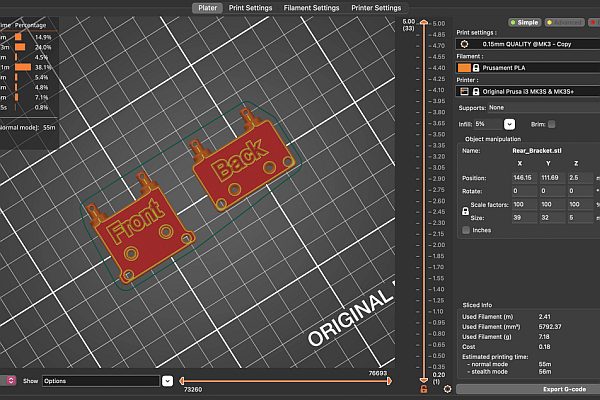
Please use the CAD files inserted right above. I used a Prusa i3 MK3S+ but you can use any you want. I used the settings in the picture. You can use 5-15% infill: 5 if you want it to print fast and 15 if you want it to be strong. I used 5% as I wanted it to print fast and I don't need the parts to be incredibly strong. You also will need to print the Build Cage, which will be used to mount the Raspberry Pi camera. Make sure to not accidentally double-print the top plate (the flat piece with a lot of holes) as I included it earlier in the previous step. Once you have the .stl files downloaded, please use a Slicer in order to set up settings for your print. Use the correct slicer for your printer, a quick Google search can inform you on which slicer you need to install on your computer. Apply glue stick on the build plate so that the print doesn't end up moving and getting spoiled. Once the print is done, remove any supports and sand any extra pieces off. If your adapters end up having filament in their holes, as mine did, there is nothing to worry about as you can just drill them out!
Step 3: Assemble the Car
Take your Exceed Blaze and remove the body pins in order to remove the top plastic cover. You also need to remove the two adapters in the RC car (located at the front and back) in order to get two screws. You also have to remove the rear wing in order to obtain 4 additional screws. Attach the 3D-printed adapters using the screws that were just unscrewed (2 for each adapter). I've attached a picture of what the chassis should look like with the adapters on.
Next, take the top plate and the M2 x 6 screws. Screw on the Rasberry Pi and the PCA9685 using the screws (4 for each board). Using the M3 x 10 screws, screw the Top Plate onto the Roll Cage. Once the two are screwed into each other, insert the Raspberry Pi Camera into the camera slot in the Pi. Take the lens and bring it to the top of the Roll Cage, inserting it into the Cage's only slot. It might be tricky at once but it will be a snug fit. You can also use mounting tape if you wish.
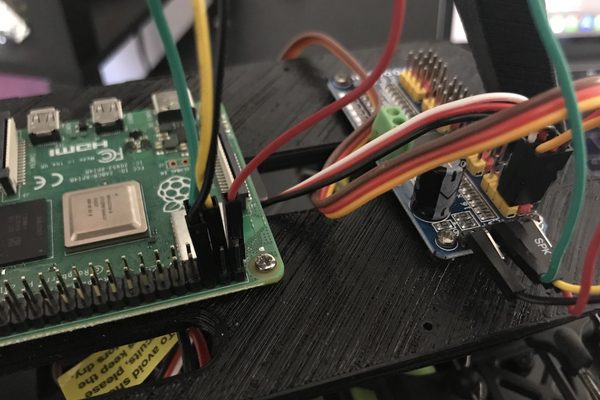
After doing this, you'll need to connect the Raspberry Pi with the Servo Driver (PCA9685). You also have to take the two servo three-way wires and attach them to channels 0 and 1. The brown-red-yellow wire goes into channel 0, while the black-red-white wire goes into channel 1. The black on the board corresponds with the black and brown on the wires.
Raspberry Pi --> PCA9685
3V3 Power    --> VCC
GPIO2        --> SDA
GPIO5        --> SCL
Ground       --> Ground
Step 5: Set Up the Raspberry Pi
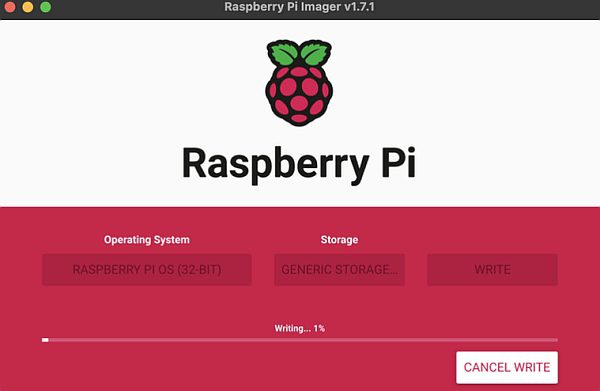
First, we will be flashing an OS on the Raspberry Pi. Install Raspian Legacy. In order to actually flash the SD card, you'll need to install a Raspberry Pi Imager. It is the software that flashes the OS. I chose the Raspberry Pi OS 32 bit, the SD card, and “wrote” it.
You then need to set up the WiFi for the first boot. On your Terminal, type the following line of code.
vi /Volumes/boot/wpa_supplicant.conf
Once it opens a file, you'll need to copy-paste the following code, replacing the contents to match the credentials of your WiFi.
country=US
ctrl_interface=DIR=/var/run/wpa_supplicant GROUP=netdev
update_config=1

network={
    ssid="<your network name>"
    psk="<your password>"
}
You then need to enable SSH on Boot. This will allow you to control the Raspberry Pi through your host PC. We will be creating an SSH file in the boot partition.
touch /Volumes/boot/ssh
Your SD card is now ready and can be ejected from your computer!
Insert the SD card in the Raspberry Pi and connect it to a monitor using a Micro-HDMI to HDMI cable. Upon booting, log in with:
- Username: pi
- Password: raspberry
Then try the following command to find the IP address of your Raspberry Pi. We will need this information in order to ssh into the Pi, which is essentially programming your Pi using the host PC.
ip -br a
To see if you found the correct number, on your Host PC, on Terminal, type:
ssh pi@<your pi ip address>
Update the software
sudo apt-get update --allow-releaseinfo-change
sudo apt-get upgrade
Configure your Raspberry Pi:
sudo raspi-config
- change the Pi's default password for protection purposes
- change the Hostname if you'd like to
- enable “Interfacing Options – I2C”
- enable “Interfacing Options – Camera”
- select “Advanced Options – Expand Filesystem”
Once you've done all of these steps, land on the Finish option and press enter.
Next, you'll need to install Dependencies.
sudo apt-get install build-essential python3 python3-dev python3-pip python3-virtualenv python3-numpy python3-picamera python3-pandas python3-rpi.gpio i2c-tools avahi-utils joystick libopenjp2-7-dev libtiff5-dev gfortran libatlas-base-dev libopenblas-dev libhdf5-serial-dev libgeos-dev git ntp
You also can install Dependencies for OpenCV. Although this isn't required (in the case of wanting a minimal install), you can install them as having OpenCV is always a bonus.
sudo apt-get install libilmbase-dev libopenexr-dev libgstreamer1.0-dev libjasper-dev libwebp-dev libatlas-base-dev libavcodec-dev libavformat-dev libswscale-dev libqtgui4 libqt4-test
If this gives you an error because you do not have the libqtgui4 packages installed, retype the line, but without the last two packages. It should work now.
Now you'll need to set up the Virtual Environment.
python3 -m virtualenv -p python3 env --system-site-packages
echo "source env/bin/activate" >> ~/.bashrc
source ~/.bashrc
The meaning of the second line: in the bashrc file,.which is located in the home directory, concatenate (add to the end) the text written in double quotation marks. > means overwrite. We don't want to use this because we don’t want to overwrite an important file with a lot of bash shortcuts. On the other hand, >> means concatenate, which means add to the end of the file. The meaning of the third line: the bashrc file runs every time you open a new tab of Terminal. What if you want to reload the bashrc file, because of the changes made using the second line, in the same tab? You use source. You'll note that the bashrc file has the line of text we concatenated at the very bottom (refer to image).
Now, the DonkeyCar Python code needs to be installed. Please cd to the Projects directory we created earlier and then install the code from GitHub.
git clone https://github.com/autorope/donkeycar
cd donkeycar
git checkout main
pip install -e .[pi]
pip install https://github.com/lhelontra/tensorflow-on-arm/releases/download/v2.2.0/tensorflow-2.2.0-cp37-none-linux_armv7l.whl
Although optional, you can install OpenCV. You should definitely install the library if you installed its dependencies earlier.
sudo apt install python3-opencv
You can test to see if the import was a success by entering:
python -c "import cv2"
Step 6: Create Your DonkeyCar Application
Please ssh into your Raspberry Pi.
ssh pi@<your ip address>
We first need to create a set of files that will be used to control the Donkey Car.
donkey createcar --path ~/mycar
If you used the PCA9685, we need to make sure we can see it on I2c, which is basically a communication protocol.
sudo apt-get install -y i2c-tools
sudo i2cdetect -y 1
This should give you the following output:
    0  1  2  3  4  5  6  7  8  9  a  b  c  d  e  f
00:          -- -- -- -- -- -- -- -- -- -- -- -- --
10: -- -- -- -- -- -- -- -- -- -- -- -- -- -- -- --
20: -- -- -- -- -- -- -- -- -- -- -- -- -- -- -- --
30: -- -- -- -- -- -- -- -- -- -- -- -- -- -- -- --
40: 40 -- -- -- -- -- -- -- -- -- -- -- -- -- -- --
50: -- -- -- -- -- -- -- -- -- -- -- -- -- -- -- --
60: -- -- -- -- -- -- -- -- -- -- -- -- -- -- -- --
70: 70 -- -- -- -- -- -- --
If you get something different, please double-check your wiring.
Please install the Robocar Controller mobile app on your iOS or Android phone to calibrate and train your car. If you chose to use a Raspberry Pi model which is not the 4B, please note that you cannot use this method as the mobile app is only compatible with that one model.
In order to flash the SD card with pre-built image, you'll need to install Etcher and the latest pre-built image. This step cannot be skipped as the app only works with the image that we flash on the SD card.
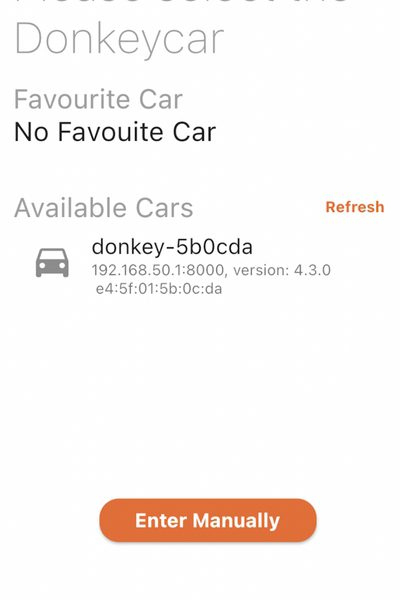
Turn on your Raspberry Pi and wait for the green light to stop blinking (may take up to 3 minutes). Next, go to the WiFi settings of your phone. You should see a network similar to “donkey-xxxxx” show up. I included a screenshot of what it looked like on my phone. Please keep in mind that the last 5 digits for you might not necessarily be the same.
First-Time Set Up
- Launch the app and agree to all the terms and conditions
- You will see your car appear with the IP address 192.186.50.1
- Click on your car and you will be taken to the setup screen
- choose the correct controller type (PCA9685), country, and enter your WiFi network's credentials
- Review your settings
- By this point, your phone is probably disconnected from the Pi's Hotspot as it is now connected with the WiFi you just entered the credentials for
Click on your car and you will now see a series of squares, each with a different icon.
Step 7: Calibrate the Car
Now, you need to calibrate your car. It basically is the process of telling your car what left is and what right is. Once you click on the calibrate icon, you will be taken to a screen with a couple of sliders and virtual joysticks. You will need to adjust the numbers and see which ones turn the wheel to the extreme left and the extreme right. My values were 450 and 300 for left and right, respectively. Try starting off at 400 for left and 290 for right. Ascend and descend by 10s to find the value for your car!
The Throttle tab is the same as the Steering tab, except meant for forward and reverse. I had the forward value of 410 and the reverse value of 330, but once again, this might not be the same for your car. Ascend and descend by values of 10 and you will find the value meant for your car!
Step 8: Drive the Car
After you're done calibrating your car, you are ready to drive it! Once you click on the drive button from the main menu page (the page with all the icons), you will be asked if you would like to use a virtual or physical joystick. I chose to use the virtual joystick so that I wouldn't have to carry my remote control everywhere. The remote control should have come with your RC car. You also need to share your location. This information goes into the meta.json file.
Once you've done this, your phone will show you the Raspberry Pi Camera's output, along with two knobs, one on each side. The left knob is for the throttle (forward/reverse) while the right knob is for the steering (left/right).
Click on the red button with the white circumference to start recording. It is crucial to record as without it, your system won't be collecting any data. Please keep in mind that the recording does not stop when you stop your driving. Once you have finished driving, tap the Exit button on the upper left corner. Your screen will show a driving summary which contains histograms and information on the number of images collected. You can view all the data you collect under the “Data” tab.
Step 9: Train the Data
As of right now, the app's development team provides a free data training service.
Go to the Train tab from the main page. Click on the + at the upper right corner of the screen. You will be asked to select the “tubs” of data you'd like to use to train. Please check the boxes of the tubs you'd like to use. Upon pressing “Train” at the bottom, you'll be taken to a summary page. Press “Submit” once you're ready to train the data.
Once the training is complete, the screen will display an accuracy graph and the training loss. Simultaneously, the app will upload the trained model to your car. The data is now ready to get tested!
Step 10: Autopilot
You can start your autopilot by clicking on the Autopilot button on the main page or inside the Train function. Once you're inside the function, you are allowed to switch between Autopilot and User Control. You can press the emergency stop button if things go sideways during autopilot.
Keep collecting data, training it, and testing the models until you have an accurate-driving car!
Source: Self-Driving Car