SelfiesBot is a Twitterbot that takes…Selfies! The Twitter feed for @selfiesbot is here.
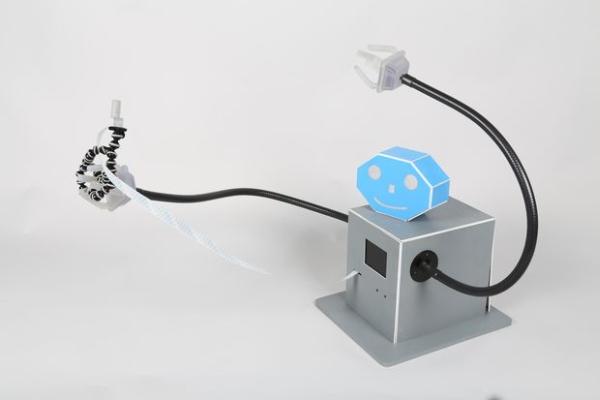
SelfiesBot is a sculpture that uses a Raspberry Pi to take a photo, preview it and then post it to its Twitter account.
This Instructable will give details of the software, electronics and physical construction involved with SelfiesBot. This is by far the most complex Instructable that I've written.
Step 1: Conceptual Development
As with all of my art projects, I spent a lot of time thinking this one through.
SelfiesBot is the crown jewel of my Bot Collective — a series of Twitterbots. Each bot has a “body” (a sculptural shell) and a “brain” (a microcontroller that sends Tweets), making the collective a set of network performance art objects.
SelfiesBot takes the phenomenon of the “selfie” and puts it into an automated form. The bot takes a picture of itself…or does it? Push button controls make operate it. A mirroring effect takes place as it looks infinitely into its own preview monitor.
I discovered two things early on:
1. People like to pose next to SelfiesBot — such that the human selfies meme continues.
2. I quickly discovered that pictures alone aren't very compelling. So, I modified SelfiesBot so that it combines each photo it tweets with random text that scraped from Twitter that uses the #selfies hashtag. People don't know what the text will be, so SelfiesBot acts as a sort of roulette wheel of collaged image & text.
Step 2: Flowchart the Interaction
I divided the project into three stages:
Electronics
Using the GPIO, SelfiesBot has a series of buttons that let you take pictures, save them, post them and delete them.
Software
Using Python and the command-line environment, SelfiesBot interfaces with the electronics with a simple UI to let you take images, manage them and tweet them.
Fabrication
SelfiesBot is a sculpture that houses the electronics and software, hiding them.
I built the basic electronics first and then the software.
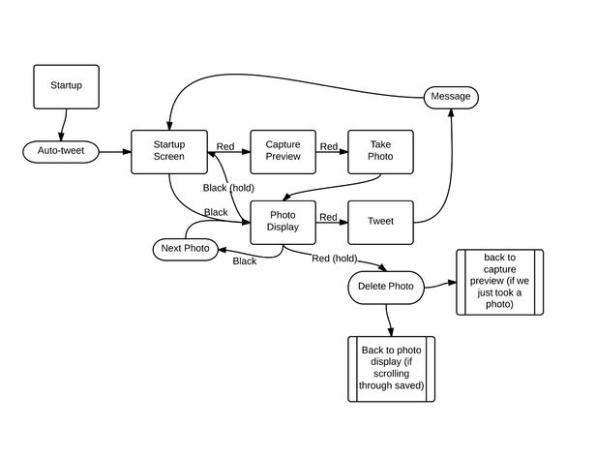
What was extremely helpful was creating this flowchart that shows the interaction of the buttons and different UI screens. It could have been easy to skip this step, but oh, was I happy to diagram in front of me when coding the interface screens in Python.
Step 3: Setting up the Raspberry Pi
There are several things we want to do with the Raspberry Pi:
1. Basic configuration
2. Installing the GPIO
3. Making a Twitterbot
4. Making your Python Script Autostart
Fortunately, I've written Instructables for each of these steps. I deployed the Autostart code at the end, since I wanted to get the software working in the shell environment before locking myself into Autostart.
I began with Steps 1-3. I saved step 4 for the very end, after testing the timing and interaction with friends and colleagues.
Step 4: Gather Components
I used a nearly duplicate set of components as the my Black Box Timelapse — these steps are close-to-identical to my previous Instructable.
Here's the component list:
– Raspberry Pi
– Small TFT monitor, which I ordered from Adafruit for $45.
– Rechargeable 12V battery
– USB battery that outputs 2A. Currently, I'm using this one from Adafruit, which has been reliable, thought a bit heavy
– a 12V USB powered supply. Since I need to run 12V for the monitor and want 3 USB ports (wifi dongle, USB and keyboard) and because the Raspberry Pi only runs 2, a powered hub makes sense. Plus, it saves battery life for the Raspberry Pi.
– RCA male-to-male coupler
– Micro USB for running out to the battery
– Perf board with: 3-position switch, leads for recharging and GPIO.
– GPIO via the Raspberry Cobbler
* This 12V battery ended up having problems with the USB output. I was hoping to have one battery run the show, but the Raspberry Pi ended up spiking the power needs when the camera was taking a picture and then the battery would cause a voltage drop, forcing the Raspberry Pi to reboot
Step 5: Battery Charging Mechanism
The electronics portion of this Instructable isn't as well-developed as I'd like. I'm going to improve upon this in the future.
The perf board uses both a simple charging circuit for the 12V battery and two buttons for interaction control.
This brand of battery has a the same input and output jack, so I rigged up a simple mechanism which has a three-position switch. In the up position, the 12V battery supplies power to the monitor via the video cables. In the down position, it will look for the charger, as the female connector. In the neutral or middle position, no power will be active. I tie all the grounds together (video, battery, charger) and the switch will connect the positive wire of the battery to either to the video monitor, the charger or nothing. The USB battery isn't part of this circuit and has an on/off switch.
This is a fairly straightfoward electronics circuit. I used two buttons and two LEDs to control the menu system.
These components are covered in my Using the GPIO with the Raspberry Pi Instructable, so please read this through to figure out more on how to set up a simple pushbutton and LED with the Raspberry Pi.
(just in case, the circuit diagram is above).
Step 7: Setting up the Camera
For the camera mount, I 3D-printed this camera holder, from a previous Instructable that I wrote and put it on a small tripod that can be wrapped around one of SelfiesBot's hands.
I would highly recommend using the PiCamera Python module for using the Raspberry Pi.
The implementation details are in my SelfiesBot GitHub repository — feel free to download it and play with it.
One thing that I did discover with using the Raspberry Pi camera module is that it takes about 250mA of power, so originally I was using a lower-grade battery and when the current would spike, the battery would drop its power to the Raspberry Pi, forcing a reboot.
Step 8: Coding in Pygame
Once I had all the basic software installed on the Raspberry Pi, the SelfiesBot code took about a day to write.
I used the Pygame environment as my interaction model, using my flow chart to navigate through the different screens for button input. The SelfiesBot GitHub repository has all the code in it.
Development was tedious, but following my interaction flowchat was critical in making this a smooth programming experience.
The LEDs simply light up when you hold one of the buttons down, so that you know the electronics circuit is actually working.
Step 9: Build the electronics armature
The housing for the electronics is often the trickiest part of any electronics project — and one which is usually overlooked.
The first thing I did was built out an armature for all of the electronics. This took a few iterations, some cardboard prototyping, but eventually I nailed it.
The essential components are:
1. the batteries — these have to be easily accessible so they can be recharged.
2. the Raspberry Pi — this is buried in there, but I do wa
nt to be able to sometimes pull the SD card
3. a 12V-powered USB hub that powers a wireless keyboard, the WiFi dongle and a small USB drive where the images will be stored. The little USB drive is also something I want to have access to.
4. The GPIO and the various tethered electronics coming out the back
5. Video monitor (this will end up being attached to the face) and can be detached from the rest of components in the armature.
6. Lots of cables
I wish I had better documentation of this step, since it was critical, but hopefully you get the idea. I secure the batteries with velcro. Everything else is held in by various blocks of wood. You'll see a nice photo at the end of the Instructable.
Step 10: Lasercut the Panels A
rmature
Based on the dimensions of the electronics armature, I came up with a second armature, which is the exoskeleton of SelfiesBot.
The electronics armature nestles into this one and can be completely removed to work/fix the electronics.
We will later attach the exterior panels to this armature.
Step 11: Armature Assembly
Using a brad nail gun, I fastened together the exoskelton armature.
Even without a jig, it ends up being fairly square, at lea
st good enough to hold the exterior panels.
Step 12: Paint the exterior panels a light gray
I used 1/8″ birch ply for the exterior faces of SelfiesBot.
I was a lot easier to paint one big panel than hand-painting many smaller ones, so I painted a gray color before laser-cutting the panel pieces I used 1 coat of primer and 2 coats of low-VOC latex paint.
I also created a base for SelfiesBot, which was a 3/8″ piece of wood. I first laser-cut this and then painted this at the same time as the 1/8″ wood.
Step 13: Attach bottom plate to armature
I used a couple brad nails to properly tack the armature in place. Then, I attached the bottom plate to the built armature with several screws from the bottom.
Step 14: Cardboard Prototype Panels
I spent loads of time on this step. The back plate needed to fit the electronics: the buttons, two LEDs, and more. Laser-cutting cardboard w
as fast and cheap, so hours of iteration were-well worth it.
Step 15: Lasercut Panels
Based on the cardboard protoypes, I lasercut the panels. Since they were painted before cutting, I had to be super-careful to get the cuts right.
Step 16: Clean edges on the belt sander
The edges were burnt, as always with a laser-cutter. I eventually painted these white, but I needed to reduce the burn marks, so I cleaned the ed
ges with a belt sander. You can sand these by hand if you don't have this tool in your shop.
For more detail: SelfiesBot — Twitterbot that takes Selfies using Rapsberry Pi


