
How to merge different IoT devices and services? Node-RED provides an elegant solution.
Node-RED provides an elegant solution to merge different IoT devices and services.
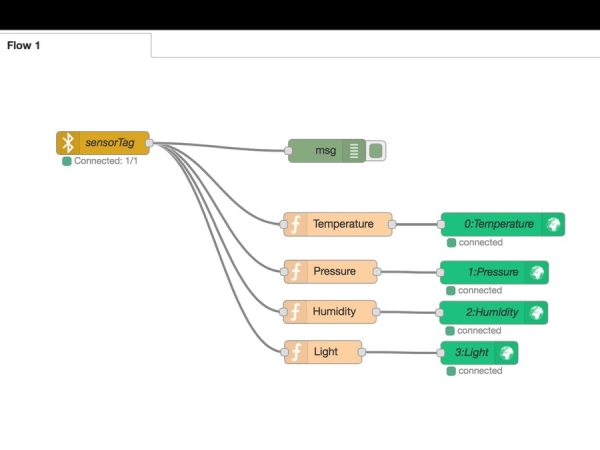
- The SensorTag acquires weather data and sends them to the Raspberry Pi through BLE (Bluetooth Low Energy).
- The Node-RED flow runs on the Raspberry Pi, processes the weather data and sends to the Blynk server, either on the cloud or locally, through WiFi.
- An iOS- or Android-based phone or tablet connects to the same Blynk server, either on the cloud or locally, and displays the measures on a beautiful way.
The RedBear IoT pHAT provides BLE and WiFi to the Raspberry Pi Zero.
General Preparation
Download the Debian Jessie Lite image and prepare a microSD-card. On macOS, I’m using ApplePi-Baker to prepare the microSD-card.
In order to enjoy SSH through USB, update the microSD-card on the main computer with
$
nano config.txt
At the very bottom, add
dtoverlay=dwc2 Press ctrl-O ctrl-X to save and close. Then launch
$
nano cmdline.txt
After rootwait, add a space then
modules-load=dwc2,g_ether Press ctrl-O ctrl-X to save and close. Power-cycle the Raspberry Pi.
Connect to the Raspberry Pi, with an USB cable on USB port. On the main computer,
$
ssh [email protected]
Default password is raspberry.
To proceed with the update and upgrade, launch on the Raspberry Pi
$
sudo apt-get update
sudo apt-get upgrade
Set the timezone. Launch on the Raspberry Pi
$
sudo raspi-config
Install and run rpi-update. Launch on the Raspberry Pi
$
sudo apt-get install rpi-update
sudo rpi-update
Install RedBear IoT pHAT
Power the Raspberry Pi off, plug the RedBear IoT pHAT on the Raspberry Pi, power the Raspberry Pi on, connect to it and launch
$
cat /proc/device-tree/hat/product
If the answer is IoT pHAT w/eep_v0.3, the board is ready. Proceed to next section. Otherwise, the EEPROM needs to be updated. Just follow this procedure.
To confiture WiFi, launch on the Raspberry Pi
$
ifconfig
sudo nano /etc/wpa_supplicant/wpa_supplicant.conf
Add at the end
network={
   ssid="SSID"
   psk="passwork"
   key_mgmt=WPA-PSK
}
Press ctrl-O ctrl-X to save and close. Finally, reboot.
$
sudo reboot
Connect using Ethernet over USB or WiFi and launch on the main computer
$
ssh [email protected]
Default password is raspberry.
To check Bluetooth is running, launch on the Raspberry Pi
$
hciconfig
hci0:	Type: BR/EDR  Bus: UART
	BD Address: E0:76:D0:CF:2F:A4  ACL MTU: 1021:8  SCO MTU: 64:1
	UP RUNNING
	RX bytes:717 acl:0 sco:0 events:42 errors:0
	TX bytes:1532 acl:0 sco:0 commands:42 errors:0
To scan Bluetooth devices, launch on the Raspberry Pi
$
bluetoothd -v
5.23
sudo bluetoothctl
[bluetooth]#
scan on
[NEW] Device B0:B4:48:ED:B4:84 CC2650 SensorTag
[bluetooth]#
connect B0:B4:48:ED:B4:84
Attempting to connect to B0:B4:48:ED:B4:84
[CHG] Device B0:B4:48:ED:B4:84 Connected: yes
Connection successful
[bluetooth]#
trust B0:B4:48:ED:B4:84
[CHG] Device B0:B4:48:ED:B4:84 Trusted: yes
[bluetooth]#
quit
The SensorTag Node-RED requires Bluetooth, as well as an Ethernet over USB connection or a WiFi connection.
Install node, npm and Node-RED
Launch on the Raspberry Pi
$
sudo apt-get update
sudo apt-get install node
sudo apt-get install nodered
sudo apt-get install npm
Check
$
node -v
v0.10.29
npm -v
1.4.21
To obtain release 0.12 of node, launch on the Raspberry Pi
$
wget https://s3-eu-west-1.amazonaws.com/conoroneill.net/wp-content/uploads/2015/02/node-v0.12.0-linux-arm-pi.tar.gz
tar -zxvf node-v0.12.0-linux-arm-pi.tar.gz
cd node-v0.12.0-linux-arm-pi
sudo cp -R * /usr/local/
cd ..
sudo rm -R node-v0.12.0-linux-arm-pi
node -v
v0.12.0
To install Node-RED
$
sudo apt-get install nodered
To install npm to manage additional nodes,
$
sudo apt-get install npm
To obtain release 2.15 of npm, launch on the Raspberry Pi
$
sudo npm install -g [email protected]
npm -v
2.15.11
Install Additional Nodes
There are two releases for the SensorTag, node-red-contrib-sensortag and node-red-node-sensortag. I managed to get the first one to work.
$
sudo apt-get install libbluetooth-dev libudev-dev pi-bluetooth
sudo setcap cap_net_raw+eip $(eval readlink -f `which node`)
cd ~/.node-red
npm install node-red-contrib-sensortag
List the installed nodes
npm list
└─┬ [email protected]
 └─┬ [email protected]
   └─┬ [email protected]
     └─┬ [email protected]
       ├── [email protected]
       └─┬ [email protected]
         └── [email protected]
To install the Blynk node, launch on the Raspberry Pi Zero
$
hash -r
cd ~/.node-red
npm install node-red-contrib-blynk-websockets
Launch the Blynk app
On the iOS- or Android-based phone or tablet, install the Blynk app and launch it. Enter your credentials, either to Blynk cloud or a local server.