
- Introduction
Raspberry Pi is a small singleboard computer with USB, WiFi, Bluetooth, Ethernet, HDMI,
Audio, and GPIO connectivity. In cs424, we will be controlling an iRobot create using a
Raspberry Pi 3 Model B. This particular model is the most capable compared to the other
models. It has 4 cores each clocked to 1.2 GHz, and 1 GB of RAM. The minimum hardware
required to run the system is (1) a Raspberry Pi motherboard, (2) a MicroSD memory card, and
(3) Power supply. Additionally we will also be using the Raspberry Pi Camera Module v2 as the
“vision” for our robot. In this tutorial, we set up Raspberry Pi with an operating system, start it,
connect to it, install necessary libraries required for the assignments with the iRobot and the
Camera. We will also configure IllinoisNet WiFi, and a simple discovery protocol so that we can
develop our software on the Raspberry Pi, and communicate to the robot in a wireless manner.
General Precautions
Raspberry Pi is a bare motherboard and has the electrical connections exposed. Therefore do
not put it on a metallic surface as it may short some terminals. When putting it on the payload
bin of the iRobot, note that there are metallic screws there and so take necessary precautions to
isolate (for example put it on a paper or a plastic). Try not to touch the pins of the chips by hand
whether the pi board is powered on or not. Sometimes the static charge from our body is
enough to destroy the chips. Hold the board by the edges and discharge static from your body
before setting the board down. When transporting use the antistatic bag that the Raspberry Pi
was originally in. - Install Raspbian Operating System
Before we can boot the pi, we need to install an operating system on the 32 GB MicroSD card.
There are many operating systems including different flavors of Linux that can be installed. We
will be installing Raspbian operating system, which is a Debian based distribution optimized for
Pi hardware (https://www.raspbian.org). Because it is Debian based, you can inherit a lot of
knowledge from commonly used Ubuntu Linux.
Make sure that you have the MicroSD card and its adapter. Most of the laptops have only the
slot for a full sized SD card. The adapter converts the MicroSD card to the form factor of a
fullsized card. Connect the card to your Mac, Linux, or Windows laptop. At this point there are
two available routes to take.
2.1 Install Raspbian via NOOBS (New Out Of Box Software)
This is the easiest method. However, it requires you to have a HDMI display, HDMI Cable, USB
Keyboard, and a USB Mouse. You can download NOOBS from the following link. Pick the
3
“offline and network install” option as it contains the entire contents for the operating system
https://www.raspberrypi.org/downloads/noobs/ Once NOOBS is downloaded, refer to
https://www.raspberrypi.org/documentation/installation/noobs.md for a description of how to
format the SD card and install NOOBS on it. The installation process is basically extracting the
zip file and copying it to the card. After copying NOOBS, properly eject the card from your
computer. The card may corrupt if you remove it from the slot without ejecting. Next step
is to boot the Pi.
2.1.1 Connecting Devices to Raspberry Pi
We need to connect the devices and power it up. (1) Insert the MicroSD card into the Raspberry
Pi. Note that you might need to remove it from the adapter at first as the Pi directly takes the
MicroSD form factor. You can find the MicroSD card slot (friction loaded) on the opposite side of
the motherboard. (2) Attach one end of an HDMI cable to the Pi and the other end to a display.
If that display is an external monitor or a TV, you need to power that up separately. (3) Connect
a USB keyboard and a USB Mouse. (4) To keep things simple, ignore the camera for now, (5)
Connect the USB 5V power supply. Do not use random USB chargers from your disposal
because those may not have sufficient current rating. Use the CanaKit power supply that has
been provided for this purpose. Note that there is no “start” or “on” switch / button. Once power
supply is connected, it will boot like a computer. If the system has power, it will have a “red” led
turned on. The “green” led beside it may blink intermittently, which indicates activity on the
MicroSD card.
2.1.2 Installing Raspbian after Powering Up Raspberry Pi
Once it boots, you need to follow the instructions displayed on screen and install Raspbian. The
following article illustrates the entire process described in this section in more detail.
http://lifehacker.com/thealwaysuptodateguidetosettingupyourraspberr1781419054
Once you have Raspbian installed, jump to Section 3 to set up the configurations.
2.2 Install Operating System Image without booting up Raspberry Pi
This section describes how to install Raspbian directly on a memory card without using NOOBS.
It is slightly involved and may require the use of a terminal if you are using a Linux or a Mac
computer. But it doesn’t require the use of an HDMI display, a keyboard, and a mouse.
Download Raspbian Jessie image from
https://www.raspberrypi.org/downloads/raspbian/
Select the one that says “Full desktop image based on Debian Jessie” (i.e. not Lite version)
Follow the link
https://www.raspberrypi.org/documentation/installation/installingimages/README.md
It shows how to install Raspbian installed on the MicroSD card using your Mac, Linux, or
Windows machine. We also reproduce those links in this section.
4
If you want to install Raspbian on the SD card using Mac OS X:
https://www.raspberrypi.org/documentation/installation/installingimages/mac.md
If you want to install Raspbian on the SD card using Linux:
https://www.raspberrypi.org/documentation/installation/installingimages/linux.md
If you want to install Raspbian on the SD card using Windows:
https://www.raspberrypi.org/documentation/installation/installingimages/windows.md
Once you follow the steps, you should have Raspbian Jessie installed on the MicroSD card.
Jump to Section 3. - Set Up Configurations
In this section, you will (1) Change the hostname of the Raspberry Pi to a name unique to your
group, (2) Set up WiFi configurations for IllinoisNet Enterprise Network and possibly your home
network, if you have, (3) Set up a simple discovery protocol for the devices.
If you came here from Section 2.1, it makes sense for you to directly jump to Section 3.1.
If you came here from Section 2.2, you can take either 3.1, 3.2, or 3.3
3.1 Setting Up Initial Configurations after Booting Up Raspberry Pi
As you may expect, this method requires having a display, keyboard, and mouse connected to
the Raspberry Pi. We will power up the system and edit the configuration files on it. If these
devices are not connected or you haven’t boot up Pi yet, follow Section 2.1.1 to do so.
3.1.1 Change Hostname
In the following sections, we show the commands required to make the configuration changes.
We will be using the nano editor. If you are not comfortable with nano, you can use any other
editor you prefer. Note that Ctrl + o saves a file in nano, Ctrl + x exits nano.
Some of the commands require sudo. Default user is pi, and default password is raspberry
In this section, we want to set the hostname of your raspberry pi to robotpiN. Replace N by
your assigned group number (For example, hostname will be robotpi4 for Group 4). To do
that, we need to edit two files:
sudo nano /etc/hosts
There should be a line (most likely the last line) 127.0.1.1 raspberrypi
Change the term raspberrypi to robotpiN
If there is no such line, or if the term after 127.0.1.1 is something else, check if you
have opened the correct file. Use Ctrl + o to save the changes, Ctrl + x to exit nano.
5
sudo nano /etc/hostname
Change the term raspberrypi to robotpiN
Use Ctrl + o to save your changes, Ctrl + x to exit nano
Note that if you came to this section because you were instructed to follow Section 3.1.1,
3.1.2, 3.1.3, and 3.1.4 when you were in Section 3.3 (which happens if you have mounted the
MicroSD card on a linux machine as opposed to attaching it to the Raspberry Pi), then the files
you should be editing are ./etc/hosts and ./etc/hostname (remember the leading
dot), provided you correctly performed a cd (change directory) to the filesystem of the
Raspbian on the MicroSD card. The same rule (i.e there should be a leading dot) also apply
for the files edited in Section 3.1.2, 3.1.3, and 3.1.4.
3.1.2 Configure WiFi
Execute sudo nano /e tc/wpa_supplicant/wpa_supplicant.conf
Go to the bottom of the file, and add a section like the following. This setting will work for most
of your home WiFi networks, given you are using WPAPSK scheme (which is default these
days). You should put appropriate values for the fields named your_home_wifi_name and
your_home_wifi_passphrase. Note the presence of the ” quotation marks that should
enclose these values.
network={
ssid=”your_home_wifi_name”
psk=”your_home_wifi_passphrase”
key_mgmt=WPAPSK
}
Using the same mechanism, we now configure IllinoisNet Enterprise network. Enterprise
network requires both an identity (Your NetId) and a password (Your NetId password). For
security reasons, instead of directly putting the password in plaintext, we will be storing the
password hash. Execute the following command to generate the hash.
echo n ‘your_netid_password' | iconv t utf16le | openssl md4
Note the single quotation marks around the plaintext password. You must use the single
quotation marks around the plaintext password. Because passwords generally contain
special characters, it may not work if you use double quotation or no quotation. The output of
this command will look like (stdin)= 6602f435f01b917388 9a8d3b9bdcfd0b
Your output will contain some other hexadecimal string instead of 6602…fd0b depending on
your NetId password. We should now execute history cw to remove terminal history as we
typed password in plain text in the terminal, and that should not stay in the history.
Once you have the password hash, add the following block to the wpa_supplicant.conf
file. Replace 6602f435f01b9173889a8d3b9bdcfd0b by the actual hash you generated,
6
and your_net_id by your net_id. Note the absence of quotation marks (“) around
hash:6602…fd0b. Make sure that there is no space between the keyword hash: and the hash
itself (i.e. the hexadecimal string that your generated from your NetId password)
network={
ssid=”IllinoisNet”
key_mgmt=WPAEAP
proto=WPA2
eap=PEAP
ca_cert=”/etc/ssl/certs/AddTrust_External_Root.pem”
identity=” your_net_id”
password=hash: 6602f435f01b9173889a8d3b9bdcfd0b
phase1=”peapver=0″
phase2=”MSCHAPV2″
}
Use Ctrl + o to save your changes, Ctrl + x to exit nano
You can also copy the text from https://courses.engr.illinois.edu/cs424/mp/wpasupplicant.txt
3.1.3 Configure DHCP Client
Default Raspbian Jessie makes the network interfaces manual. We want to configure the
interfaces to take IP Address through DHCP. In this section we edit the file
/etc/network/interfaces
Open the file by running
sudo nano /etc/network/interfaces
Find the words “manual” in the file, and change those by “dhcp”. There should be three such
instances. Finally the file should look like following. We have highlighted the changes:
interfaces(5) file used by ifup(8) and ifdown(8)
Please note that this file is written to be used with dhcpcd
For static IP, consult /etc/dhcpcd.conf and ‘man dhcpcd.conf'
Include files from /etc/network/interfaces.d:
sourcedirectory /etc/network/interfaces.d
auto lo
iface lo inet loopback
iface eth0 inet dhcp
7
allowhotplug wlan0
iface wlan0 inet dhcp
wpaconf /etc/wpa_supplicant/wpa_supplicant.conf
allowhotplug wlan1
iface wlan1 inet dhcp
wpaconf /etc/wpa_supplicant/wpa_supplicant.conf
Use Ctrl + o to save your changes, Ctrl + x to exit nano
3.1.4 Configure Discovery Protocol
We want to configure a simple discovery protocol, so that we can easily find the IP address of
our Raspberry Pi, once connected to IllinoisNet wireless network. We want to send a message
to the server apollo3.cs.illinois.edu coordinating the protocol, whenever a network
interface is up on our Raspberry Pi. Note that if the changes mentioned in Section 3.1.3 are
not made, the discovery protocol configured in this section might not work.
sudo touch /etc/network/ifup.d/robotpi
sudo chmod 755 /etc/network/ifup.d/robotpi
Open the file by running
sudo nano /etc/network/ifup.d/robotpi
Add the following lines
! /bin/sh
curl data “hostname=/bin/hostname&data=/sbin/ifconfig” \
http://apollo3.cs.illinois.edu/robotpi/controller.py/send_heartbeat
Notice the backtick ( ` ) and the double quotation ( ” ) symbols. For your convenience you can
copy the text from https://courses.engr.illinois.edu/cs424/mp/ifupdrobotpi.txt
Use Ctrl + o to save your changes, Ctrl + x to exit nano.
At this point, we are done with the initial configuration. Reboot Pi by sudo reboot now , and
Jump to Section 4 to test our configuration.
3.2 Setting Up Initial Configuration through a Wired Network
This method is almost same as Section 3.1. In this method, we still need to boot up Raspberry
Pi. Review Section 2.1.1 on how to boot up a Raspberry Pi. Instead of connecting a HDMI
Display, Keyboard, and Mouse, connect an Ethernet cable to the respective port of the Pi.
Connect the other end of the Ethernet cable to a Wireless Router that has DHCP running. You
can also connect it to your desktop/laptop machine if you do not have a Wireless Router.
After powering it up, wait a minute or two for Raspbian to completely boot. Now we can ssh into
it. If you connected the Ethernet cable to a wireless router, you need to visit the web console of
the router to find the IP Address of the Pi. Suppose that IP Address is 192.168.xxx.yyy.
You can now ssh to the Pi by using ssh [email protected]. xxx.yyy
It will ask for a password. Default username is pi, and the default password is raspberry
Depending on the settings of your router, you can skip the IP Address step, and might be able
directly find the Pi by name raspberrypi.local and connect using
ssh [email protected]
If you do not have a wireless router, you have connected the Pi directly to your machine’s
Ethernet port. In this case, you have created a private wired network. Your machine is likely to
get a autoconfiguration IP of the format 169.254.xxx.yyy . You may be able to directly find
the Pi by the name raspberrypi.local . If that does not work, you need to find the
autoconfiguration IP of the Raspberry Pi. Run the command sudo arpscan l
This will likely find the IP Address of the Raspberry Pi. You may not have arpscan installed in
your machine. In that case you need to install it at first. For Linux, it is available from your
package manager. For OS X, install it from homebrew. For Windows, you need to find an ARP
scanning software.
Once you have been able to ssh into the Raspberry Pi, follow Section 3.1.1, 3.1.2, 3.1.3, and
3.1.4 to make configuration changes. Once done, jump to Section 4 to test our configuration.
3.3 Setting Up Initial Configurations without Booting Up Raspberry Pi
This method doesn’t require the use of a display, keyboard, and mouse. You do not even need
to boot up the Pi to set the initial configurations. Rather we will be editing the configurations
directly on the MicroSD card. Because Raspbian on the MicroSD card uses ext4 filesystem,
you need to have Linux running on your machine. If your machine doesn’t have a card
reader (common scenario for desktop machines), you need to use a USB Card Reader. If
you do not have Linux installed on your machine, you can use a Ubuntu Live CD/DVD to
temporarily boot it up on Linux without actually installing Linux. If your machine is a laptop, it
may not have a CD/DVD drive, in which case you can create a Ubuntu Live USB and use that to
temporarily boot Linux.
If you are using Mac OS X, the following article shows how to create a bootable USB
http://business.tutsplus.com/tutorials/howtocreateabootableubuntuusbdriveformacinosx
cms21253 on Mac. To boot from USB on a Mac, connect the USB drive to it, restart the
machine, press and hold Option key immediately upon hearing the startup chime. Release the
key after Startup Manager appears and gives you option to boot from the USB. If you are using
a windows computer, you can use the software in https://rufus.akeo.ie to create a bootable
USB. Note that it might be possible to install drivers for ext4 filesystem on your Windows or OS
X operating system, and edit the configuration files on the MicroSD card without using Linux.
For OS X, such drivers have been reported to be unstable and cause other side effects
including corrupting the filesystem of the MicroSD card. Therefore, we do not take that route.
Once you are running Linux on your machine, insert the MicroSD card (through the MicroSD to
SD adapter if required). It will possibly mount it on /media or /media/ubuntu . Inside the
mounted location, there will be two directories. One of those will be named “boot”. We are not
interested in the “boot” directory. But we need to edit some files inside the other directory.
That directory can have different names. The name can be either (i) a string of hexadecimal
characters and dashes related to the MicroSD card, or (ii) the name can also be “root”. Open a
terminal, and change directory like following. Only one of these will work
cd /media/ubuntu/ hexadecimal_string_related_to_the_memory_card/
(OR)
cd /media/hexadecimal_string_related_to_the_memory_card/
(OR)
cd /media/ubuntu/root
(OR)
cd /media/root
This directory corresponds to the filesystem of the Raspbian installed on the MicroSD card.
Once we are inside the proper directory as mentioned above, we need to change the following
files. Note the leading dot (.) as these paths are relative to the present directory.
⇒ Edit ./etc/hostnam e (See Section 3.1.1)
⇒ Edit ./etc/hosts (See Section 3.1.1)
⇒ Edit ./etc/wpa_sup plicant/wpa_supplicant.conf (See Section 3.1.2)
⇒ Edit ./etc/network/interfaces (See Section 3.1.3)
⇒ Create a file ./etc/network/ifup.d/robotpi and set appropriate permissions. (See
Section 3.1.4)
These files correspond to the files edited in Section 3.1.1, 3.1.2, 3.1.3, and 3.1.4. Follow those
sections to make the changes. Remember the leading dot (.) in the paths here. We need to
edit files on the MicroSD card corresponding to the Raspberry Pi’s filesystem. If you forget the
leading dot, you will be editing files of the host Linux operating system instead, which
can result in unexpected problems. Once done, exit the terminal, make sure no other app
is using the MicroSD card, unmount and safely eject the MicroSD card. Jump to Section 4
to test our configuration.
- Testing the Initial Configuration
In this section we test our configuration. If you haven’t attached the MicroSD card to the
Raspberry Pi yet (which can happen if you followed Section 2.2 and 3.3), now is the time to do
so. Review section 2.1.1 on how to connect devices to the Raspberry Pi. In this section, we test
whether we can connect to the Raspberry Pi in a wireless setting by connecting only the (1)
MicroSD card, (2) CanaKit 5V USB Power Supply.
Wait a few minutes for the Pi to completely boot up. Now open a browser on your computer and
visit http://apollo3.cs.illinois.edu/robotpi. It will come up with a dashboard page like Figure 4.1.
This dashboard is important when working incampus, as the assigned IP Address through
IllinoisNet WiFi is dynamic.
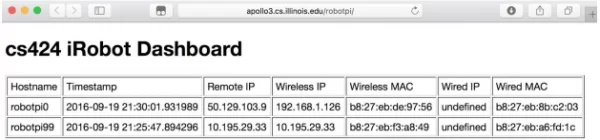
If you have set up the configurations correctly, the table should contain a row with information
related to your Raspberry Pi. That row should have the unique hostname you gave it in Section
3 in the first column. The timestamp should be recent (as you have just boot the machine).
Check the wireless IP. This is the present IP Address of your Raspberry Pi when connected
through WiFi. Check if you can ssh to it by running the following (replace 10.195.29.33 by
the actual IP Address displayed on the dashboard)
ssh [email protected]
If you haven’t changed the password, the default password should be raspberry
If everything worked upto this point, anytime you need the IP Address dynamically assigned to
your Raspberry Pi, you should visit http://apollo3.cs.illinois.edu/robotpi to find it.
Note that the command to safely shutdown the Raspberry Pi is sudo shutdown now
The command to restart immediately sudo reboot now