
Documentation
Everything in this file comes from the Getting started with Raspberry Pi Pico for C/C++ development guide. This file contains all of the same content, just organized into an enumerated list.
Getting everything installed
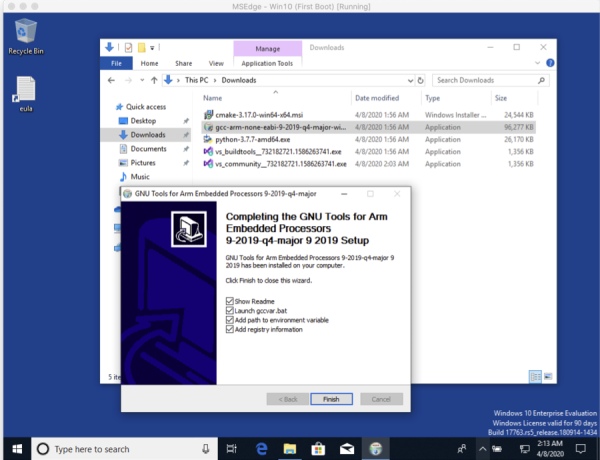
- Install the ARM GCC compiler.
- During installation, make sure to tick the box to register the path to the ARM compiler as an environment veraible in the Windows shell when prompted to do so. See the image below.
- Install CMake.
- When prompted, add CMake to the system
PATHfor all users.
- When prompted, add CMake to the system
- Install Visual Studio Code
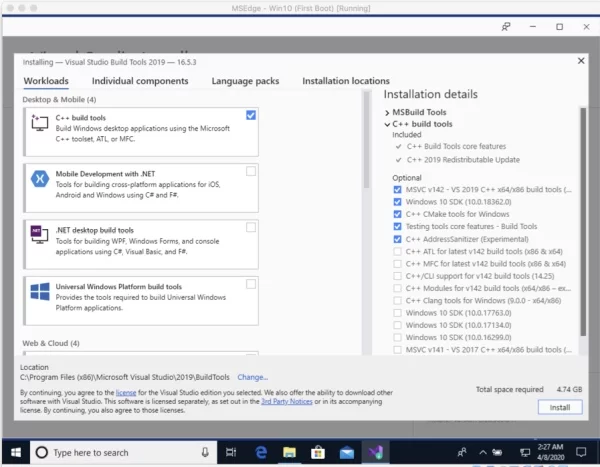
- Install Build Tools for Visual Studio 2019
- When prompted by the Built Tools for Visual Studio installer, you need to install the C++ build tools only.
- You must install the full “Windows 10 SDK” package as the SDK will need to build the
pioasmandelf2uf2tools locally. Removing it from the list of installed items will mean that you will be unable to build Raspberry Pi Pico binaries. - This takes a while.

Install Python 3.7
- When prompted by the installer, add Python 3.7 to the system
PATHfor all users.
- You should be additionally disable the
MAX_PATHlength when prompted at the end of the installation. - When installing, choose ‘Custom installation,' click through ‘Optional Features' and then under ‘Advanced Features' choose ‘Install for all users'
- It is possible that you will need to make a symbolic link so that the Makefile can find Python 3. To do so, type
cmdin the Run Window so that the Developer Command Prompt icon appears in the Start Menu. Select the small arrow to the right of the icon, and then select “Run as administrator.” Navigate toC:\Program Files\Python37and make a symlink by runningC:\Program Files\Python37 > mklink python3.exe python.exe
Only do this if your build fails because Make can't find your python installation.
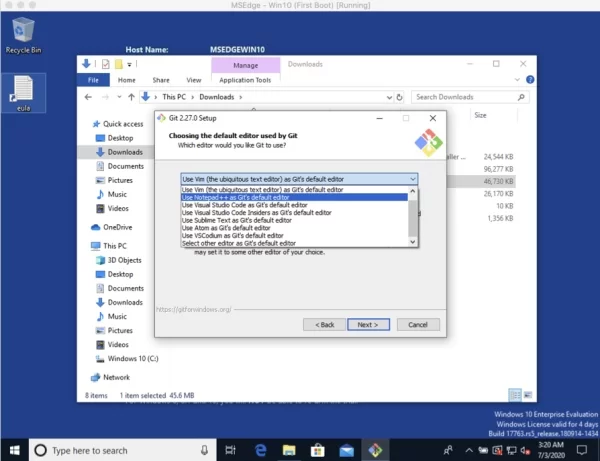
- Install Git.
- When prompted by the installer, make sure that you change the default editor away from
vim(see below)
- Tick the checkbox to allow Git to be used from third-party tools.
- Check the box “Checkout as is, commit as-is” (unless you have a strong reason not to)
- Select “Use Windows' default console window”
- Select “Enable experimental support for pseudo consoles”
Getting the SDK and examples
- Open Windows PowerShell, and create a directory where you'd like to store all the Pico examples and the SDK. I put mine in
C:\Users\vha3\Pico - Run the following set of commands:
C:\Users\vha3\Pico> git clone -b master https://github.com/raspberrypi/pico-sdk.gitC:\Users\vha3\Pico> cd pico-sdkC:\Users\vha3\Pico\pico-sdk> git submodule update --initC:\Users\vha3\Pico\pico-sdk> cd ..C:\Users\vha3\Pico> git clone -b master https://github.com/raspberrypi/pico-examples.git
Building the example projects from the Command Line
- From the Windows Menu, select
Windows > Visual Studio 2019 > Developer Command Prompt - Navigate to the directory where you've installed the Pico examples and SDK. For me, it was
C:\Users\vha3\Pico. - Set the path to the SDK by running the following:
C:\Users\vha3\Pico > setx PICO_SDK_PATH "..\..\pico-sdk" - Close the current command prompt window.
- Open a new Command Prompt window by again navigating from the Windows Menu to
Windows > Visual Studio 2019 > Developer Command Prompt. Closing/re-opening will set the environment variable that we configured above. - Navigate to the
pico-examplesfolder. For me, this was in the directoryC:\Users\vha3\Pico\pico-examples - Build the “Hello World” example by running:
C:\Users\vha3\Pico> cd pico-examplesC:\Users\vha3\Pico\pico-examples> mkdir buildC:\Users\vha3\Pico\pico-examples> cd buildC:\Users\vha3\Pico\pico-examples\build> cmake -G "NMake Makefiles" ..C:\Users\vha3\Pico\pico-examples\build> nmake - Within the
builddirectory, you will now find ahello_worlddirectory. You will find directories for each of the other example projects too. These folders will contain the ELF,bin, anduf2target files for each project. Theuf2target file can be dragged-and-dropped directly onto an RP2040 board attached to your PC via USB, as explained in the next section.
Programming the Pico
- While holding down the
BOOTSELbutton, plug the Pico into a USB port. - The Pico will appear as a mass storage device in your file navigator.
- Drag-and-drop
C:\Users\vha3\Pico\pico-examples\build\blink.uf2to the Pico, as you would if you were moving a file to a flash drive. - The Pico will automatically reboot, and start running the Blink example, flashing the LED.
Building the example projects from Visual Studio Code
- Navigate via the Windows Menu to
Windows > Visual Studio 2019 > Developer Command Prompt - When the command prompt window opens, type
C:\Users\vha3\Pico > code. This will open Visual Studio Code with all of the correct environment variables set so that the toolchain is correctly configured. - Note from the guide: If you start Visual Studio Code by clicking on its desktop icon, or directly from the Start Menu, then the build environment will not be correctly configured. This can be done manually later in the CMake Tools Settings, but the easiest way to configure the Visual Studio Code environment is just to open it from a Developer Command Prompt Window where these environment variables are already set.
- Click on the Extensions icon in the left-hend toolbar (or type
Ctrl + Shift + X) and search for “CMake Tools” - Click the “CMake Tools” entry in the list, and then click the install button
- Click the Cog Wheel at the bottom of the navigation bar on the left-hand side of the interface and select “Settings”
- In the Settings pange, click on “Extensions” and the “CMake Tools configuration.”
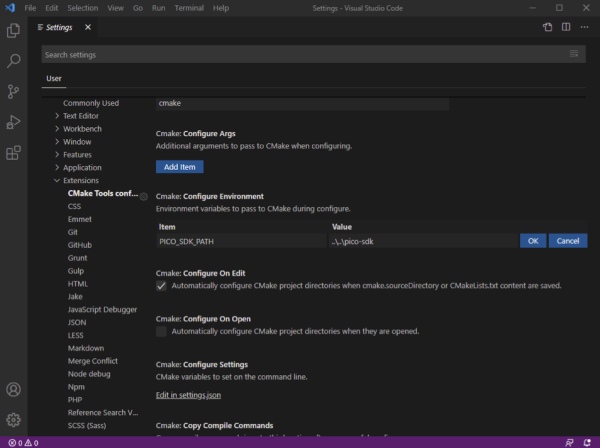
- Scroll down to “Cmake: Configure Environment” and click on “Add Item”
- Set the Item to
PICO_SDK_PATHand set the Value to..\..\pico-sdkas shown below
- Scroll down to “Cmake: Generator” and enter “NMake Makefiles” into the box.
- Close the Settings panel.
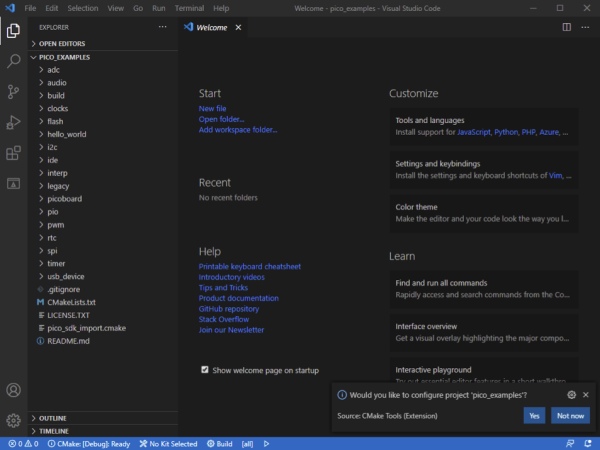
- Navigate to
File > Open Folderand navigate to thepico-examplesrepo, then hit “Okay.” - You will be prompted to configure the project, as shown below. Click “Yes” and then select “GCC for arm-none-eabi” for your compiler.
- Click the “Build” button (with a cog wheel) in the blue bottom bar of the window. This will create the build directory and run CMake and build the example projects.
- Program the Pico by navigating to an example project directory within the build directory and drag/dropping onto the Pico, as explained in the previous section.