A 7-segment display is a great way to display numbers using your Propeller. You can find these in many products that need to display numbers in a simple way, like clocks, kitchen appliances, or digital scales. This display uses seven LEDs arranged in a special pattern that makes it possible to show any number from 0 to 9. This tutorial will show you exactly how to control the display, and use it to count.
Circuit
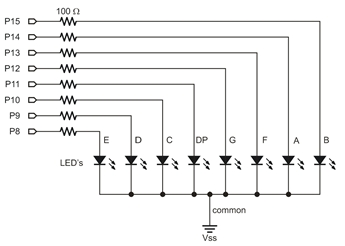
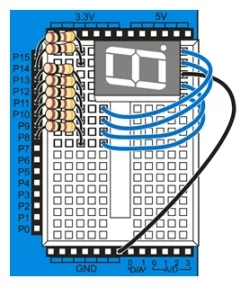
Each individual LED in the 7-segment display needs a resistor between it and the Propeller’s I/O pin. When each I/O pin is set to high (outputs 3.3 V), the LED it is connected to lights up. Any resistor value between 100 Ω and 1 kΩ will work for the LED resistor and the lower the resistance, the brighter the segment. It’s best to use resistors of the same value so all the segments light up evenly.
Parts
(8) 100 Ω Resistors (brown-black-brown). Or, you can substitute 220 Ω resistors (red-red-brown)
(1) 7-Segment Green LED (Part #350-00027)
- Build the circuit shown in the wiring diagram using the schematic as a reference.
How it Works
First, the code sets all the pins between 8 and 15 to outputs with set_directions(15, 8, 0b11111111). Next, the code outputs a 0 with the command set_outputs(15, 8, 0b11100111). If you look through the rest of the code, you can see that each digit has its own binary representation. The number 1, for example, is represented as 0b10000100. If you investigate more closely, you’ll notice the binary digits correspond to I/O pins, in reverse order, from 15 to 8. So the binary representation for the number 1 sets pins 15 and 10 to high. If you look at the schematic, you’ll notice that pin 15 is connected to segment B and pin 10 is connected to segment C. Referring to the diagram below, you’ll see that together, segments B and C make up the number 1.
/*  Seven Segment.c
   Display digits on a 7-segment (common cathode) LED display.*/
#include "simpletools.h"                      // Include simpletools
int main()                                    // main function
{  set_directions(15, 8, 0b11111111);          // P15...P8 -> output

  set_outputs(15, 8, 0b11100111);             // 0 -> 7-segment display
  pause(500);
  set_outputs(15, 8, 0b10000100);             // 1
  pause(500);
  set_outputs(15, 8, 0b11010011);             // 2
  pause(500);
  set_outputs(15, 8, 0b11010110);             // 3
  pause(500);
  set_outputs(15, 8, 0b10110100);             // 4
  pause(500);
  set_outputs(15, 8, 0b01110110);             // 5
  pause(500);
  set_outputs(15, 8, 0b01110111);             // 6
  pause(500);
  set_outputs(15, 8, 0b11000100);             // 7
  pause(500);
  set_outputs(15, 8, 0b11110111);             // 8
  pause(500);
  set_outputs(15, 8, 0b11110110);             // 9
  pause(500);}
Did You Know?
7-segment LEDs can also be used to display letters. You may already have seen examples of this on CD/DVD players, calculators, or microwaves. Although every letter of the English alphabet can be represented (in capital and/or lowercase form) using a single device, some letters are a bit more difficult to display in an easily recognizable way.

Want to learn more? Visit the Wikipedia article about 7-segment display character representations at http://en.wikipedia.org/wiki/Seven-segment_display_character_representations.
For more detail: Seven-Segment Display


