
I am an MCT student from Howest in Kortrijk, Belgium.
My project is a Smart garbage using a Raspberry Pi 4. Its purpose is to easily keep track of how much trash is produced over a period of time. When the bin is full, the garbage collector can be notified.
The smart trash can is intended for city staff/businesses who can efficiently empty their trash cans because they can see which trash cans are full.
Green city, clean city, my dream city. Keep track of your consumed waste with Smart Garbage.
What are the features?
- tracking volume and weight
- open door with badge or via webapp
- live data on dashboard
- there is also a charts and history
- map for the location of smart garbage
- login and sign up
Look at my code and try it yourself if you find it interesting.
The GitHub repository: https://github.com/howest-mct/2021-2022-projectone-Jinlei2000
Supplies
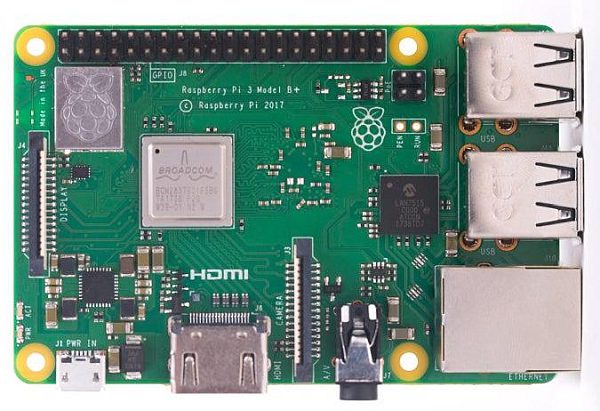
Raspberry Pi 4B with 16GB SD Card
The Raspberry Pi is a computer that runs Linux, but it also provides a set of GPIO (general purpose input/output) pins, allowing you to control electronic components for physical computing and explore the Internet of Things (IoT).
My whole project runs on my Raspberry 4 with a configured image.
Weight sensor with HX711
This is used to measure the weight of the garbage.
Ultrasonic sensor
I use this to keep track of the volume of Smart garbage. That way you can see how full it is.
LCD Display 16×2 with PCF8574 expander
With the LCD you can see the wlan IP address when you press the button.
RFID reader
The badge reader is used to open the door if you are registered. You can also create an account on the website using the badge reader.
Two servo motors
The first servo is used to close the door on the garbage. The second is used for the lid.
WS2812B – Neopixel 8 ring
The neopixel serves to display the volume via 8 leds.
Two magnet-contacts
The magnet contacts are used to keep track of the status of the 2 doors.
PI T-Cobbler, Breadboards and lots of wires
To connect everything I needed breadboards and jumperwires, I use the GPIO T-Cobbler clearly know which bin goes where.
Some more detail
In my bill of materials you will find all the necessary components to recreate the project.
Step 1: Schematic
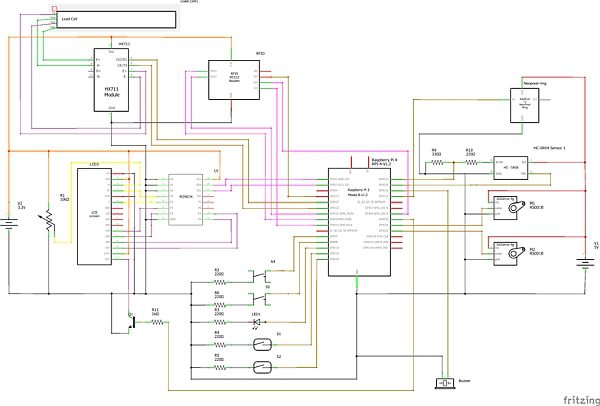
I created my schematics in Fritzing. It is a very handy program to create a schematic for any project.
my colors used in scheme are:
- Red = 5V
- Orange = 3.3V
- Black = GND
You can find my files below to take a closer look at it.
Important!!
Look at all the components very carefully, as some operate at 5 volts. Do not confuse between 5 and 3.3 volts and do not connect directly 5 volts to your GPIO pins.
Step 2: Database
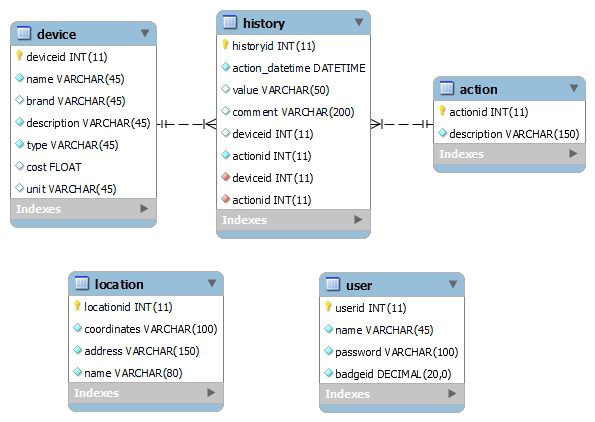
I store all the data from the sensors and actuators in a relational database of SQL (MariaDB).
I'm going to explain a little more about my 5 tables that I using.
Device
You can see the name, id, price and unit of measure of each device separately.
History
Here is all the history data of all sensors with value and time. You will also find actuators and website actions.
Some example:
- user is logged in
- door is open
- starting raspberry pi
- measure weight
- measure volume
Action
There are all the actions are stored of all the things that can happen such as sensors, actuators and web.
Location
The location and name of the Smart garbage are stored for later to display on the web page.
User
Of course, we want only authorized people to be able to open your Smart garbage and view the website, so authentication is required. Before you can do anything, though, you need to create an account with a name, password and badge id.
You can find the dump file on my GitHub.
Step 3: Preparing the Raspberry Pi
Before we can run the code we are going to prepare the raspberry pi.
1) Downloading Raspberry Pi OS.
Go to Raspberry Pi OS and download image –> (Raspberry Pi OS with desktop). This may take a while.
2) Writing image to your SD Card.
When it is finished downloading, you can write the image to your sd card with (recommend 8 or 16GB) Win32 Disk Imager. How to do this? Tutorial Video
3) Configuring the SD Card. When writing is done, we can start setting up the SD Card.
- Open file explorer.
- Go to my pc –> find boot disk
- Create a new file ssh without extension Notepad++.
- Add ‘ip=169.254.10.1' to the end of the file and save it.
4) Starting the Raspberry Pi.
- Connect an internet cable from your PC to your Pi
- Open Putty.
- Choose port 22 and enter the ip address of your Pi 169.254.10.1 and connection type SSH.
- Enter login pi and the password raspberry.
- If you get a warning message, click Yes.
5) Some configuration.
Enable I2C and SPI on the Raspberry Pi with:
sudo raspi-config
Choose Interface Options and enable (I2C and SPI). Navigate to Localisation Options –> change timezone and WLAN Country.
Then reboot the Pi.
sudo reboot
6) Adding WiFi.
Adding your own home wifi.
sudo wpa_passphrase 'Networkname' 'Password' >> /etc/wpa_supplicant wpa_supplicant.conf
Reload your wireless network card in the PI.
wpa_cli -i wlan0 reconfigure
You can now check the connection by requesting the ip-address (wlan0).
ifconfig
7) Installing some packages.
Stay up to date with the latest version.
sudo apt update
sudo apt upgrade
Install the following packages and libraries for python:
sudo pip install flask-cors
sudo pip install flask-socketio
sudo pip install simple-websocket
sudo pip install mysql-connector-python
sudo pip install gevent
sudo pip install gevent-websocket
sudo pip install selenium
sudo apt install chromium-chromedriver
sudo pip3 install rpi_ws281x adafruit-circuitpython-neopixel
sudo python3 -m pip install --force-reinstall adafruit-blinka
sudo apt install python3-dev python3-pip
sudo pip3 install mfrc522
Now reboot the Pi.
sudo reboot
8) Get github code.
Clone the github repository.
git clone https://github.com/howest-mct/2021-2022-projectone-Jinlei2000
9) Database
Install MariaDB and configuration.
sudo apt install mariadb-server mariadb-client -y
Securing the database.
sudo mysql_secure_installation
Enter > Type a password (remember) > y > y > y > y Create a user on the database.
sudo mysql -u root -p
create user 'USERNAME'@'localhost' identified by 'USERNAME';
grant all privileges on *.* to USERNAME@localhost;
flush privileges;
exit;
Make a new connection on MySQLWorkBench
- Open MySQL WorkBench and make a new connection.
- Connection Method –> Standard TCP/IP over SSH.
- SSH Hostname: 169.254.10.1
- SSH Username: pi
- SSH Password: raspberry
- MySQL Hostname: 127.0.0.1
- MySQL Server Port: 3306
- Username: USERNAME
- Password: PASSWORD
10) Apache
Install Apache and configuration.
sudo apt install apache2
Some plugins:
sudo a2enmod proxy_http
sudo a2enmod rewrite
sudo a2enmod ssl
Follow this link to configure Self Signed Certificate for https: Tutorial Change some configurations.
nano /etc/apache2/sites-available/000-default.conf
Replace the following lines with the following lines and change DocumentRoot to the path of your project (SAVE: CTRL + X > Y > Enter):
Go to GitHub copy apache file
Now restart the Apache.
sudo systemctl restart apache2
Check the status of Apache.
sudo systemctl status apache2
Loaded: loaded (/lib/systemd/system/apache2.service; enabled; vendor preset:
enabled)
Active: active (running) since ...
11) Run the server.
Last things to be done. Go to Geoapify create account and make a new project. Now copy the API key. Then go to the project directory on the PI (frontend > script > dashboard.js > line 371) and paste the API key.
Ready to run everything 😆.
sudo /bin/python3 /backend/app.py
12) Automatic starting of the software (services).
If you follow this your raspberry pi is booting your software will start automatically. I have 2 files that need to be started. One is app.py and other is powerbtn.py.
Create the file and put the contents of the following lines in it:
nano /etc/systemd/system/smartgarbage.service
Don't forget to replace the placeholders with the correct directory (ExecStart, WorkingDirectory)!
[Unit]
Description=smartgarbage
After=network.target
[Service]
ExecStart==/usr/bin/python3 -u /home/student/2021-2022-projectone-Jinlei2000/backend/app.py
WorkingDirectory=/home/student/2021-2022-projectone-Jinlei2000/backend
StandardOutput=inherit
StandardError=inherit
Restart=always
User=root
[Install]
WantedBy=multi-user.target
Save the file (CTRL + X > Y).
Now we are going to create the second service for the powerbtn.py
nano /etc/systemd/system/powerbtn.service
Don't forget to replace the placeholders with the correct directory (ExecStart, WorkingDirectory)!
[Unit]
Description=powerbtn
After=network.target
[Service]
ExecStart==/usr/bin/python3 -u /home/student/2021-2022-projectone-Jinlei2000/backend/powerbtn.py
WorkingDirectory=/home/student/2021-2022-projectone-Jinlei2000/backend
StandardOutput=inherit
StandardError=inherit
Restart=always
User=root
[Install]
WantedBy=multi-user.target
Notify the system of the new service Next, inform the system that the new service should be active.
sudo systemctl enable powerbtn.service
Restart the system.
sudo reboot
You can now use the power button to turn the app.py script on or off. If you hold the power button longer than 6 seconds the raspberry pi will shutdown.
Step 4: Backend
Everything from backend is programmed in Python.
If you want to change anything in my code you can use Visual Studio Code. Tutorial remotely on Raspberry Pi using VSCode Remote SSH.
The backend is very important to send data to the frontend. In the backend I used routes, socket.io and threading.
Routes (API)
I take data from my database and make a route out of it. This way my fronted can later retrieve data from my backend.
Socket.io allows me to transmit live data to my web page without refreshing. It is very useful to implement this.
Is used to run multiple tasks at the same time.
Important!!
Go to config.py. You have to set your Database credentials (user, password and database).
This takes care of the connection with your database.
Step 5: Frontend
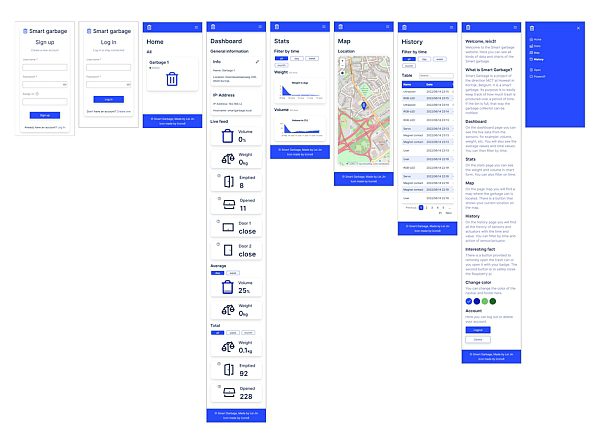
I first created and tested all of my wireframes in Adobe XD. Then I started programming in html, css and javascript.
I used Chart.js for the charts and Datatables for the table.
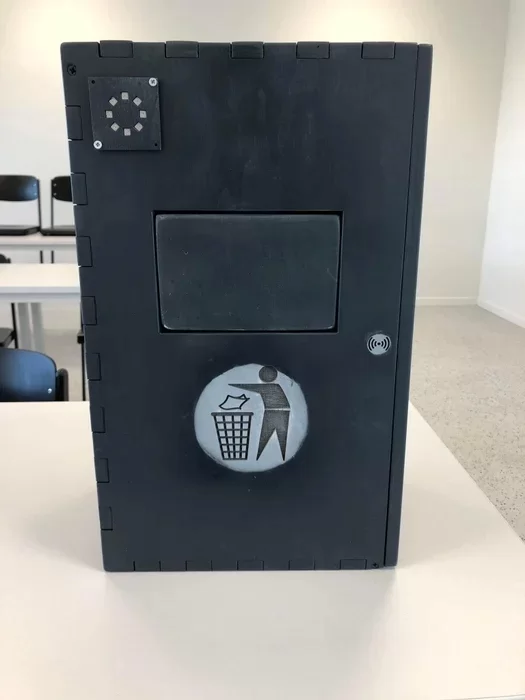
Step 6: Building the Trash Can
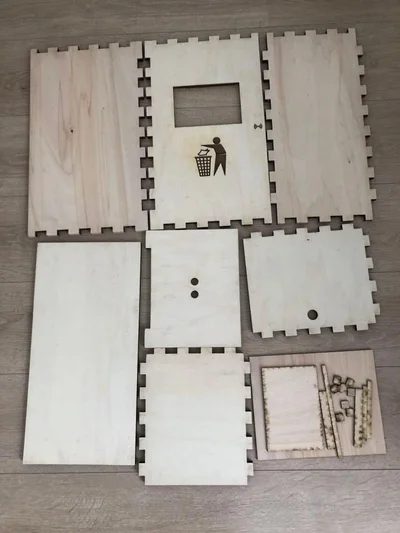
Here you can download my laser-cutting documents that I made on Illustrator.
The box is made of 12mm plywood boards.
The boards are all screwed together. The top is not screwed so you can still open and see the connections. I also used 3D components like lcd holder, servo lock. You can also download them below to use it. At the very bottom you see a the scale sensor mounted with 3 screws. On top of that is a plywood plate of 4mm. I used primer for the first coat and then finished with gray spray. It's not so hard to put it together. Have fun making it!😉
Source: Smart Garbage