This project is submitted to Deakin University, School of IT, for Unit SIT210 – Embedded Systems Development.

Problem Statement:
Even though there are a lot of security systems that are present in the market but most involve the use of motion sensors and CCTV camera separately in the premises which incurs extra cost on the user and time wastage in case of checking CCTV feed if any unwanted motion is detected inside the premises.
This project also touches a bit on integration of home security and home automation into a single working system.
Requirements:
1) Raspberry Pi 4
Specifications:
· Broadcom BCM2711, Quad core Cortex-A72 (ARM v8) 64-bit SoC @ 1.5GHz
· 4GB LPDDR4-3200 SDRAM
· 2.4 GHz and 5.0 GHz IEEE 802.11ac wireless, Bluetooth 5.0, BLE
· Gigabit Ethernet
· 2 USB 3.0 ports; 2 USB 2.0 ports.
· Raspberry Pi standard 40 pin GPIO header
· 2 × micro-HDMI ports
· 2-lane MIPI DSI display port
· 2-lane MIPI CSI camera port
· 4-pole stereo audio and composite video port
· H.265 (4kp60 decode), H264 (1080p60 decode, 1080p30 encode)
· OpenGL ES 3.0 graphics
· Micro-SD card slot for loading operating system and data storage
· 5V DC via USB-C connector (minimum 3A*)
· 5V DC via GPIO header (minimum 3A*)
· Power over Ethernet (PoE) enabled (requires separate PoE HAT)
· Operating temperature: 0 – 50 degrees C ambient
2) Raspberry Pi Camera
Specifications:
· 5MP Omnivision 5647 Camera Module
· Still Picture Resolution: 2592 x 1944
· Video: Supports 1080p @ 30fps, 720p @ 60fps and 640x480p 60/90 Recording
· 15-pin MIPI Camera Serial Interface – Plugs Directly into the Raspberry Pi Board
· Size: 20 x 25 x 9mm
· Weight 3g
3) PIR MOTION SENSOR
Specification:
· Working voltage range: DC 5-20V
· Static current: 65uA
· Level output Voltage: High 3 V / low 0V
· Delay time: 0.3-18s
· Dimensions: 32mm*24mm *25mm
4) Arduino UNO
Specification:
· Microcontroller: ATmega328
· Operating Voltage: 5V
· Input Voltage (recommended): 7-12V
· Input Voltage (limits): 6-20V
· Digital I/O Pins: 14 (of which 6 provide PWM output)
· Analog Input Pins: 6
· DC Current per I/O Pin: 40 mA
· DC Current for 3.3V Pin: 50 mA
· Flash Memory: 32 KB (ATmega328) of which 0.5 KB used by bootloader
· SRAM: 2 KB (ATmega328)
· EEPROM: 1 KB (ATmega328)
· Clock Speed: 16 MHz
· Length: 68.6 mm
· Width: 53.4 mm
· Weight: 25 g
5) Particle Argon
Specification:
· On-board additional 4MB SPI flash
· Micro USB 2.0 full speed (12 Mbps)
· Integrated Li-Po charging and battery connector
· JTAG (SWD) Connector
· RGB status LED
· Reset and Mode buttons
· On-board 2.4GHz PCB antenna for Bluetooth (does not support Wi-Fi)
· Two U.FL connectors for external antennas (one for Bluetooth, another for Wi-Fi)
· Meets the Feather specification in dimensions and pinout
· FCC, CE and IC certified
· RoHS compliant
6) Breadboard
7) LED Lights
8) Jumper Wire: Male to Female.
9) OpenCV on Raspberry Pi
10) Python IDE on Raspberry Pi
11) MQTT connection between Raspberry Pi and Argon
12) IFTTT
WORKING MECHANISM:
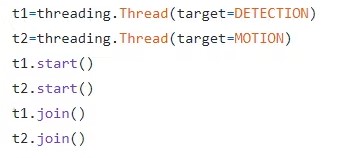
The system detects the motion in the premises and the video is captured inside the premises concurrently.
· When the motion is detected, a signal is sent to the Particle Argon using MQTT which triggers an email to the user using IFTTT and LED turns on few secs in the prototype, this is the component to address one of the drawbacks of the system, that is capturing video in dark, so if motion is detected, the lights inside the premises turn on, thus enabling the functioning of the camera, and after few seconds led turns off in the prototype.
· The camera captures the video of any activity in the premises.
· If there is a person in the premises, the machine learning algorithm first detects the face and the recognizer i.e., trained model with dataset recognizes the face of the person.
· If the face is known, the led turns on permanently, this is done to welcome user home.
· If the face is of unknown person, the emails are sent to the user using SMTP library.
Setup:
1) Download and Install Raspbian OS on Raspberry Pi using the link: https://www.raspberrypi.org/downloads/raspberry-pi-os/.
2) Setup the Particle Argon device using the steps provided on Particle website: https://docs.particle.io/quickstart/argon/.
3) Download and install Arduino IDE to work with Arduino https://www.arduino.cc/en/main/software.
Components of the Project:
1) Motion Detection:
The PIR motion sensor is connected to GPIO of raspberry pi and any motion detected is read by raspberry pi.
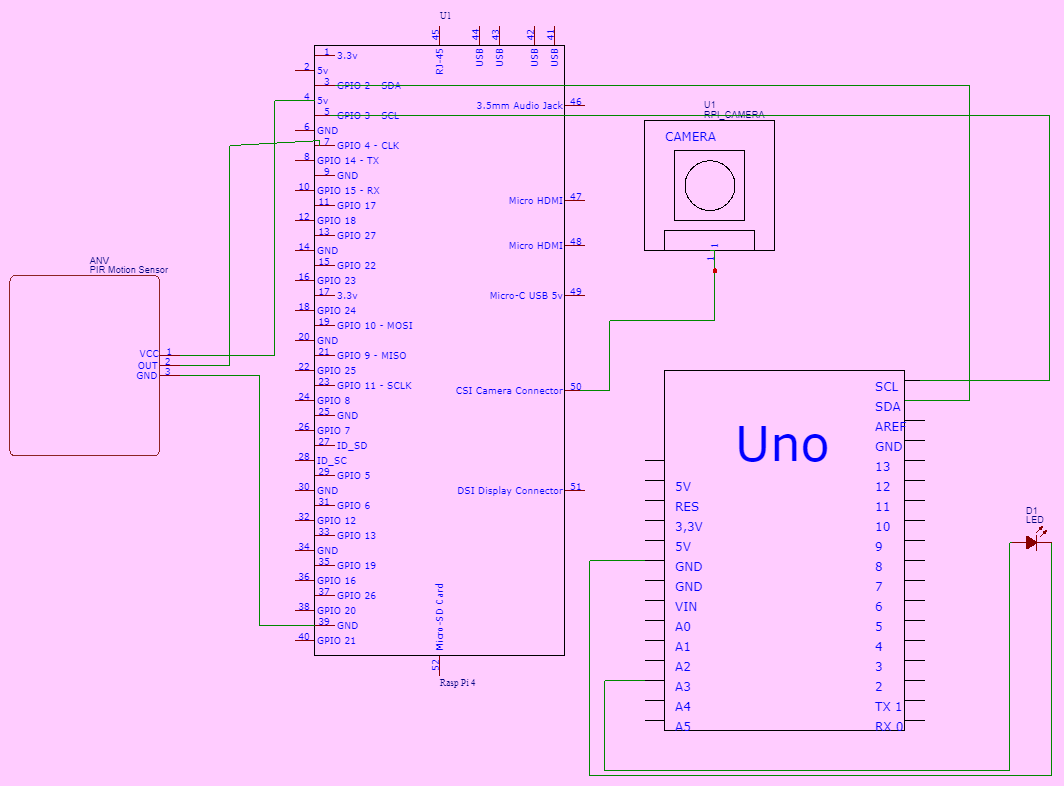
Connection between Motion Sensor and Raspberry Pi:
VCC- 5V
GND-GND
Output- GPIO 26
Coding:
This code reads the activity of the PIR motion sensor and any detected motion is recorded and ALARM function is called as the course of action.
2) Face Detection and Recognition:
· Install OpenCV environment on Raspberry Pi. Recommended Link: https://www.learnopencv.com/install-opencv-4-on-raspberry-pi/
· OpenCV can take a lot of space on the memory card, so make sure the card is big enough.
· What is Haar Cascade? It is a machine learning object detection algorithm used to identify objects in an image or video and based on the concept of features proposed by Paul Viola and Michael Jones in their paper “Rapid Object Detection using a Boosted Cascade of Simple Features” in 2001. It is a machine learning based approach where a cascade function is trained from a lot of positive and negative images. It is then used to detect objects in other images.
In the project the numerous images of front face are stored in form of XML file and while detection, the classifier is test upon this file, the file is provided in the Github link.
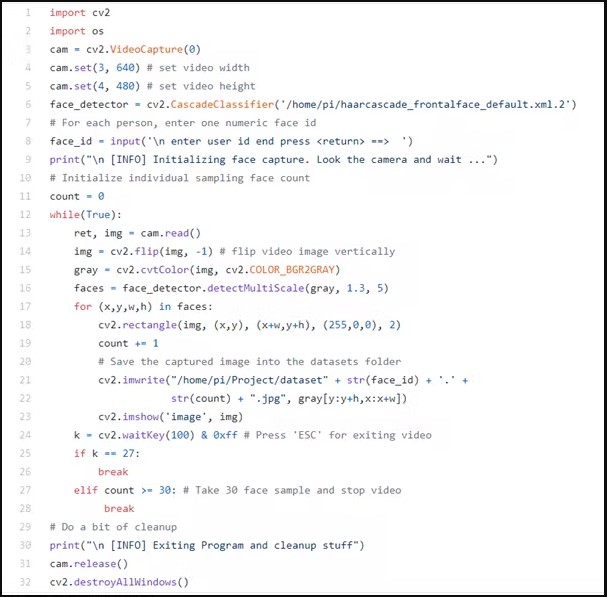
· Code to detect faces using OpenCV:
Numpy is used to convert the image into form of matrix.
· faseCascade is trained function to detect faces as it contains xml file of frontal faces.
· faceCascade.detectMultiScale() function is used to detect faces in the live video stream and scaleFactor specifies how much the image size is reduced with each scale. minNeighbours specifies how many neighbours each candidate rectangle should have to retain it.
· Imshow() function shows the video of the camera along with border around the face.
· Prepare the dataset of images of the user, in this case would be myself using the code given, what it does is it detects the face and captures 30 images of the face and saves it into the specified folder.
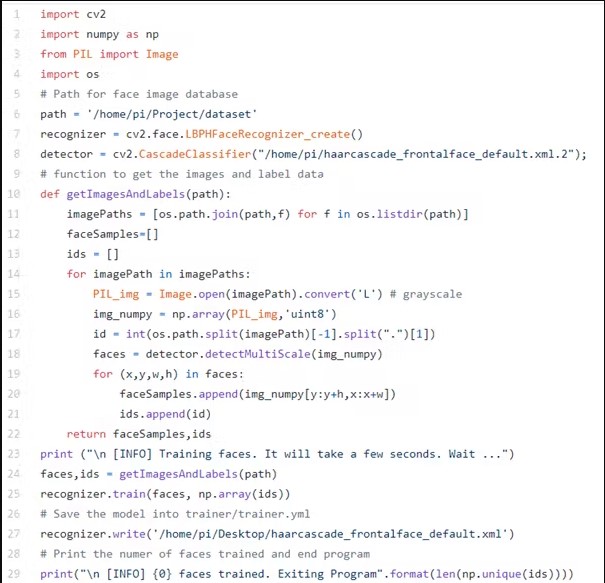
Train Face Recognizer:
· In this step the face recognizer is created and trained by feeding all the images in the dataset of the user’s image, when trained this model can be used in any project but needs to be imported properly.
3) MQTT between Argon and Raspberry PI:
MQTT is a machine-to-machine (M2M)/”Internet of Things” connectivity protocol. It was designed as an extremely lightweight publish/subscribe messaging transport. It is useful for connections with remote locations where a small code footprint is required and/or network bandwidth is at a premium. For example, it has been used in sensors communicating to a broker via satellite link, over occasional dial-up connections with healthcare providers, and in a range of home automation and small device scenarios.
Publishing with Raspberry Pi:
Subscribing this event with Argon:


Prototype:
Make all the components working and then combine them all together. Setup the circuit first and then execute the code on raspberry pi provided in final.py file in github repository.
This code would run the system and user can check the working mechanism.
Schematics
Source: Smart Home


